21-DesignPattern(34)
1. 设计原则
面向对象设计的六大原则(SOLID)
1. 单一职责原则
单一职责原则(Single Responsibility Principle,SRP)
核心思想:一个类或者模块只负责完成一个职责
作用:
- 提高系统的可维护性:职责单一的类更容易理解、修改和扩展
- 减少类的复杂性:职责单一的类更简单,减少了类的复杂性
- 提高代码的可复用性:职责明确的类更易于在不同上下文中重用
- 增强系统的灵活性:职责单一的类可以独立变化,不会影响其他类
这个原则挺好理解,不要设计大而全的类、而是要设计功能单一即粒度小的类,具体是从职责的角度去划分
- 用户类能操作用户的基本信息外,还能操作用户的文件,这其实就违反了单一职责(既能操作用户基本数据,还能操作文件,有两个职责了)
class User {
    private String name;
    private String email;

    public User(String name, String email) {
        this.name = name;
        this.email = email;
    }

    public String getName() {
        return name;
    }

    public String getEmail() {
        return email;
    }

    // 保存用户数据到文件
    public void saveToFile() {
        // 代码将用户数据保存到文件
    }

    // 从文件读取用户数据
    public void loadFromFile() {
        // 代码从文件读取用户数据
    }
}
拆分成:用户数据类、用户数据文件操作类
// 用户数据类
class User {
    private String name;
    private String email;

    public User(String name, String email) {
        this.name = name;
        this.email = email;
    }

    public String getName() {
        return name;
    }

    public String getEmail() {
        return email;
    }
}

// 用户数据文件操作类
class UserFileManager {
    public void saveToFile(User user) {
        // 代码将用户数据保存到文件
    }

    public User loadFromFile() {
        // 代码从文件读取用户数据并创建User对象
        return new User("defaultName", "defaultEmail");
    }
}
- 这样设计出来的代码就符合高内聚、低耦合,且易于扩展和维护
- 注意:避免拆分的过于细致。因为拆分得过细,会适得其反,反倒会降低内聚性,也会影响代码的可维护性
- eg:用户的姓名一个类、用户邮箱又是一个类
2. 开闭原则
开闭原则(Open/Closed Principle,OCP)
核心思想:对扩展开放、对修改关闭
- 识别业务或代码上的一些变化和不变的点,将变化的点抽象出来,复用不变点的逻辑,日后新增变化时仅需新增代码,而不需要修改其他代码,这样设计出来的代码就符合开闭原则
- 避免过度设计,预判非常未来的变化点,而将目前的代码搞得太复杂,提升的编码的成本
// 计算圆形和矩形的面积
class Circle {
    private double radius;

    public Circle(double radius) {
        this.radius = radius;
    }

    public double getRadius() {
        return radius;
    }
}

class Rectangle {
    private double width;
    private double height;

    public Rectangle(double width, double height) {
        this.width = width;
        this.height = height;
    }

    public double getWidth() {
        return width;
    }

    public double getHeight() {
        return height;
    }
}

class AreaCalculator {
    public double calculateCircleArea(Circle circle) {
        return Math.PI * circle.getRadius() * circle.getRadius();
    }

    public double calculateRectangleArea(Rectangle rectangle) {
        return rectangle.getWidth() * rectangle.getHeight();
    }
}
假设现在要新增一个三角形,那么 AreaCalculator 肯定是需要改动的,从这个角度来看,它不符合开闭原则
- 抽象定义一个接口,规定了
calculateArea(),不同图形实现不同的计算面积方法
// 图形接口
interface Shape {
    double calculateArea();
}

// 圆形实现
class Circle implements Shape {
    private double radius;

    public Circle(double radius) {
        this.radius = radius;
    }

    public double getRadius() {
        return radius;
    }

    @Override
    public double calculateArea() {
        return Math.PI * radius * radius;
    }
}

// 矩形实现
class Rectangle implements Shape {
    private double width;
    private double height;

    public Rectangle(double width, double height) {
        this.width = width;
        this.height = height;
    }

    public double getWidth() {
        return width;
    }

    public double getHeight() {
        return height;
    }

    @Override
    public double calculateArea() {
        return width * height;
    }
}

// 三角形实现
class Triangle implements Shape {
    private double base;
    private double height;

    public Triangle(double base, double height) {
        this.base = base;
        this.height = height;
    }

    public double getBase() {
        return base;
    }

    public double getHeight() {
        return height;
    }

    @Override
    public double calculateArea() {
        return 0.5 * base * height;
    }
}

// 面积计算器
class AreaCalculator {
    public double calculateArea(Shape shape) {
        return shape.calculateArea();
    }
}
不能只从代码的修改角度判断破坏了开闭原则,而是要理解:
- 是否破坏原有的逻辑实现?
- 是否破坏了单元测试?
- 是否需要大量的回归验证?
3. 里氏替换原则
里氏替换原则(Liskov Substitution Principle,LSP)
核心思想:子类对象可以替换父类出现的任何地方,并且保证原来的程序逻辑正常且不被改变
- 目的:保证兼容的前提条件下做扩展和调整,这样替换实现类后才不会出现错误
- 子类和父类不仅指的是继承关系,也可以是接口和实现类之间的关系
- 子类违反了父类定义的约定,约定包括:函数声明要实现的功能;对输入、输出、异常的约定;甚至包括注释中所罗列的任何特殊说明
4. 接口隔离原则
接口隔离原则(Interface Segregation Principle, ISP)
核心思想:客户端(指调用者、使用者)不应该被迫依赖它不使用的方法,即一个类对另一个类的依赖应该建立在最小接口上
作用:
- 提高系统的灵活性、可维护性:精简的接口使得系统各部分更加独立,修改和扩展时影响较小
- 增强代码的可读性:小而具体的接口更加直观,方便理解和使用
- 减少代码的臃肿、冗余:避免类实现不必要的方法,减少代码量
// 实现一个打印机(打印文档、照片、信封)
interface Printer {
    void printDocument();
    void printPhoto();
    void printEnvelope();
}
- 对于一些仅支持文档的打印机来说,它必须实现所有方法,这其实就违法了接口隔离原则
- 正确的做法是将接口拆分成多个,让不同类型的打印机仅需实现自己需要的接口即可
interface DocumentPrinter {
    void printDocument();
}

interface PhotoPrinter {
    void printPhoto();
}

interface EnvelopePrinter {
    void printEnvelope();
}
1. 接口隔离、单一职责区别
- 接口隔离原则:强调应根据使用需求定义精简、具体的接口,避免臃肿的接口和不必要的依赖,所以它的角度是从调用者是否需要这个角度出发的,而不是通过职责单一的角度去考虑
- 接口隔离,其实也是提供了一种判断职责是否单一的标准
5. 依赖倒置原则
依赖倒置(反转)原则(Dependency Inversion Principle, DIP)
核心思想
- 高层模块不应该依赖低层模块。二者都应该依赖其抽象
- 抽象不应该依赖细节。细节应该依赖抽象
作用:
- 提高系统的灵活性:通过依赖抽象,系统的各个模块可以独立变化,减少耦合
- 增强代码的可维护性:修改、扩展功能时,只需更改、增加具体实现,而不影响高层模块
- 方便进行单元测试:通过依赖抽象,可以轻松替换具体实现,用于测试
interface MessageService {
    void sendMessage(String message);
}

class EmailService implements MessageService {
    @Override
    public void sendMessage(String message) {
        System.out.println("Sending email: " + message);
    }
}

class SmsService implements MessageService {
    @Override
    public void sendMessage(String message) {
        System.out.println("Sending SMS: " + message);
    }
}

// --------------------------------------------------------------

class MessageSender {
    // 仅需依赖发送接口(抽象)即可
    private MessageService messageService;

    public MessageSender(MessageService messageService) {
        this.messageService = messageService;
    }

    public void send(String message) {
        messageService.sendMessage(message);
    }
}
6. 迪米特法则
迪米特法则(Law of Demeter, LoD),又称为最少知识原则(Principle of Least Knowledge)
- 简单理解:不应该有直接依赖关系的类,不要有依赖,有依赖关系的尽量只依赖必要的接口。该知道的需要知道,不该知道的一律不要知道。
核心思想:
- 一个对象应尽量少地了解其他对象的内部细节
- 一个对象只应与直接的朋友通信,而不与朋友的朋友通信。直接的朋友指的是那些直接与当前对象进行交互的对象
好处:
- 降低耦合度:减少对象之间的依赖,使系统更加模块化
- 提高代码的可维护性:修改一个对象时,不会影响到不相关的对象,减少了维护的复杂性
- 增强系统的可复用性:模块化和低耦合的系统更容易重用和扩展
class Address {
    private String street;
    private String city;
}

class Student {
    private Address address;
}

class Teacher {
    // Teacher 类需要通过 Student 类获取 Address 类的信息
    public void printStudentAddress(Student student) {
        Address address = student.getAddress();
        System.out.println("Street: " + address.getStreet());
        System.out.println("City: " + address.getCity());
    }
}
- 违反了迪米特法则。Teacher 实际上不需要直接访问 Student 的属性
- 把打印功能直接封装在 student 内
- Teacher 就不依赖 Student 的内部细节,后续有关 city 或者 street 的改动仅需在 student 内,不影响 teacher
class Address {
    private String street;
    private String city;
}

class Student {
    private Address address;

    public void printAddress() {
        System.out.println("Street: " + address.getStreet());
        System.out.println("City: " + address.getCity());
    }
}

class Teacher {
    public void printStudentAddress(Student student) {
        student.printAddress();
    }
}
2. 什么是设计模式
设计模式是在软件开发过程中经过经验积累和验证,总结得出的一套通用代码设计方案,是踩在巨人肩膀上总结的设计成果
- 当遇到类似场景,可以快速地参考设计模式实现代码。不仅可以加速编码速度,也提升了代码的可扩展性、可重用性、可维护性!
1. 作用
帮助我们快速解决常见问题
- 提供解决特定软件设计问题的通用方法,套用即用。eg:单例模式、代理模式、责任链模式等
提升代码可扩展性
- 通常考虑了软件的扩展性,将不同的功能和功能变化分离开来实现,使得未来添加新功能更加容易
提高代码可重用性
- 本身就是经验的总结,按照设计模式的思路,很多代码封装的很好,便于复用,减少重复工作
提升代码可维护性
- 使得代码结构更加清晰,易于理解和维护
简化沟通成本
- 设计模式就是一种通用语言,通过设计就能明白其实现含义,有助于开发者之间更有效地沟通设计意图
提供最佳实践
- 是经验的总结,可以指导开发者避免常见陷阱,采用最佳实践
3. 分为哪三大类
创建型模式(Creational Patterns)
- 用于创建对象的模式,同时隐藏对象创建的逻辑,避免代码中出现大量 new 操作和复杂的创建逻辑
- 常用:单例模式、工厂模式、建造者模式
- 不常见:原型模式
结构型模式(Structural Patterns)
- 用于处理对象组合的结构,关注类与对象的组合
- 常用:适配器模式、桥接模式、组合模式、装饰器模式
- 不常见:外观模式(门面模式)、享元模式
行为型模式(Behavioral Patterns)
- 用于定义对象如何相互协作以完成单个对象无法单独实现的任务
- 常用:观察者模式、责任链模式、策略模式、模板模式、状态模式、迭代器模式
- 不常见:备忘录模式、命令模式、中介者模式、访问者模式、解释器模式
4. 创建型模式(5)
1. 单例模式
单例模式(Singleton Pattern)是最简单的一种设计模式,一个类只能有一个实例,这个类就是单例类,就是单例模式
- 主要用于资源管理(避免资源冲突)、保证全局唯一的场景
2. 场景
- 配置管理
- 基本上应用都会有一个全局配置,这个配置从理论上来说需要保证唯一性,确保读取到的配置是同一份,是一致的,所以天然适合单例实现
- 连接池、线程池
- 池化资源需要保证唯一性,不然就没有池化的意义了,总不能每次访问池化资源都新建一个吧?需要保持单例,控制具体池化资源的数量,便于管理和监控
- 日志、缓存等需要全局唯一避免资源冲突的场景
3. 几种实现?线程安全?
1. 懒汉式
- 优点:延迟加载
- 缺点:线程不安全,多线程并发访问的情况下可能会产生多个实例
public class Singleton {
    private static Singleton instance;

    // 私有构造函数,防止外部实例化
    private Singleton() {}

    public static Singleton getInstance() {
        if (instance == null) {
            instance = new Singleton();
        }
        return instance;
    }
}
改进:加个锁。锁的竞争,可能会有性能问题
public class Singleton {
    private static Singleton instance;

    // 私有构造函数,防止外部实例化
    private Singleton() {}

    public static synchronized Singleton getInstance() {
        if (instance == null) {
            instance = new Singleton();
        }
        return instance;
    }
}
2. 双重检查
- 利用 volatile 关键字保证了可见性,利用双重检查机制减少了同步带来的性能损耗
public class Singleton {
    private static volatile Singleton instance;

    // 私有构造函数,防止外部实例化
    private Singleton() {}

    public static Singleton getInstance() {
        if (instance == null) {
            synchronized (Singleton.class) {
                if (instance == null) {
                    instance = new Singleton();
                }
            }
        }
        return instance;
    }
}
3. 饿汉式
- 线程安全
- 没有延迟加载
public class Singleton {
    private static final Singleton instance = new Singleton();

    // 私有构造函数,防止外部实例化
    private Singleton() {}

    public static Singleton getInstance() {
        return instance;
    }
}
4. 静态内部类
- 线程安全
- 延迟加载
public class Singleton {
    private Singleton() {}

    private static class SingletonHolder {
        private static final Singleton INSTANCE = new Singleton();
    }

    public static Singleton getInstance() {
        return SingletonHolder.INSTANCE;
    }
}
5. 枚举实现
- 利用 Java 保证枚举实例全局唯一线程安全的特性
public enum Singleton {
    INSTANCE;

    public void bizMethod() {
        // 一些业务逻辑方法
    }
}

//使用

SingletonEnum singleton = SingletonEnum.INSTANCE;
singleton.bizMethod();
2. 工厂方法模式
工厂方法模式定义了一个创建对象的接口,一个具体的工厂类负责生产一种产品,如果需要添加新的产品,仅需新增对应的具体工厂类而不需要修改原有代码实现
// 产品接口
public interface Product {
    void use();
}

// 具体产品实现
public class ConcreteProduct implements Product {
    @Override
    public void use() {
        System.out.println("Using ConcreteProduct");
    }
}

// 工厂接口
public abstract class Factory {
    public abstract Product createProduct();
}

// 具体工厂实现
public class ConcreteFactory extends Factory {
    @Override
    public Product createProduct() {
        return new ConcreteProduct();
    }
}

// 使用工厂方法创建产品
public class Client {
    public static void main(String[] args) {
        Factory factory = new ConcreteFactory();
        Product product = factory.createProduct();
        product.use();
    }
}
3. 抽象工厂模式
抽象工厂提供一个创建一系列相关或相互依赖对象的接口,简单来说不仅是生产一个产品,而是一个系列产品
- 抽象工厂就是打包式的创建系列对象,已经搭配好了,屏蔽关联对象的一些创建细节
- 有两个产品
ProductA、ProductB,以及它们的具体实现ConcreteProductA1、ConcreteProductA2、ConcreteProductB1、ConcreteProductB2,使用抽象工厂模式来创建这些相关产品
// 抽象产品A
public interface ProductA {
    void use();
}

// 具体产品A1
public class ConcreteProductA1 implements ProductA {
    @Override
    public void use() {
        System.out.println("Using ConcreteProductA1");
    }
}

// 具体产品A2
public class ConcreteProductA2 implements ProductA {
    @Override
    public void use() {
        System.out.println("Using ConcreteProductA2");
    }
}

// -------------------------------------------------------------

// 抽象产品B
public interface ProductB {
    void eat();
}

// 具体产品B1
public class ConcreteProductB1 implements ProductB {
    @Override
    public void eat() {
        System.out.println("Eating ConcreteProductB1");
    }
}

// 具体产品B2
public class ConcreteProductB2 implements ProductB {
    @Override
    public void eat() {
        System.out.println("Eating ConcreteProductB2");
    }
}

// -------------------------------------------------------------

// 抽象工厂
public interface AbstractFactory {
    ProductA createProductA();
    ProductB createProductB();
}

// 具体工厂1
public class ConcreteFactory1 implements AbstractFactory {
    @Override
    public ProductA createProductA() {
        return new ConcreteProductA1();
    }

    @Override
    public ProductB createProductB() {
        return new ConcreteProductB1();
    }
}

// 具体工厂2
public class ConcreteFactory2 implements AbstractFactory {
    @Override
    public ProductA createProductA() {
        return new ConcreteProductA2();
    }

    @Override
    public ProductB createProductB() {
        return new ConcreteProductB2();
    }
}

// -------------------------------------------------------------

// 使用抽象工厂创建产品
public class Client {
    public static void main(String[] args) {
        AbstractFactory factory1 = new ConcreteFactory1();
        ProductA productA1 = factory1.createProductA();
        ProductB productB1 = factory1.createProductB();
        productA1.use();
        productB1.eat();

        AbstractFactory factory2 = new ConcreteFactory2();
        ProductA productA2 = factory2.createProductA();
        ProductB productB2 = factory2.createProductB();
        productA2.use();
        productB2.eat();
    }
}
工厂方法模式:
- 关注创建单一产品对象
- 使用子类来决定创建哪个具体产品
- 扩展性较好,新增产品时只需增加新的工厂子类
抽象工厂模式:
- 关注创建一系列相关或相互依赖的产品对象
- 提供一个接口,用于创建多个产品族的对象
- 增加新的产品族较为容易,但增加新产品类型较为困难(eg:要加个
createProductC,所有实现具体工厂的代码都得改)
1. 简单工厂模式
简单工厂模式(Simple Factory Pattern)不属于 GoF 23 种经典设计模式之一,但在实际开发中非常常见,作用是利用一个工厂作为入口,将多个对象的创建和使用分离。根据传入的参数来创建并返回不同类型的对象实例
// 产品接口
public interface Product {
    void use();
}

// 具体产品A
public class ConcreteProductA implements Product {
    @Override
    public void use() {
        System.out.println("Using ConcreteProductA");
    }
}

// 具体产品B
public class ConcreteProductB implements Product {
    @Override
    public void use() {
        System.out.println("Using ConcreteProductB");
    }
}

// 简单工厂类
public class SimpleFactory {
    public static Product createProduct(String type) {
        switch (type) {
            case "A":
                return new ConcreteProductA();
            case "B":
                return new ConcreteProductB();
            default:
                throw new IllegalArgumentException("Unknown product type");
        }
    }
}

// 客户端代码
public class Client {
    public static void main(String[] args) {
        Product productA = SimpleFactory.createProduct("A");
        productA.use();       // Output: Using ConcreteProductA

        Product productB = SimpleFactory.createProduct("B");
        productB.use();       // Output: Using ConcreteProductB
    }
}
优点:
- 将对象的创建集中在工厂类中,便于管理和维护
- 屏蔽了底层的创建细节,对使用者来说更方便
缺点:
- 如果一个工厂类集中所有产品的创建逻辑,那么职责过重,不符合单一职责原则
- 新增一个产品类型,工厂类都需要被修改,不符合开闭原则
4. 建造者模式
一般情况下,只有复杂对象的创建才需要使用建造者模式。eg:一个对象有十几个参数
- 用构造器填参,可读性很差
- 属性有依赖关系
- 需要一些必填校验
- 对象为了保证不可变性,不能暴露
setter()
A a = new A("a", 1, false, null, "b", null, false , 1, 2, 3, "c", false, null, null,true);
eg:hutool 内的 ExecutorBuilder 提供了建造者模式创建线程池
public ExecutorService buildTaskPool() {
return ExecutorBuilder.create()
        .setCorePoolSize(10)
        .setMaxPoolSize(20)
        .setWorkQueue(new LinkedBlockingQueue<>(100))
        .setKeepAliveTime(3L, TimeUnit.SECONDS)
        .setThreadFactory(new ThreadFactoryBuilder().setNamePrefix("task-pool-").build())
        .build();
}
5. 原型模式
原型模式:主要通过复制(克隆)现有的实例来创建新的对象,避免复杂创建过程,提升创建对象的效率
- eg:创建一个内部榜单对象,这个对象的构造需要循环遍历DB很多数据,然后在内存中组装最终才得到的,所以这个对象的创建成本很高
- 此时还需要一个外部榜单对象,需要屏蔽内部榜单对象中的一些数据即可
- 克隆内部榜单对象,得到外部榜单对象,再将里面的属性改一改屏蔽一些敏感数据即可
// 原型接口
public interface Prototype extends Cloneable {
    Prototype clone();
}

// 具体原型类
public class ConcretePrototype implements Prototype {
    private String field;

    public ConcretePrototype(String field) {
        this.field = field;
    }

    @Override
    public Prototype clone() {
        try {
            return (Prototype) super.clone();
        } catch (CloneNotSupportedException e) {
            e.printStackTrace();
            return null;
        }
    }

    @Override
    public String toString() {
        return "ConcretePrototype{" +
                "field='" + field + '\'' +
                '}';
    }
}

// 客户端代码
public class Client {
    public static void main(String[] args) {
        ConcretePrototype prototype = new ConcretePrototype("Initial Field");
        ConcretePrototype clone = (ConcretePrototype) prototype.clone();

        System.out.println(prototype); 	// Output: ConcretePrototype{field='Initial Field'}
        System.out.println(clone);		// Output: ConcretePrototype{field='Initial Field'}
    }
}
5. 结构型模式(7)
1. 代理模式
不改变原始对象的前提下,通过引入一个代理对象来控制对原始对象的访问,实现额外的功能
- 动态代理就是代理模式,Spring AOP 就是动态代理
- RPC 框架也是使用了动态代理才使得调用远程方法和本地方法一样
- 统一报错、监控、限流、鉴权等,需要跟业务解耦的功能,基本上都是使用代理类进行统一处理的
// 统计文档展示的次数,通过 DocumentProxy 代理类就附加了这个功能

interface Document {
    void displayContent();
}

class RealDocument implements Document {
    private String content;

    public RealDocument(String content) {
        this.content = content;
    }

    @Override
    public void displayContent() {
        System.out.println("Displaying content: " + content);
    }
}

class DocumentProxy implements Document {
    private RealDocument realDocument;
    private String content;
    private static int accessCount = 0;

    public DocumentProxy(String content) {
        this.content = content;
    }

    @Override
    public void displayContent() {
        accessCount++;
        if (realDocument == null) {
            realDocument = new RealDocument(content);
        }
        realDocument.displayContent();
        System.out.println("Document accessed " + accessCount + " times.");
    }
}

// 客户端代码
public class Client {
    public static void main(String[] args) {
        Document document = new DocumentProxy("Hello, World!");
        document.displayContent();  // 显示内容并记录访问次数
        document.displayContent();  // 再次显示内容并记录访问次数
    }
}
2. 桥接模式
将抽象和实现解耦,使它们可以独立地变化
- JDBC 就使用了桥接模式,借着它来理解下这个设计模式
- JDBC 定义了抽象的规范,不同的DB厂商遵循这些规范,但是它们各自又有不同的实现
- Mysql 传入
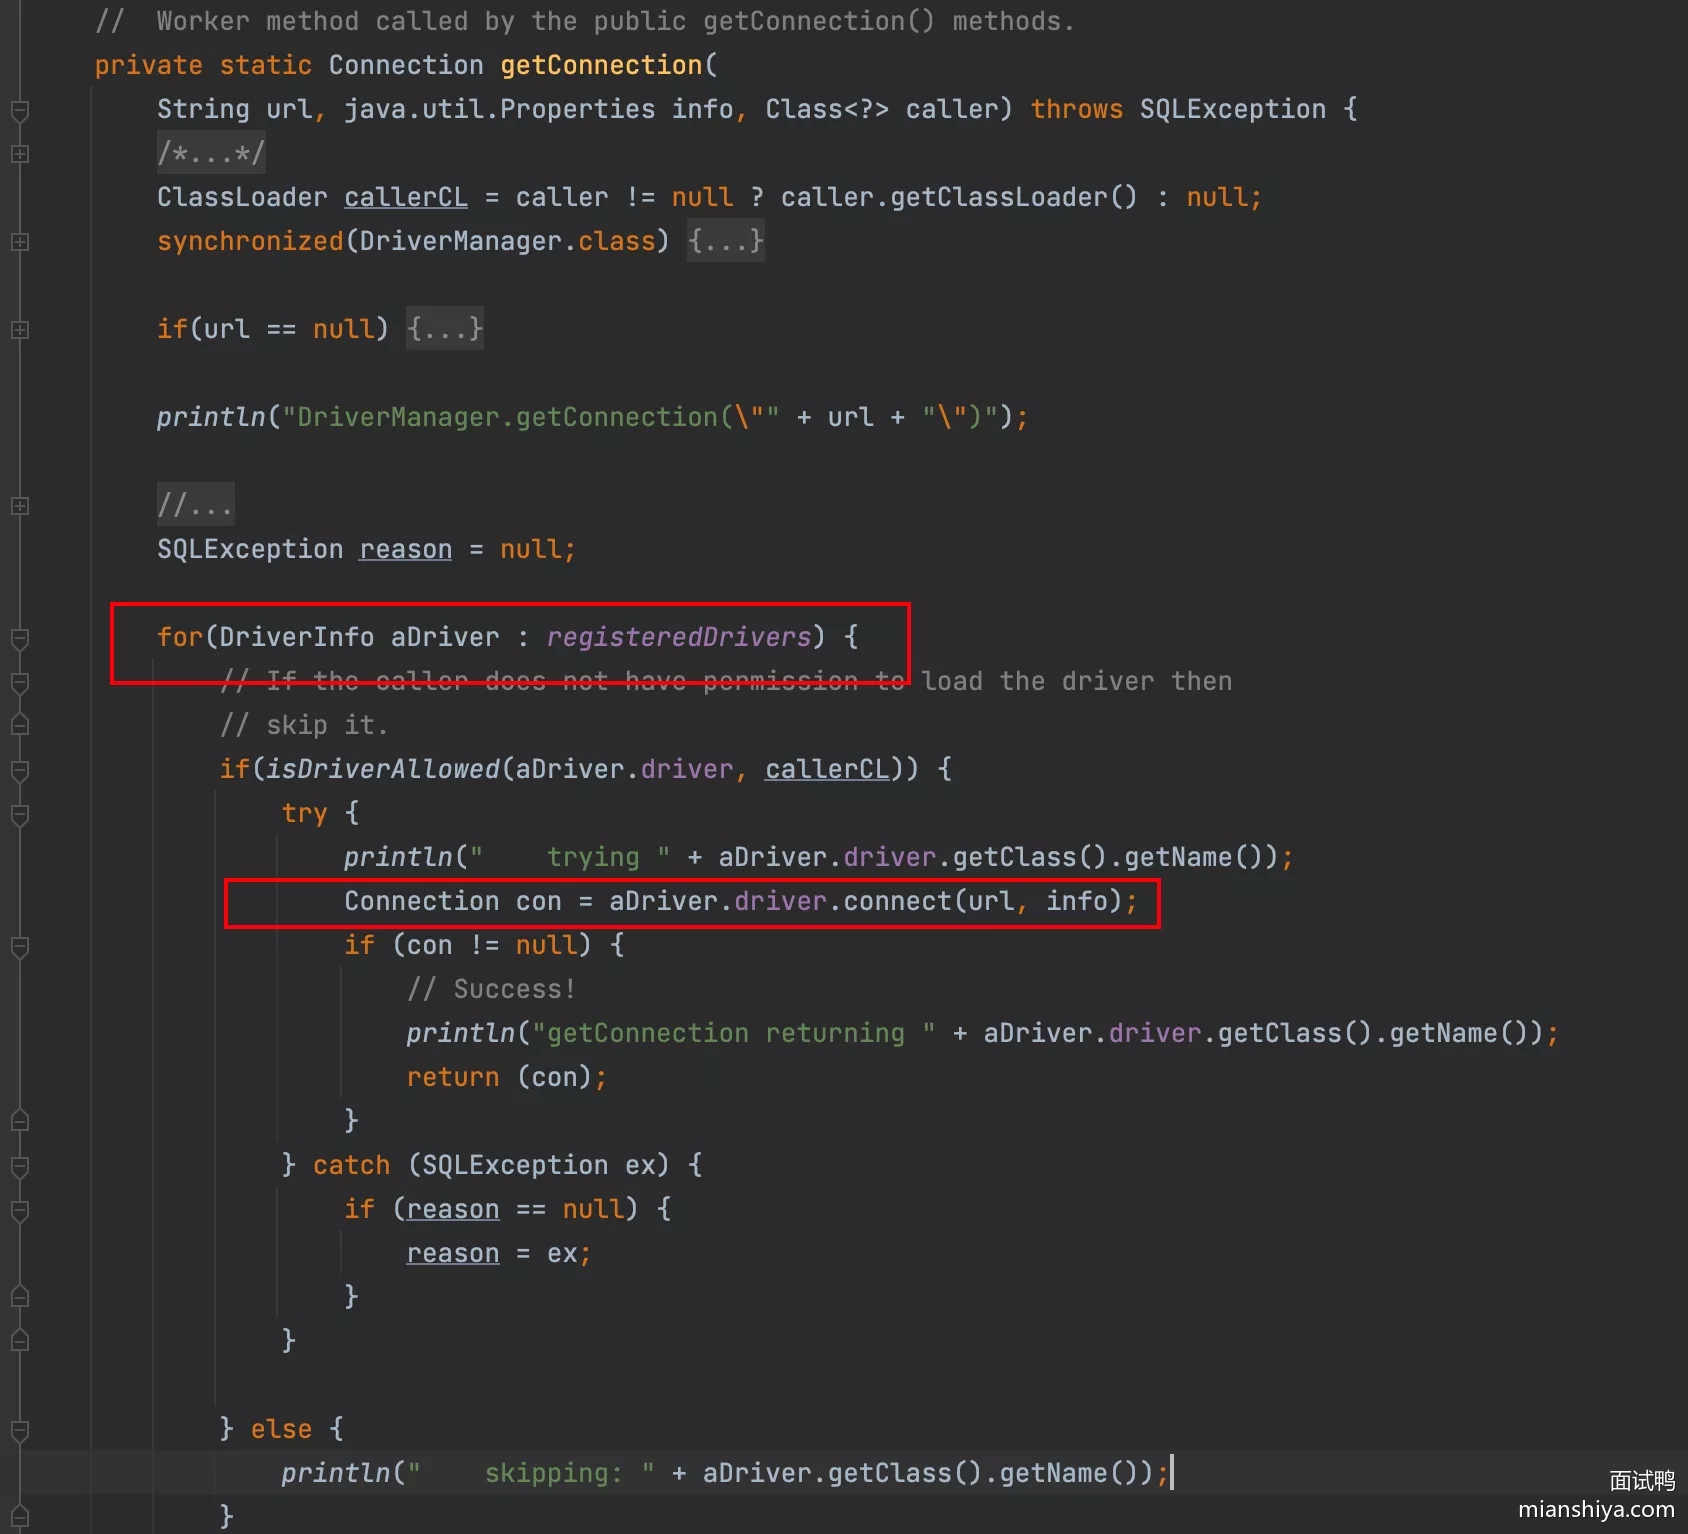
com.mysql.jdbc.Driver驱动实现类,Oracle 替换实现类为oracle.jdbc.driver.OracleDriver即可,这就是典型的抽象与实现解耦 - 实际执行DB操作。eg:获取连接,实际上就是委托给具体的实现类
JDBC 源码如下:
3. 装饰器模式
装饰器模式(Decorator Pattern)主要作用给原始类增强功能,一般使用组合形式对原始类进行一定的扩展,并且可以将多个装饰器组合在一起,实现多个功能的叠加
- 多个装饰器组合:需要装饰类、原始类实现同样接口或继承同样的抽象类
import java.io.*;

public class IOExample {
    public static void main(String[] args) throws IOException {
        File file = new File("test.txt");
        FileInputStream fis = new FileInputStream(file);
        BufferedInputStream bis = new BufferedInputStream(fis);
        DataInputStream dis = new DataInputStream(bis);

        while (dis.available() > 0) {
            System.out.println(dis.readLine());
        }

        dis.close();
    }
}
FileInputStream用来读取文件流,然后被BufferedInputStream装饰,提供了缓存的功能- 再被
DataInputStream装饰,提供了按数据类型读取的功能 - 多个装饰器叠加在一起,实现了多个功能的增强,且不会增加类的实现复杂度,每个装饰器仅需关注自己的加强功能即可,提高代码的灵活性、可维护性
// 接口类
interface Component {
    void operation();
}

// 具体构件
class ConcreteComponent implements Component {
    @Override
    public void operation() {
        System.out.println("ConcreteComponent operation");
    }
}

// 装饰器
abstract class Decorator implements Component {
    protected Component component;

    public Decorator(Component component) {
        this.component = component;
    }

    @Override
    public void operation() {
        component.operation();
    }
}

// 具体装饰器 A
class ConcreteDecoratorA extends Decorator {
    public ConcreteDecoratorA(Component component) {
        super(component);
    }

    @Override
    public void operation() {
        super.operation();
        addedBehavior();
    }

    private void addedBehavior() {
        System.out.println("ConcreteDecoratorA added behavior");
    }
}

// 具体装饰器 B
class ConcreteDecoratorB extends Decorator {
    public ConcreteDecoratorB(Component component) {
        super(component);
    }

    @Override
    public void operation() {
        super.operation();
        addedState();
    }

    private void addedState() {
        System.out.println("ConcreteDecoratorB added state");
    }
}

// 客户端代码
public class Client {
    public static void main(String[] args) {
        Component component = new ConcreteComponent();
        Component decoratorA = new ConcreteDecoratorA(component);
        Component decoratorB = new ConcreteDecoratorB(decoratorA);
        decoratorB.operation();
        // Output:
        // ConcreteComponent operation
        // ConcreteDecoratorA added behavior
        // ConcreteDecoratorB added state
    }
}
4. 适配器模式
将不兼容的接口转换成可兼容的接口

优点:
- 提高了类的复用性:适配器模式使得原本由于接口不兼容而无法复用的类可以复用
- 提高了类的扩展性:通过使用适配器,可以在不修改现有代码的情况下使用新的接口
- 符合开闭原则:不修改现有类的情况下引入适配器类来解决问题,符合开闭原则
主要形式:
- 类适配器:通过继承实现适配器功能(它只能适配一个适配者类,不适合复合多种接口的场景)
- 对象适配器:通过组合(持有被适配对象的实例)实现适配器功能
1. 类适配器
// 目标接口
public interface Target {
    void request();
}

// 适配者类
public class Adaptee {
    public void specificRequest() {
        System.out.println("Adaptee's specificRequest");
    }
}

// 类适配器
public class Adapter extends Adaptee implements Target {
    @Override
    public void request() {
        specificRequest();
    }
}

// 客户端代码
public class Client {
    public static void main(String[] args) {
        Target target = new Adapter();
        target.request();  // Output: Adaptee's specificRequest
    }
}
2. 对象适配器
// 目标接口
public interface Target {
    void request();
}

// 适配者类
public class Adaptee {
    public void specificRequest() {
        System.out.println("Adaptee's specificRequest");
    }
}

// 对象适配器
public class Adapter implements Target {
    private Adaptee adaptee;

    public Adapter(Adaptee adaptee) {
        this.adaptee = adaptee;
    }

    @Override
    public void request() {
        adaptee.specificRequest();
    }
}

// 客户端代码
public class Client {
    public static void main(String[] args) {
        Adaptee adaptee = new Adaptee();
        Target target = new Adapter(adaptee);
        target.request();  // Output: Adaptee's specificRequest
    }
}
3. 场景
- 经常在对接多个外部系统接口的场景下需要使用适配器模式,因为不同的外部系统提供的接口都是不一样的,但是对内部系统来说需要提供统一接口来屏蔽不同外部系统的接口的差异,提升代码的复用性
- eg:整合老系统时,由于老系统的接口已经跟不上新接口的设计,此时就可以利用适配器模式作为中间层,兼容老系统的接口调用
- Java 日志中的 slf4j 其实就是使用适配器模式来统一不同日志框架接口,使得不需要修改代码就可以替换不同的底层日志实现
4. 装饰器,适配器,代理,桥接
最大的区别就是设计思路或者说用意的区别,它们的出发点是不一样的
- 装饰器模式:目的是在不改变原始类接口、不对原始类复杂化的情况下,对原始类进行本身功能增强并支持多层嵌套
- 代理模式:目的是在不改变原始类接口,为原始类提供代理类,对其实现额外功能,和装饰器的区别在于不是增强原始类本身对应的功能
- 适配器模式:目的是面对不兼容的接口进行适配,主要是兼容性问题
- 桥接模式:目的是将抽象与实现分离,使它们可以独立地变化。eg:JDBC 场景,不同数据库厂商的不同实现
5. 外观模式
外观模式(Facade Pattern)也叫门面模式,为子系统提供一组统一接口,隐藏内部的实现细节,方便子系统使用
- eg: A 系统有 a、b、c 三个接口,B 需要分别调用 a、b、c 三个接口,比较麻烦,所以 A 将 a、b、c 封装成一个接口给 B 调用,对 B 来说使用起来就方便了,这就是外观模式(门面模式)
- 不仅降低了子系统的使用成本,实际上也减少系统之间的依赖关系,降低了系统之间的耦合度,便于维护和升级
- 提供给外部的接口,此时利用外观模式封装甚至能提升性能,因为对外提供一个大接口,在大接口内糅合多次内部 rpc 调用耗时和多接口多次 http 调用耗时可不一样,从公网和内网角度来看,延时就差很多了
xxxFacade一般就是使用了外观模式
不过在使用外观模式的同时,也需要考虑接口的设计粒度
- 接口的粒度太大,可复用性就低了,接口的粒度太小,易用性就低了。所以设计是一个权衡的过程,综合考虑,理论上可复用性为主,然后特殊情况利用外观模式封装一个大接口提供出去
// 我回家想看电影,需要打开 DVD、投影仪、音响,比较麻烦,因此就做了一个 HomeTheaterFacade 来简化操作

// DVD播放器子系统
class DVDPlayer {
    public void on() {
        System.out.println("DVD Player is on.");
    }

    public void play(String movie) {
        System.out.println("Playing movie: " + movie);
    }

    public void stop() {
        System.out.println("Stopping the movie.");
    }

    public void off() {
        System.out.println("DVD Player is off.");
    }
}

// 投影仪子系统
class Projector {
    public void on() {
        System.out.println("Projector is on.");
    }

    public void setInput(String input) {
        System.out.println("Projector input set to: " + input);
    }

    public void off() {
        System.out.println("Projector is off.");
    }
}

// 音响系统子系统
class SoundSystem {
    public void on() {
        System.out.println("Sound System is on.");
    }

    public void setVolume(int level) {
        System.out.println("Sound System volume set to: " + level);
    }

    public void off() {
        System.out.println("Sound System is off.");
    }
}

public class HomeTheaterFacade {
    private DVDPlayer dvdPlayer;
    private Projector projector;
    private SoundSystem soundSystem;

    public HomeTheaterFacade(DVDPlayer dvdPlayer, Projector projector, SoundSystem soundSystem) {
        this.dvdPlayer = dvdPlayer;
        this.projector = projector;
        this.soundSystem = soundSystem;
    }

    public void watchMovie(String movie) {
        System.out.println("Get ready to watch a movie...");
        projector.on();
        projector.setInput("DVD");
        soundSystem.on();
        soundSystem.setVolume(10);
        dvdPlayer.on();
        dvdPlayer.play(movie);
    }

    public void endMovie() {
        System.out.println("Shutting down the movie theater...");
        dvdPlayer.stop();
        dvdPlayer.off();
        soundSystem.off();
        projector.off();
    }
}
6. 组合模式
组合模式(Composite Pattern),将对象组合成树形结构,表示“部分-整体”的层次关系,使得调用方可以一致地对待单个对象和对象组合
- 注意,数据必须是树形结构,也因此应用场景有限,但在业务上还是比较常见,因为很多业务都有后台管理系统,含菜单管理、部门管理等
- 通过组合模式,提供统一的接口,简化对层次结构的处理,使得使用方代码更加简洁与灵活
// 展示组织内的部门和人员信息

import java.util.ArrayList;
import java.util.List;

// 抽象接口
interface OrganizationComponent {
    void showDetails();
}

// 人员
class Employee implements OrganizationComponent {
    private String name;
    private String position;

    public Employee(String name, String position) {
        this.name = name;
        this.position = position;
    }

    @Override
    public void showDetails() {
        System.out.println("Employee: " + name + ", Position: " + position);
    }
}

// 部门
class Department implements OrganizationComponent {
    private String name;
    private List<OrganizationComponent> components = new ArrayList<>();

    public Department(String name) {
        this.name = name;
    }

    @Override
    public void showDetails() {
        System.out.println("Department: " + name);
        for (OrganizationComponent component : components) {
            component.showDetails();
        }
    }

    public void add(OrganizationComponent component) {
        components.add(component);
    }

    public void remove(OrganizationComponent component) {
        components.remove(component);
    }
}

// 使用代码
public class Client {
    public static void main(String[] args) {
        // 创建人员
        OrganizationComponent employee1 = new Employee("John Doe", "Developer");
        OrganizationComponent employee2 = new Employee("Jane Smith", "Designer");
        OrganizationComponent employee3 = new Employee("Emily Davis", "Manager");

        // 创建部门
        Department engineeringDepartment = new Department("Engineering Department");
        Department designDepartment = new Department("Design Department");
        Department headDepartment = new Department("Head Department");

        // 添加人员到部门
        engineeringDepartment.add(employee1);
        designDepartment.add(employee2);
        headDepartment.add(employee3);

        // 添加子部门到上级部门
        headDepartment.add(engineeringDepartment);
        headDepartment.add(designDepartment);

        // 显示整个组织结构的详情
        headDepartment.showDetails();
        // Output:
        // Department: Head Department
        // Employee: Emily Davis, Position: Manager
        // Department: Engineering Department
        // Employee: John Doe, Position: Developer
        // Department: Design Department
        // Employee: Jane Smith, Position: Designer
    }
}
7. 享元模式
享元模式(Flyweight Pattern),用于通过共享来减少内存占用,提高内存效率
- eg:一个系统中可能会存在大量的重复对象,并且这些对象实际是不可变的,在设计上仅在内存中保留一份实例,然后多处引用即可,节省内存的开销
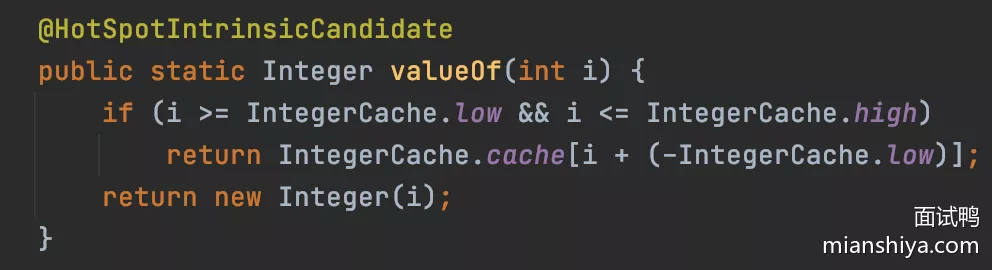
- 在 Integer 中就采用了享元模式,即
IntegerCache缓冲池- 面试题,即 Integer
[-128, 127]之内的相等,而超过这个范围用==就不对了,因为这个范围内采用了享元模式,本质就是同一个对象 - 原理:Integer 内部有个
IntegerCache,默认范围是[-128, 127],在静态块中会初始化好缓存值。根据设置JVM-XX:AutoBoxCacheMax=<size>来修改缓存的最大值,最小值改不了
- 面试题,即 Integer
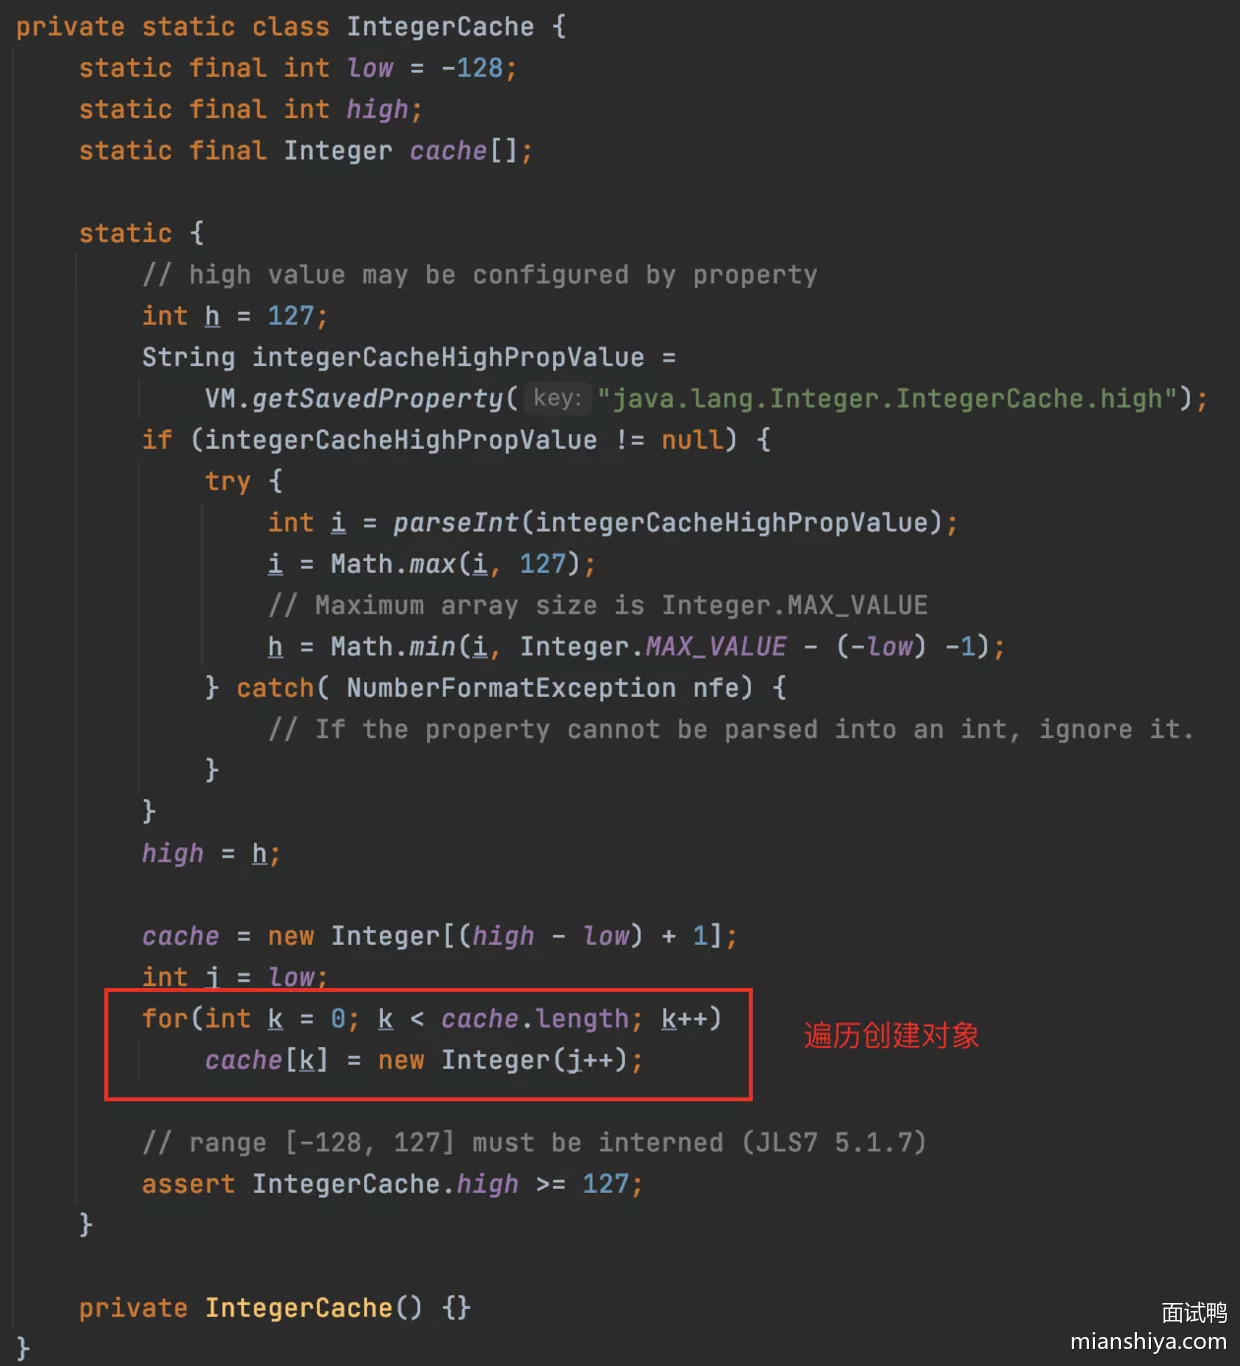
在相关Integer操作时,会判断它的值是否在IntegerCache内,如果是则直接范围IntegerCache内已经初始化好的值
JDK 之所以要这样实现,是因为实践发现大部分的数据操作都集中在值比较小的范围,所以采用了享元模式
6. 行为型模式
1. 模板方法模式
在一个抽象类中定义了一个算法(业务逻辑)的骨架,具体步骤的实现由子类提供,它通过将算法的不变部分放在抽象类中,可变部分放在子类中,达到代码复用和扩展的目的
- 复用:所有子类可以直接复用父类提供的模板方法,即上面提到的不变的部分
- 扩展:子类可以通过模板定义的一些扩展点就行不同的定制化实现
JdbcTemplate使用了模板方法来处理DB的操作HttpServlet类的service()也用了模板方法,doGet()、doPost()等方法都是需要子类实现的
abstract class AbstractClass {
    // 模板方法
    public final void templateMethod() {
        primitiveOperation1();
        primitiveOperation2();
        hook();
    }

    // 基本操作(抽象方法)
    protected abstract void primitiveOperation1();
    protected abstract void primitiveOperation2();

    // 钩子方法(可选的操作,提供默认实现)
    protected void hook() {}
}


class ConcreteClassA extends AbstractClass {
    @Override
    protected void primitiveOperation1() {
        System.out.println("ConcreteClassA: primitiveOperation1");
    }

    @Override
    protected void primitiveOperation2() {
        System.out.println("ConcreteClassA: primitiveOperation2");
    }
}

class ConcreteClassB extends AbstractClass {
    @Override
    protected void primitiveOperation1() {
        System.out.println("ConcreteClassB: primitiveOperation1");
    }

    @Override
    protected void primitiveOperation2() {
        System.out.println("ConcreteClassB: primitiveOperation2");
    }

    @Override
    protected void hook() {
        System.out.println("ConcreteClassB: hook");
    }
}
2. 策略模式
策略模式定义了一系列算法,并将每个算法封装起来,使它们可以相互替换,让算法独立于使用它的客户端(调用方)而变化
- 很多情况下,代码里有大量的
if else, switch等,可以通过使用策略模式,避免大量条件语句的使用,实现算法的分离和独立变化 - 目的:解耦多个策略,并方便调用方在针对不同场景灵活切换不同的策略
// 策略的定义
public interface Strategy {
    void execute(User user);
}

// 具体策略
public class AStrategy implements Strategy{
    void execute(User user) {
        System.out.println("Executing Strategy A " + user.getName());
    }
}
public class BStrategy implements Strategy{
    void execute(User user) {
        System.out.println("Executing Strategy B " + user.getName());
    }
}


// 策略的创建
public class StrategyFactory {
    private static final Map<String, Strategy> strategies = new HashMap<>();

    static {
        strategies.put("A", new AStrategy());
        strategies.put("B", new BStrategy());
    }

    public static Strategy getStrategy(OrderType type) {
        return strategies.get(type);
    }
}

// 策略的使用
public class xxService {
    public void execute(User user) {
        String type = user.getType();
        Strategy strategy = StrategyFactory.getStrategy(type);
        return strategy.execute(user);
    }
}
3. 责任链模式
允许将多个对象连接成一条链,并且沿着这条链传递请求,让多个对象都有机会处理这个请求,请求会顺着链传递,直到某个对象处理它为止
- 避免了请求发送者、接受者之间的耦合,增强了系统的灵活性、可扩展性
- 需要处理链式请求的场景中
- 日志的处理,不同级别不同输出
- Spring 拦截器的 Chain 也是责任链模式
- 请假审批也可以采用责任链模式
// 请假天数少于 3 天的请求由部门经理审批,3 到 7 天的请求由总经理审批,超过 7 天的请求由 CEO 审批
abstract class Approver {
    protected Approver nextApprover;

    public void setNextApprover(Approver nextApprover) {
        this.nextApprover = nextApprover;
    }

    public abstract void approveRequest(int days);
}

class Manager extends Approver {
    @Override
    public void approveRequest(int days) {
        if (days <= 3) {
            System.out.println("Manager approved " + days + " days leave request.");
        } else if (nextApprover != null) {
            nextApprover.approveRequest(days);
        }
    }
}

class GeneralManager extends Approver {
    @Override
    public void approveRequest(int days) {
        if (days <= 7) {
            System.out.println("General Manager approved " + days + " days leave request.");
        } else if (nextApprover != null) {
            nextApprover.approveRequest(days);
        }
    }
}

class CEO extends Approver {
    @Override
    public void approveRequest(int days) {
        if (days > 7) {
            System.out.println("CEO approved " + days + " days leave request.");
        } else if (nextApprover != null) {
            nextApprover.approveRequest(days);
        }
    }
}

public class ApprovalChainDemo {
    public static void main(String[] args) {
        Approver manager = new Manager();
        Approver generalManager = new GeneralManager();
        Approver ceo = new CEO();

        manager.setNextApprover(generalManager);
        generalManager.setNextApprover(ceo);

        manager.approveRequest(2);
        manager.approveRequest(5);
        manager.approveRequest(10);
    }
}
4. 观察者模式
也称为发布订阅模式,定义了对象之间的一对多的依赖关系,让多个观察者对象同时监听某一个主题对象。当主题对象状态发生变化时,它会通知所有观察者对象
- 目的:将观察者、被观察者代码解耦,使得一个对象或者说事件的变更,让不同观察者可以有不同的处理,非常灵活,扩展性很强,是事件驱动编程的基础
- 场景:消息队列、 Spring 内的监听器机制
组成部分:
- Subject(主题/被观察者):状态发生变化时,通知所有注册的观察者
- Observer(观察者):接收来自主题的更新通知,并进行相应的操作
- ConcreteSubject(具体主题):实现具体的主题对象,保存需要被观察的状态
- ConcreteObserver(具体观察者):实现具体的观察者对象,更新自己以与主题的状态同步
1. 新闻发布系统
- 定义接口
- 新闻发布者(Subject)可以发布新闻,观察者(Observer)是订阅者,希望获取新闻更新
- 实现具体类
- 具体新闻发布者(Concrete Subject)维护一个订阅者列表,并在发布新闻时通知他们
- 具体观察者(Concrete Observer)eg:报纸、新闻网站等,实现更新方法来展示新闻
- 订阅和退订
- 订阅者可以订阅(注册)、退订(注销)新闻发布者的新闻
- 发布新闻
- 当新闻发布者有新新闻时,它通知所有订阅的观察者,观察者更新自己的新闻内容
- 客户端代码
- 客户端代码创建新闻发布者和观察者对象,订阅者选择订阅新闻,并在接收到新闻时更新显示
// 定义观察者接口
interface Observer {
    void update(String news);
}

// 具体观察者
class NewsPaper implements Observer {
    public void update(String news) {
        System.out.println("新报 " + news);
    }
}

// ------------------------------------------------------------

// 定义主题接口
interface Subject {
    void attach(Observer o);
    void detach(Observer o);
    void notifyObservers();
}

// 具体新闻发布者
class NewsPublisher implements Subject {
    private List<Observer> observers = new ArrayList<>();

    public void attach(Observer o) {
        observers.add(o);
    }

    public void detach(Observer o) {
        observers.remove(o);
    }

    public void notifyObservers() {
        for (Observer observer : observers) {
            observer.update("新闻更新");
        }
    }

    public void publishNews() {
        // 假设这里是新闻发布逻辑
        notifyObservers();
    }
}

// 客户端代码
public class Client {
    public static void main(String[] args) {
        NewsPublisher publisher = new NewsPublisher();
        Observer newsPaper = new NewsPaper();

        publisher.attach(newsPaper);
        publisher.publishNews();

        publisher.detach(newsPaper);
        publisher.publishNews(); // 此时报纸订阅者不会接收到新闻
    }
}
5. 状态模式
允许对象在其内部状态发生改变时改变其行为,将状态的行为封装在独立的类中,并将这些状态对象组合在拥有状态的对象中,这样就可以在状态改变时切换状态对象,从而改变对象的行为
- 主要是状态机的一种实现方式,状态机可分为:状态、事件、动作三个部分
- 事件的触发就会导致状态的改变,并且可作出一定的动作(也可以没有动作,只有状态的改变)
- 可以将状态相关的行为局部化到不同的状态类中,减少上下文类的复杂性,使代码更清晰、易维护和扩展
业务场景:
- 订单的处理就是一个状态机,订单的创建、支付、发货、退款、关闭等,使用状态模式可以更好地管理订单的状态转换和对应的行为
- 游戏中的一些行为。eg:站立、行走、奔跑、跳跃等,不同状态的角色需要有不同的行为和动画
// 定义状态接口
interface State {
    void handle(Context context);
}

// 具体实现类
class ConcreteStateA implements State {
    @Override
    public void handle(Context context) {
        System.out.println("State A is handling the request.");
        context.setState(new ConcreteStateB());
    }
}

class ConcreteStateB implements State {
    @Override
    public void handle(Context context) {
        System.out.println("State B is handling the request.");
        context.setState(new ConcreteStateA());
    }
}

// 上下文环境
class Context {
    private State state;

    public Context(State state) {
        this.state = state;
    }

    public void setState(State state) {
        this.state = state;
    }

    public void request() {
        state.handle(this);
    }
}


public class Client {
    public static void main(String[] args) {
        Context context = new Context(new ConcreteStateA());

        context.request();    // State A is handling the request.
        context.request();    // State B is handling the request.
        context.request();    // State A is handling the request.
        context.request();    // State B is handling the request.
    }
}
- State 就是状态,request 就是触发的事件,每次调用 request 就实现了状态的转化
6. 访问者模式
将数据结构与操作分离,使得可以在不改变数据结构的前提下定义新的操作。访问者模式通过将操作封装到独立的访问者对象中,使得新的操作可以很容易地添加到系统中。符合开闭原则,也保证了类的职责单一
- 对象序列化场景。eg:将对象转成 JSON、XML 等格式,利用访问者模式将对象的结构和序列化操作分离,这样就能很方便的扩展新的序列化格式
// 访问者接口(类比序列化接口)
interface Visitor {
    void visit(ElementA element);
    void visit(ElementB element);
}

// 具体访问者类(类比具体序列化实现)
class ConcreteVisitor implements Visitor {
    @Override
    public void visit(ElementA element) {
        System.out.println("Processing ElementA: " + element.getName());
    }

    @Override
    public void visit(ElementB element) {
        System.out.println("Processing ElementB: " + element.getName());
    }
}

// ----------------------------------------------------------------------

// 需要对序列化的元素接口
interface Element {
    void accept(Visitor visitor);
}

// 具体被序列化的元素
class ElementA implements Element {
    private String name;

    public ElementA(String name) {
        this.name = name;
    }

    public String getName() {
        return name;
    }

    @Override
    public void accept(Visitor visitor) {
        visitor.visit(this);
    }
}

class ElementB implements Element {
    private String name;

    public ElementB(String name) {
        this.name = name;
    }

    public String getName() {
        return name;
    }

    @Override
    public void accept(Visitor visitor) {
        visitor.visit(this);
    }
}

// 对象结构,包含很多元素
class ObjectStructure {
    private List<Element> elements = new ArrayList<>();

    public void addElement(Element element) {
        elements.add(element);
    }

    public void accept(Visitor visitor) {
        for (Element element : elements) {
            element.accept(visitor);
        }
    }
}


// 客户端代码
public class Client {
    public static void main(String[] args) {
        // 组装对象
        ObjectStructure objectStructure = new ObjectStructure();
        objectStructure.addElement(new ElementA("Element A1"));
        objectStructure.addElement(new ElementB("Element B1"));
        objectStructure.addElement(new ElementA("Element A2"));

        // 访问者 (如果是序列化场景,ConcreteVisitor 可以当做 JSON 序列化)
        Visitor visitor = new ConcreteVisitor();
        objectStructure.accept(visitor);

        // 假设后面要替换 xml 序列化,仅需新建 xml 的访问者,然后传入到对象内部即可
        Visitor visitorXML = new XMLVisitor();
        objectStructure.accept(visitorXML);
    }
}
7. 命令模式
命令模式(Command Pattern)将请求封装成对象,从而使得请求参数化,便于对请求排队或记录请求日志,以及支持可撤销的操作
- 大部分编程语言都不支持以函数作为参数传递,利用命令模式就可以实现这点
// 命令接口
interface Command {
    void execute();
}

// 具体命令
class LightOnCommand implements Command {
    private Light light;

    public LightOnCommand(Light light) {
        this.light = light;
    }

    @Override
    public void execute() {
        light.on();
    }
}

class LightOffCommand implements Command {
    private Light light;

    public LightOffCommand(Light light) {
        this.light = light;
    }

    @Override
    public void execute() {
        light.off();
    }
}


// 接收者
class Light {
    public void on() {
        System.out.println("The light is on.");
    }

    public void off() {
        System.out.println("The light is off.");
    }
}


// 调用者
class RemoteControl {
    private Command command;

    public void setCommand(Command command) {
        this.command = command;
    }

    public void pressButton() {
        command.execute();
    }
}


// 客户端代码
public class Client {
    public static void main(String[] args) {
        Light light = new Light();
        Command lightOn = new LightOnCommand(light);
        Command lightOff = new LightOffCommand(light);

        RemoteControl remote = new RemoteControl();
        remote.setCommand(lightOn);
        remote.pressButton();

        remote.setCommand(lightOff);
        remote.pressButton();
    }
}
- 以上的代码就是所谓的将请求封装成对象,从而使得可以用不同的请求参数化
- 也可以对请求排队或记录请求日志
- 可以将每次请求开关灯的
command存储在 list 中,最后遍历这个 list 执行命令,这样请求就排队了,同时也能记录日志 - 清空 list 的
command就是所谓的支持撤回了
- 可以将每次请求开关灯的
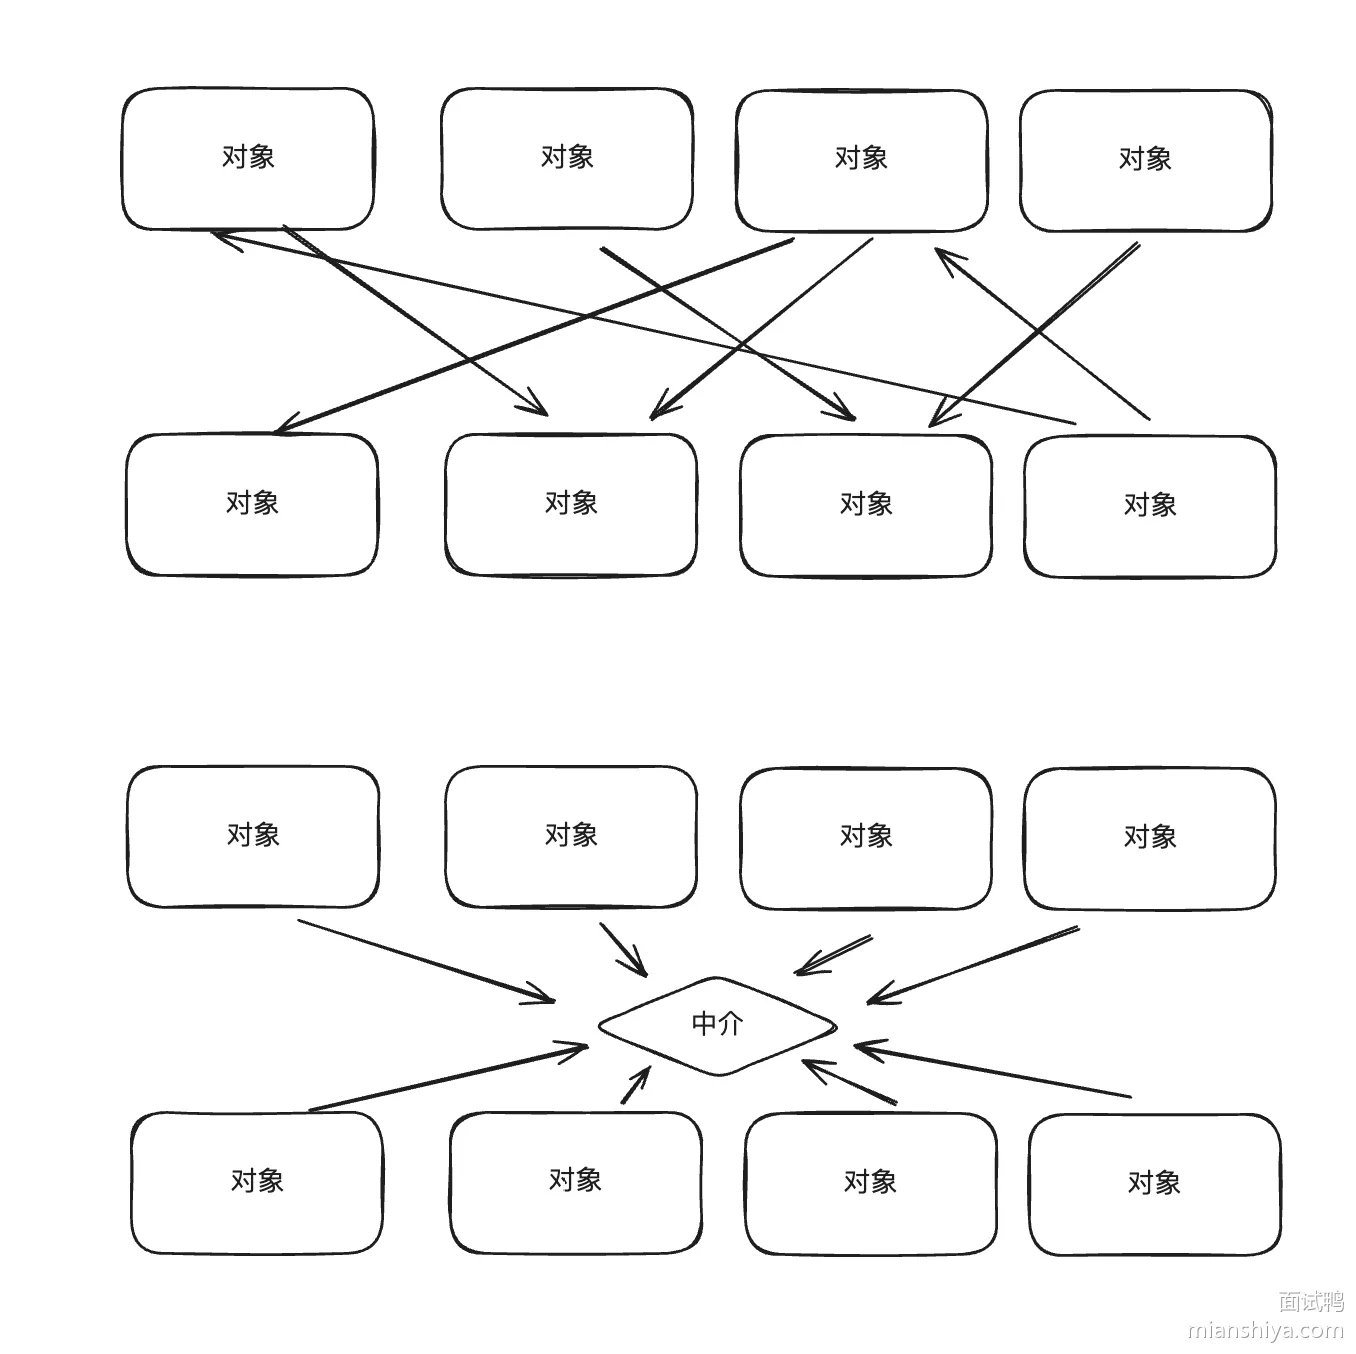
8. 中介者模式
通过引入了一个中介对象,来封装一组对象之间的交互,来避免对象之间的直接交互。通过引入一个中介者对象,使对象之间的关系变得简单且易于维护
- 在编程场景引入中介模式,因为多对象交互可能会使得关系图很混乱,代码也不清晰,让多对象都和中介交互就能避免这点
- 机场航班调度。航班起飞和降落的时间安排、地面服务的调度都是通过**中介者(塔台)**来协调
- 聊天室其实就是运用了中介模式。信息的传递都由服务器这个中介来做,所有用户都把消息发给服务器,不然如果点对点传输太复杂
interface ChatMediator {
    void sendMessage(String message, User user);
    void addUser(User user);
}

class ChatMediatorImpl implements ChatMediator {
    private List<User> users;

    public ChatMediatorImpl() {
        this.users = new ArrayList<>();
    }

    @Override
    public void addUser(User user) {
        this.users.add(user);
    }

    @Override
    public void sendMessage(String message, User user) {
        for (User u : this.users) {
            if (u != user) {
                u.receive(message);
            }
        }
    }
}

abstract class User {
    protected ChatMediator mediator;
    protected String name;

    public User(ChatMediator mediator, String name) {
        this.mediator = mediator;
        this.name = name;
    }

    public abstract void send(String message);
    public abstract void receive(String message);
}

class UserImpl extends User {
    public UserImpl(ChatMediator mediator, String name) {
        super(mediator, name);
    }

    @Override
    public void send(String message) {
        System.out.println(this.name + " sends: " + message);
        mediator.sendMessage(message, this);
    }

    @Override
    public void receive(String message) {
        System.out.println(this.name + " receives: " + message);
    }
}

public class ChatClient {
    public static void main(String[] args) {
        ChatMediator mediator = new ChatMediatorImpl();
        User user1 = new UserImpl(mediator, "Alice");
        User user2 = new UserImpl(mediator, "Bob");
        User user3 = new UserImpl(mediator, "Charlie");

        mediator.addUser(user1);
        mediator.addUser(user2);
        mediator.addUser(user3);

        user1.send("Hello, everyone!");
    }
}
9. 备忘录模式
备忘录模式(快照模式):在不违背封装原则的前提下,捕获对象内部的状态,将其保存在外部,便于后面对象恢复之前的状态,使得系统更具灵活性和可维护性
- 撤销、恢复等场景
- 暴露
setter(), 修改内部状态,就违反了封装的原则。restoreMemento()即恢复之前的状态,不会被乱用
Memento:存储状态的备忘录Originator:需要备份状态的对象类Caretaker:管理者,仅保存备忘录
// 备忘录类
class Memento {
    private String state;

    public Memento(String state) {
        this.state = state;
    }

    public String getState() {
        return state;
    }
}

// 需要备份状态的对象类
class Originator {
    private String state;

    public void setState(String state) {
        this.state = state;
        System.out.println("State set to: " + state);
    }

    public String getState() {
        return state;
    }

    public Memento createMemento() {
        return new Memento(state);
    }

    public void restoreMemento(Memento memento) {
        this.state = memento.getState();
        System.out.println("State restored to: " + state);
    }
}

// 管理存储类
class Caretaker {
    private Memento memento;

    public Memento getMemento() {
        return memento;
    }

    public void setMemento(Memento memento) {
        this.memento = memento;
    }
}

// 客户端类
public class Client {
    public static void main(String[] args) {
        Originator originator = new Originator();
        Caretaker caretaker = new Caretaker();

        originator.setState("State1");
        caretaker.setMemento(originator.createMemento());

        originator.setState("State2");
        System.out.println("Current State: " + originator.getState());

        originator.restoreMemento(caretaker.getMemento());
        System.out.println("Restored State: " + originator.getState());
    }
}
10. 迭代器模式
迭代器模式:提供一种方法顺序访问一个集合对象中的各个元素,而又不暴露该对象(可能是数组、链表、树等)的内部实现
- 将遍历逻辑与集合对象的实现分离,提供一致的遍历方式,使得代码统一化,在不改变遍历代码的情况下就能替换底层集合实现
场景:
- Java 的
java.util.Iterator接口和Iterable接口是迭代器模式的直接应用。所有集合类(eg:ArrayList、HashSet、LinkedList等)都实现了Iterable接口,并提供了iterator()来获取迭代器 - JDBC 的
ResultSet接口遍历DB查询结果,也是迭代器模式的实现
List<String> list = new ArrayList<>();
list.add("one");
list.add("two");
list.add("three");

Iterator<String> iterator = list.iterator();
while (iterator.hasNext()) {
    System.out.println(iterator.next());
}
组成部分:
Iterator(迭代器接口):定义访问和遍历元素的接口ConcreteIterator(具体迭代器):实现迭代器接口,负责遍历聚合对象中的元素Aggregate(聚合接口):定义创建迭代器的接口ConcreteAggregate(具体聚合类):实现聚合接口,返回一个具体的迭代器实例
// 定义迭代器接口
interface Iterator<T> {
    boolean hasNext();
    T next();
}

// 定义聚合接口
interface Aggregate<T> {
    Iterator<T> createIterator();
}

// 定义具体聚合类
class ConcreteAggregate<T> implements Aggregate<T> {
    private List<T> items = new ArrayList<>();

    public void addItem(T item) {
        items.add(item);
    }

    @Override
    public Iterator<T> createIterator() {
        return new ConcreteIterator<>(items);
    }
}

// 定义具体迭代器
class ConcreteIterator<T> implements Iterator<T> {
    private List<T> items;
    private int position = 0;

    public ConcreteIterator(List<T> items) {
        this.items = items;
    }

    @Override
    public boolean hasNext() {
        return position < items.size();
    }

    @Override
    public T next() {
        return items.get(position++);
    }
}

// 简单使用
public class Client {
    public static void main(String[] args) {
        ConcreteAggregate<String> aggregate = new ConcreteAggregate<>();
        aggregate.addItem("Item 1");
        aggregate.addItem("Item 2");
        aggregate.addItem("Item 3");

        Iterator<String> iterator = aggregate.createIterator();
        while (iterator.hasNext()) {
            System.out.println(iterator.next());
        }
    }
}
99. interview
- 谈谈你了解的最常见的几种设计模式,说说他们的应用场景
工作中常用的就是单例模式、简单工厂、策略、模板等设计模式
- eg:需要确保某个类只有一个实例,并提供一个全局访问点时,就能用到单例模式。eg:配置管理器、全局缓存,像常见的DB连接池等其实都用上了单例模式
- 很多时候设计模式都是组合使用。eg:支付场景,需要对接不同的支付渠道:支付宝、微信、易宝支付、连连支付等
不同渠道对应不同策略,天然适合策略模式
public interface PayService {
	void pay(PayDto payDto);
}

public class AliPayService implements PayService {
	public void pay(PayDto payDto) {
      // ...
	}
}
public class WechatPayService implements PayService {
	public void pay(PayDto payDto) {
      // ...
	}
}
不同支付渠道对接过程中会发现大部分流程都是一样的
- 先需要前置的参数检查
- 然后进行核心的支付逻辑
- 最后有一些后置的检查等等
一致的流程就能抽象成一个模板方法,让不同渠道的实现类都继承它
public abstract class AbstractPayService implements PayService {

    // 模板方法
    @Override
	public void pay(PayDto payDto) {
        paramValidate(payDto);
        doPay(payDto);
        afterProcess()
	}

	private void paramValidate(PayDto payDto) {
        // ...
	}

	private void afterProcess() {
        // ...
	}

    // 不同支付渠道的具体实现
	piublic abstract void doPay(PayDto payDto);
}

public class AliPayService extends AbstractPayService {
	public void doPay(PayDto payDto) {
      // ...
	}
}
public class WechatPayService extends AbstractPayService {
	public void doPay(PayDto payDto) {
      // ...
	}
}
简单工厂模式:选择支付渠道时,创建一个支付工厂方法
- 传入了 ALIPAY 得到支付宝的支付实现类
- 传入 WECHAT 得到微信的实现类
@Component
public class PayServiceFactory {

	@Resource
	private Map<String, PayService> payServiceMap;


	public PayService getPayService(String channel) {
        return payServiceMap.get(channel);
	}
}
- 请用一句话概括,什么是设计模式?为什么要用?
设计模式是一套在软件工程中经过验证的、用于解决特定设计问题的解决方案模板,帮助开发者避免重复发明轮子,确保设计的一致性和可维护性,提高代码的可读性和可扩展性