02-mysql
1. Install and Cnf
1. 命令行进入mysql
/usr/local/MySQL/bin/mysql -u root -p
2. 允许电脑远程连接mac mysql
grant all privileges on *.* to root@'%' identified by 'root' WITH GRANT OPTION
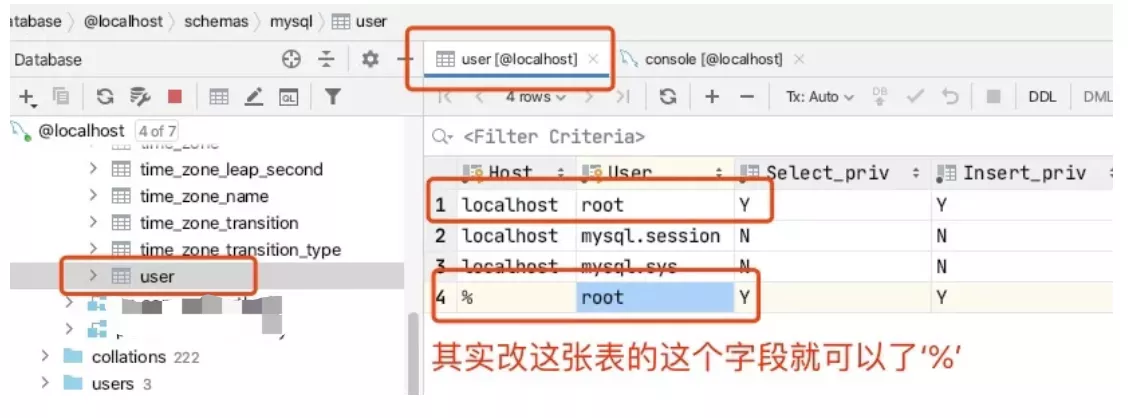
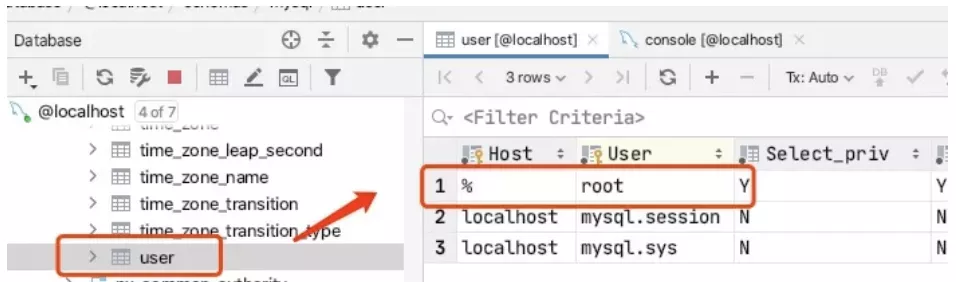
- 需要重启一下
3. 版本号查询
select version();
4. 配置文件(5.7.17)
# For advice on how to change settings please see
# http://dev.mysql.com/doc/refman/5.7/en/server-configuration-defaults.html
# *** DO NOT EDIT THIS FILE. It's a template which will be copied to the
# *** default location during install, and will be replaced if you
# *** upgrade to a newer version of MySQL.

[mysqld]

# Remove leading # and set to the amount of RAM for the most important data
# cache in MySQL. Start at 70% of total RAM for dedicated server, else 10%.
# innodb_buffer_pool_size = 128M

# Remove leading # to turn on a very important data integrity option: logging
# changes to the binary log between backups.
# log_bin

# These are commonly set, remove the # and set as required.
# basedir = .....
# datadir = .....
# port = .....
# server_id = .....
# socket = .....

# Remove leading # to set options mainly useful for reporting servers.
# The server defaults are faster for transactions and fast SELECTs.
# Adjust sizes as needed, experiment to find the optimal values.
# join_buffer_size = 128M
# sort_buffer_size = 2M
# read_rnd_buffer_size = 2M

sql_mode=NO_ENGINE_SUBSTITUTION,STRICT_TRANS_TABLES
1. 查找cnf
# 查看mysql读取配置文件的默认顺序

mysql --help|grep my.cnf
- 所有的位置都是没有配置文件的

# 查看mysql读取配置文件的默认顺序
mysqld --help --verbose | more

# 如果是修改为其他的777、666等mysql认为这是不安全的,所以自动忽略. 请将将文件权限改为mysql认可的664
sudo chmod 664 /etc/my.cnf
- 文件权限有误,被mysql忽略

2. my.cnf
- 自定义配置文件模板
/usr/local/mysql-5.7.17-macos10.12-x86_64/support-files/my-default.cnf
my-default.cnf复制并重命名/private/etc/my.cnf
3. 配置mysql可以导出任意目录
1. 查询配置
SHOW VARIABLES LIKE "secure_file_priv";

2 修改my.cnf
- my.cnf最后增加一行,=后有空格,重启mysql
secure-file-priv=
3. 测试导出
select LOGIN_NAME, USER_CODE as authkey
from t_user
where CREATE_TIME = '2021-06-24 14:31:32' INTO OUTFILE '/Users/list/Documents/user2.xlsx';
5. 卸载
sudo rm /usr/local/mysql
sudo rm -rf /usr/local/mysql*
sudo rm -rf /Library/StartupItems/MySQLCOM
sudo rm -rf /Library/PreferencePanes/My*
rm -rf ~/Library/PreferencePanes/My*
sudo rm -rf /Library/Receipts/mysql*
sudo rm -rf /Library/Receipts/MySQL*
sudo rm -rf /var/db/receipts/com.mysql.*
2. backup
1. 网址
3. 数据类型
1. tinyint
- mysql中tinyint(1)与tinyint(2)的区别
- 当指定了zerofill时才生效
CREATE TABLE `test` (
          `id` int(11) NOT NULL AUTO_INCREMENT,
          `str` varchar(255) NOT NULL,
          `state` tinyint(1) unsigned zerofill DEFAULT NULL,
          `state2` tinyint(2) unsigned zerofill DEFAULT NULL,
          `state3` tinyint(3) unsigned zerofill DEFAULT NULL,
          `state4` tinyint(4) unsigned zerofill DEFAULT NULL,
          PRIMARY KEY (`id`)
        ) ENGINE=MyISAM AUTO_INCREMENT=6 DEFAULT CHARSET=utf8

insert into test (str,state,state2,state3,state4) values('csdn',4,4,4,4);

select * from test;
id  str   state  state2  state3  state4
1  csdn 4     04     004    0004
- 2指的是存储宽度,不表示存储长度
- 如果列制定了zerofill 就会用0填充显示,例如tinyint(2)指定后2就会显示为02,自动左边补零
4. windows
1. 脚本
1. 启动
@echo off
echo start mysqlService...
pause
net start MySQL57
pause
echo 启动mysql服务完成,请确认有没有错误发生。
2. 停止
@echo off
echo 确定要停止mysqlService... 服务吗?
pause
net stop MySQL57

echo 停止mysqlService...服务完成,请确认有没有错误发生。
Pause