12-在线制作
1. 需求分析
在创建代码生成器时,能够让用户在线使用生成器制作工具,通过输入制作信息、上传模板文件,就能直接得到制作好的生成器
2. 核心设计
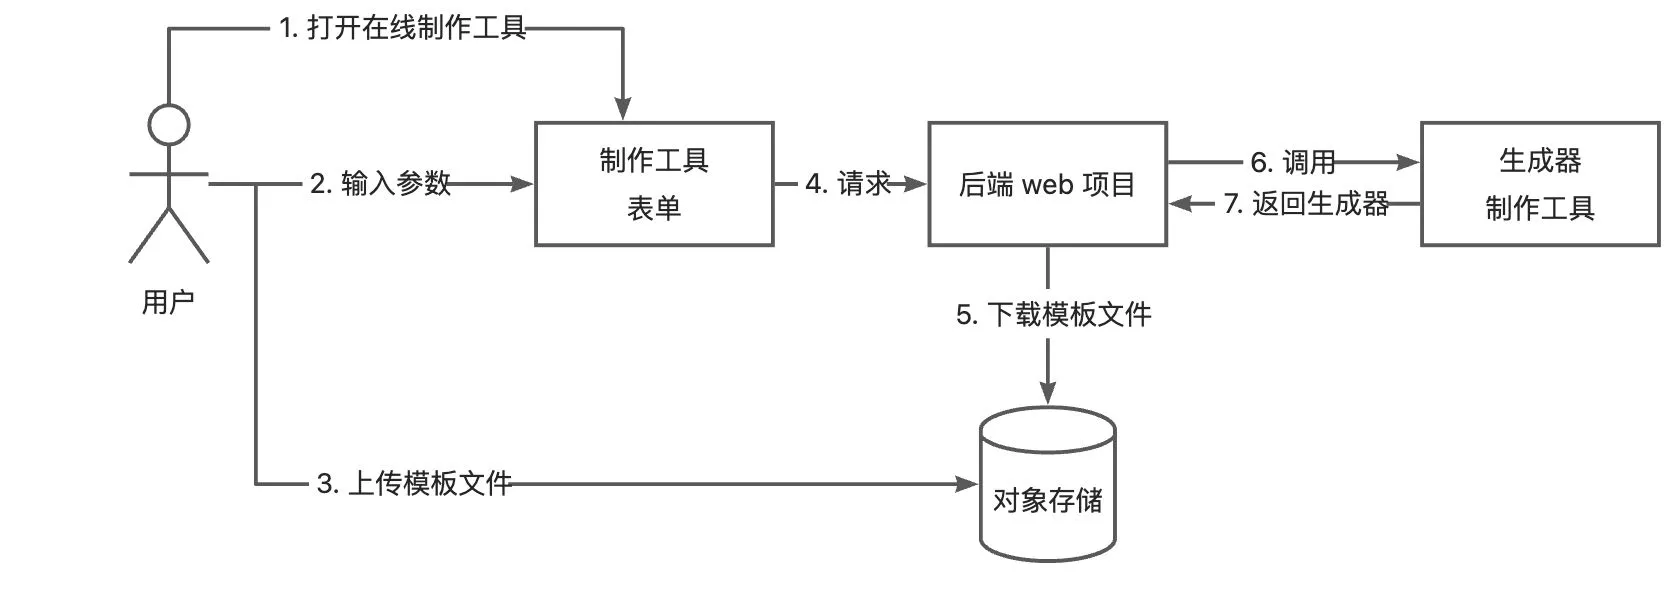
1. 业务流程
- 用户打开在线制作工具表单,上传生成器信息和模板文件(制作工具依赖的参数)
- 后端下载模板文件到本地
- 构造生成器需要的元信息对象,并指定输出路径
- 后端调用 maker 制作工具,输入上述参数,得到代码生成器
- 后端将代码生成器返回给用户,前端下载
2. 问题分析
- 制作工具所需要的信息和文件从哪来?
- web 后端怎么调用 maker 制作工具项目来制作生成器代码?
1. 制作工具所需信息从哪来
之前的创建页中,用户已经输入了基本信息和模型配置,只需要再让用户输入文件配置、并上传模板文件压缩包即可。相当于把制作工具融合在了创建生成器的流程中,而不用专门开发一个制作工具页面
2. 如何调用制作工具项目
约等于如何调用本地 Java 项目中的方法(接口)
- 如果 Java 项目使用 Maven 管理,那么可以作为依赖在 web 项目中引入
- 使用 web 框架改造本地 Java 项目,提供 Http 调用接口供调用
- 将 Java 项目制作为 jar 包,通过调用 jar 包的方式运行其方法
3. 后端开发
- 改造制作工具项目,支持传参调用
- 在线制作接口开发
1. 制作工具项目支持传参调用
- 修改 maker 项目的
GenerateTemplate,增加新方法,支持动态传入元信息(meta)和输出路径 (outputPath)。并且让原有无参方法调用该方法,遵循开闭原则,只新增不修改
public void doGenerate() throws TemplateException, IOException, InterruptedException {
    Meta meta = MetaManager.getMetaObject();
    String projectPath = System.getProperty("user.dir");
    String outputPath = projectPath + File.separator + "generated" + File.separator + meta.getName();
    doGenerate(meta,outputPath);
}

public void doGenerate(Meta meta, String outputPath) throws TemplateException, IOException, InterruptedException {
    if (!FileUtil.exist(outputPath)) {
        FileUtil.mkdir(outputPath);
    }

    // 1、复制原始文件
    String sourceCopyDestPath = copySource(meta, outputPath);

    // 2、代码生成
    generateCode(meta, outputPath);

    // 3、构建 jar 包
    String jarPath = buildJar(meta, outputPath);

    // 4、封装脚本
    String shellOutputFilePath = buildScript(outputPath, jarPath);

    // 5、生成精简版的程序(产物包)
    buildDist(outputPath, sourceCopyDestPath, jarPath, shellOutputFilePath);
}
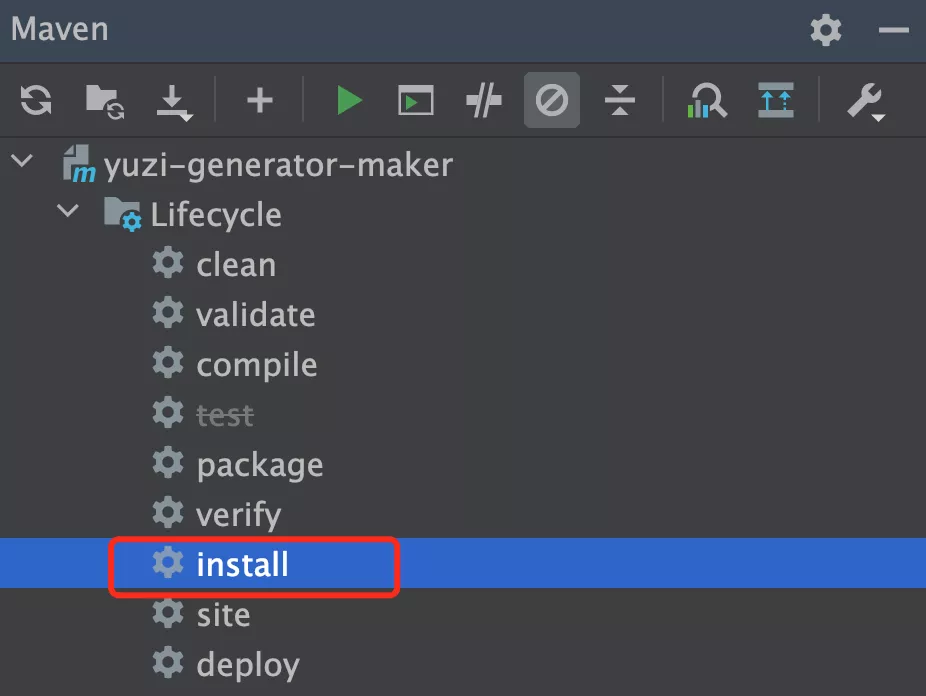
- 使用 Maven 打包 maker 项目依赖
- 通过 IDEA 界面或者命令行工具执行
mvn install即可
- 通过 IDEA 界面或者命令行工具执行
- 在 web 后端项目中引入 maker 项目依赖包
- 最好手动引入和 maker 项目一致的 freemarker 依赖版本,防止可能的冲突
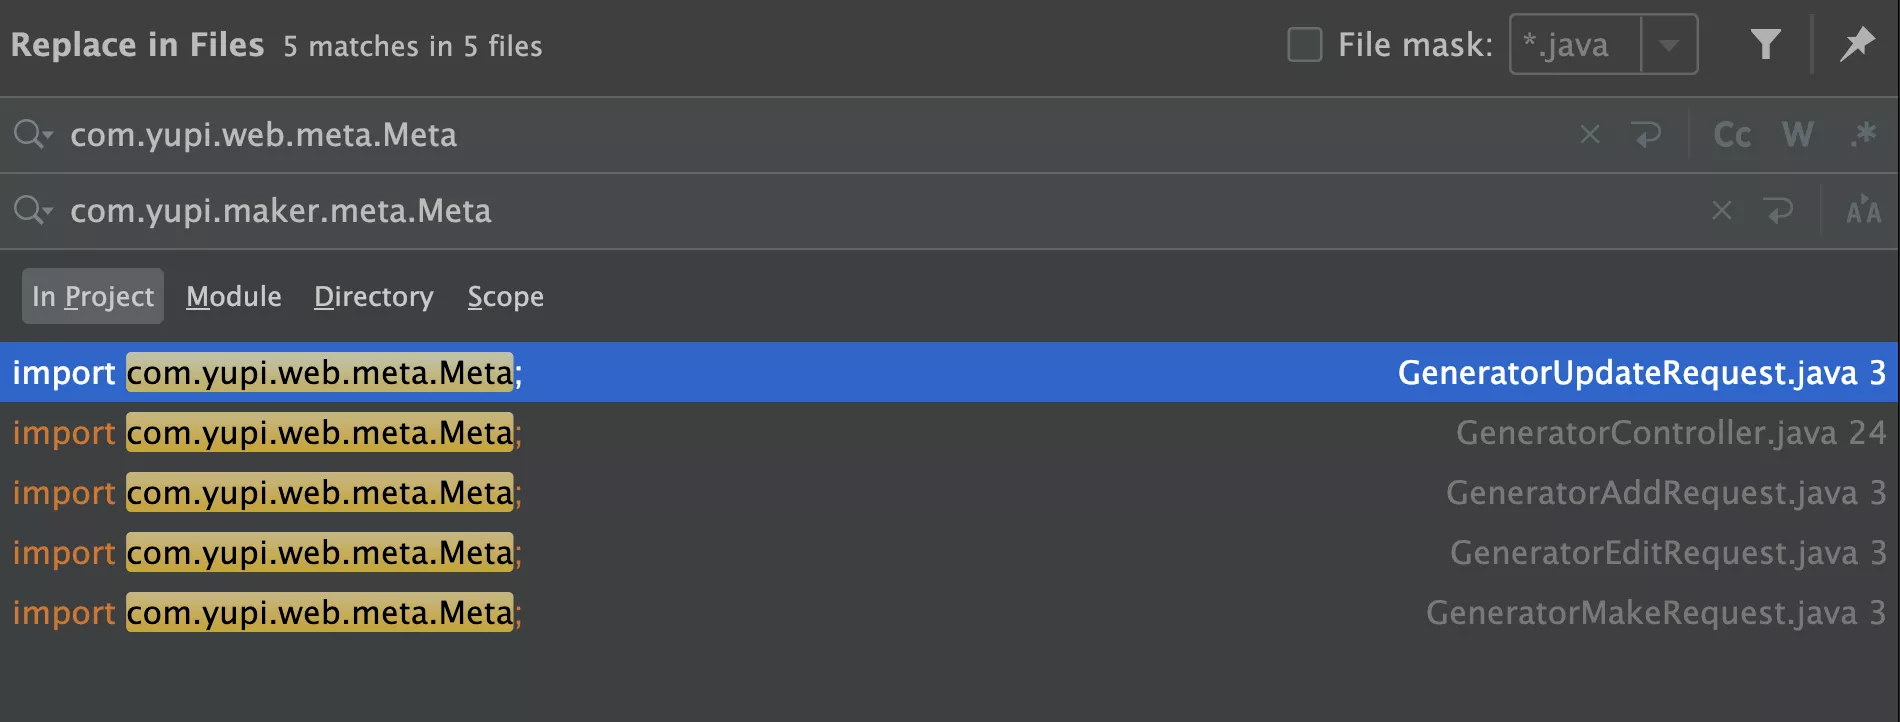
- 将 web 项目中自己复制的 Meta 类删除,替换为 maker 包的 Meta 类
<!-- 引入 maker 项目 -->
<dependency>
    <groupId>com.yupi</groupId>
    <artifactId>yuzi-generator-maker</artifactId>
    <version>1.0-SNAPSHOT</version>
</dependency>
<!-- https://freemarker.apache.org/index.html -->
<dependency>
    <groupId>org.freemarker</groupId>
    <artifactId>freemarker</artifactId>
    <version>2.3.32</version>
</dependency>
全局替换包名即可
- 处理资源路径问题
- 非常重要! 在 maker 项目中,需要读取
resources目录下的 FTL 模板文件来生成代码,之前是通过路径拼接的方式获取的。但是,项目被制作为 jar 包被其他项目引入后,无法再通过文件路径获取模板文件 - 解决方案是:不再通过文件路径获取资源,而是通过类加载器,根据资源的相对路径获取
- 重写
DynamicFileGenerator的doGenerate(),改名为doGenerateByPath(),这样不用修改调用方代码
- 非常重要! 在 maker 项目中,需要读取
/**
 * 使用相对路径生成文件
 *
 * @param relativeInputPath 相对输入路径
 * @param outputPath        输出路径
 * @param model             数据模型
 * @throws IOException
 * @throws TemplateException
 */
public static void doGenerate(String relativeInputPath, String outputPath, Object model) throws IOException, TemplateException {
    // new 出 Configuration 对象,参数为 FreeMarker 版本号
    Configuration configuration = new Configuration(Configuration.VERSION_2_3_32);

    int lastSplitIndex = relativeInputPath.lastIndexOf("/");
    String basePackagePath = relativeInputPath.substring(0, lastSplitIndex);
    String templateName = relativeInputPath.substring(lastSplitIndex + 1);

    // 指定模板文件所在的路径
    ClassTemplateLoader templateLoader = new ClassTemplateLoader(DynamicFileGenerator.class, basePackagePath);
    configuration.setTemplateLoader(templateLoader);

    // 设置模板文件使用的字符集
    configuration.setDefaultEncoding("utf-8");

    // 创建模板对象,加载指定模板
    Template template = configuration.getTemplate(templateName);

    // 文件不存在则创建文件和父目录
    if (!FileUtil.exist(outputPath)) {
        FileUtil.touch(outputPath);
    }

    // 生成
    Writer out = new FileWriter(outputPath);
    template.process(model, out);

    // 生成文件后别忘了关闭哦
    out.close();
}

/**
 * 生成文件
 *
 * @param inputPath  模板文件输入路径
 * @param outputPath 输出路径
 * @param model      数据模型
 * @throws IOException
 * @throws TemplateException
 */
@Deprecated
public static void doGenerateByPath(String inputPath, String outputPath, Object model) throws IOException, TemplateException {
    // new 出 Configuration 对象,参数为 FreeMarker 版本号
    Configuration configuration = new Configuration(Configuration.VERSION_2_3_32);

    // 指定模板文件所在的路径
    File templateDir = new File(inputPath).getParentFile();
    configuration.setDirectoryForTemplateLoading(templateDir);

    // 设置模板文件使用的字符集
    configuration.setDefaultEncoding("utf-8");

    // 创建模板对象,加载指定模板
    String templateName = new File(inputPath).getName();
    Template template = configuration.getTemplate(templateName);

    // 文件不存在则创建文件和父目录
    if (!FileUtil.exist(outputPath)) {
        FileUtil.touch(outputPath);
    }

    // 生成
    Writer out = new FileWriter(outputPath);
    template.process(model, out);

    // 生成文件后别忘了关闭哦
    out.close();
}
修改 GenerateTemplate 的 generateCode(),只需修改输入资源路径变量即可,其他代码都不用改动!
软件开发的最小修改原则:在进行系统修改时,应该尽量只修改必要的部分,以最小化对现有系统的影响
protected void generateCode(Meta meta, String outputPath) throws IOException, TemplateException {
    String inputResourcePath = "";
}
2. 在线制作接口
- 定义接口:接受用户输入的元信息配置和模板文件路径,返回代码生成器文件
- 为了便于处理,用户上传的模板文件 必须遵循一定的规范
- 必须为压缩包,有利于后端下载
- 必须直接把所有模板文件在根目录打包,而不能多套一层项目目录
- web 后端的
FileUploadBizEnum文件上传枚举要新增业务类别,用于存储用户上传的模板文件压缩包:
- 为了便于处理,用户上传的模板文件 必须遵循一定的规范
GENERATOR_MAKE_TEMPLATE("生成器制作模板文件", "generator_make_template");
- 创建工作空间,从对象存储下载模板文件压缩包
- 先判断模板文件是否存在
- 定义一个独立的工作空间,用来存放下载的模板文件、其他临时文件等
- 使用之前开发过的
cosManager.download对象存储文件下载方法,下载压缩包
- 解压文件,得到项目模板文件
- 构造制作工具所需的参数,包括 Meta 对象和生成器文件输出路径
- 构造 Meta 对象时,一定要指定 sourceRootPath 为我们刚刚下载并解压的模板文件,才能让制作工具进行处理。并且还要调用
MetaValidator.doValidAndFill给 meta 对象填充默认值,这个流程和之前我们在 maker 制作工具内执行是一致的 - 输出路径就放到工作空间下的
generated目录中
- 构造 Meta 对象时,一定要指定 sourceRootPath 为我们刚刚下载并解压的模板文件,才能让制作工具进行处理。并且还要调用
- 调用制作工具
- 返回制作好的代码生成器压缩包
- 制作工具已经生成了代码生成器的压缩包,直接下载即可
- 清理文件
- 已经将结果返回给前端了,最后可以异步清理无用文件,目前可以直接清理整个工作空间
/**
 * 制作代码生成器
 *
 * @param generatorMakeRequest
 * @param request
 * @param response
 */
@PostMapping("/make")
public void makeGenerator(@RequestBody GeneratorMakeRequest generatorMakeRequest, HttpServletRequest request, HttpServletResponse response) throws IOException {
    // 1)输入参数
    String zipFilePath = generatorMakeRequest.getZipFilePath();
    Meta meta = generatorMakeRequest.getMeta();

    // 需要登录
    User loginUser = userService.getLoginUser(request);

    // 2)创建独立工作空间,下载压缩包到本地
    if (StrUtil.isBlank(zipFilePath)) {
        throw new BusinessException(ErrorCode.NOT_FOUND_ERROR, "压缩包不存在");
    }

    // 工作空间
    String projectPath = System.getProperty("user.dir");
    // 随机 id
    String id = IdUtil.getSnowflakeNextId() + RandomUtil.randomString(6);
    String tempDirPath = String.format("%s/.temp/make/%s", projectPath, id);
    String localZipFilePath = tempDirPath + "/project.zip";

    // 新建文件
    if (!FileUtil.exist(localZipFilePath)) {
        FileUtil.touch(localZipFilePath);
    }

    try {
        cosManager.download(zipFilePath, localZipFilePath);
    } catch (InterruptedException e) {
        throw new BusinessException(ErrorCode.SYSTEM_ERROR, "压缩包下载失败");
    }

    // 3)解压,得到项目模板文件
    File unzipDistDir = ZipUtil.unzip(localZipFilePath);

    // 4)构造 meta 对象和输出路径
    String sourceRootPath = unzipDistDir.getAbsolutePath();
    meta.getFileConfig().setSourceRootPath(sourceRootPath);
    MetaValidator.doValidAndFill(meta);
    String outputPath = String.format("%s/generated/%s", tempDirPath, meta.getName());

    // 5)调用 maker 方法制作生成器
    GenerateTemplate generateTemplate = new ZipGenerator();
    try {
        generateTemplate.doGenerate(meta, outputPath);
    } catch (Exception e) {
        e.printStackTrace();
        throw new BusinessException(ErrorCode.SYSTEM_ERROR, "制作失败");
    }

    // 6)下载压缩的产物包文件
    String suffix = "-dist.zip";
    String zipFileName = meta.getName() + suffix;
    String distZipFilePath = outputPath + suffix;

    // 下载文件
    // 设置响应头
    response.setContentType("application/octet-stream;charset=UTF-8");
    response.setHeader("Content-Disposition", "attachment; filename=" + zipFileName);
    // 写入响应
    Files.copy(Paths.get(distZipFilePath), response.getOutputStream());

    // 7)清理文件
    CompletableFuture.runAsync(() -> {
        FileUtil.del(tempDirPath);
    });
}
3. 接口测试
- 首先要准备模板文件压缩包,可以直接压缩
yuzi-generator-demo-projects/acm-template-pro项目。注意要遵循规范,进入到目录中全选文件打包,不要把项目目录也打包进去了 - 利用已有的前端文件上传,将压缩包上传到对象存储,得到临时的文件路径(zipFilePath)
- Swagger 接口文档,复制 maker 项目中的
meta.json,作为请求参数的元信息来测试(移除fileConfig根层级的配置)
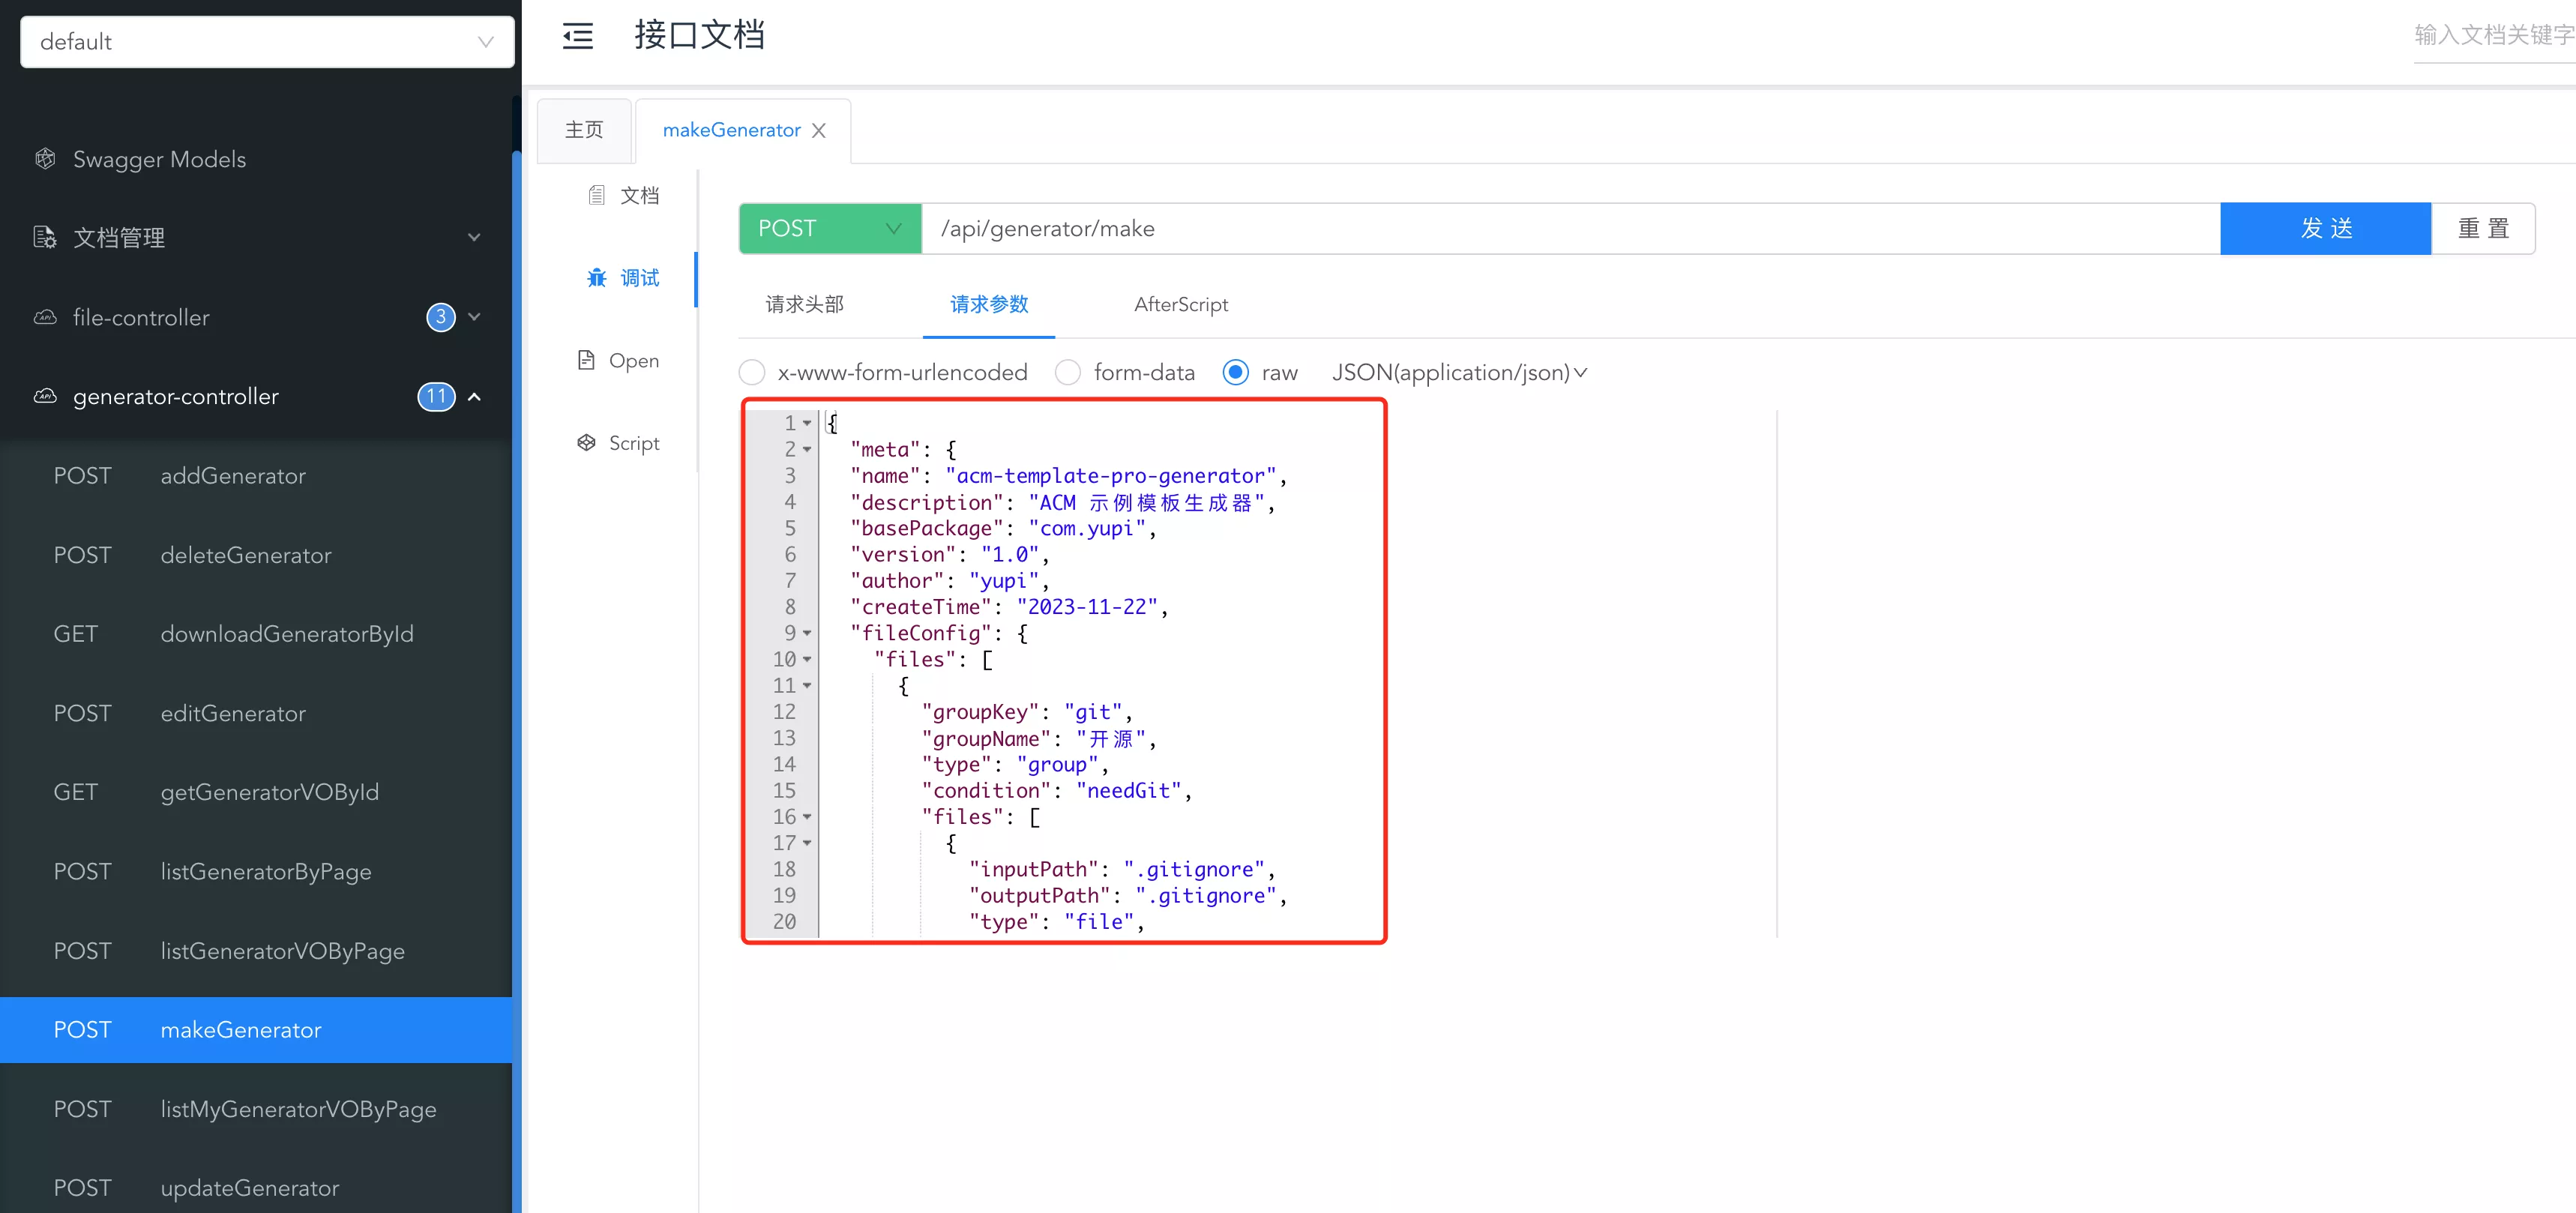
{
  "meta": {
    "name": "acm-template-pro-generator",
    "description": "ACM 示例模板生成器",
    "basePackage": "com.yupi",
    "version": "1.0",
    "author": "yupi",
    "createTime": "2023-11-22",
    "fileConfig": {
      "type": "dir",
      "files": [
        {
          "groupKey": "git",
          "groupName": "开源",
          "type": "group",
          "condition": "needGit",
          "files": [
            {
              "inputPath": ".gitignore",
              "outputPath": ".gitignore",
              "type": "file",
              "generateType": "static"
            },
            {
              "inputPath": "README.md",
              "outputPath": "README.md",
              "type": "file",
              "generateType": "static"
            }
          ]
        },
        {
          "inputPath": "src/com/yupi/acm/MainTemplate.java.ftl",
          "outputPath": "src/com/yupi/acm/MainTemplate.java",
          "type": "file",
          "generateType": "dynamic"
        }
      ]
    },
    "modelConfig": {
      "models": [
        {
          "fieldName": "needGit",
          "type": "boolean",
          "description": "是否生成 .gitignore 文件",
          "defaultValue": true
        },
        {
          "fieldName": "loop",
          "type": "boolean",
          "description": "是否生成循环",
          "defaultValue": false,
          "abbr": "l"
        },
        {
          "groupKey": "mainTemplate",
          "groupName": "核心模板",
          "type": "MainTemplate",
          "description": "用于生成核心模板文件",
          "condition": "loop",
          "models": [
            {
              "fieldName": "author",
              "type": "String",
              "description": "作者注释",
              "defaultValue": "yupi",
              "abbr": "a"
            },
            {
              "fieldName": "outputText",
              "type": "String",
              "description": "输出信息",
              "defaultValue": "sum = ",
              "abbr": "o"
            }
          ]
        }
      ]
    }
  },
  "zipFilePath": "generator_make_template/1867463332429049858/I1lxcfeV-Archive.zip"
}
4. 前端页面开发
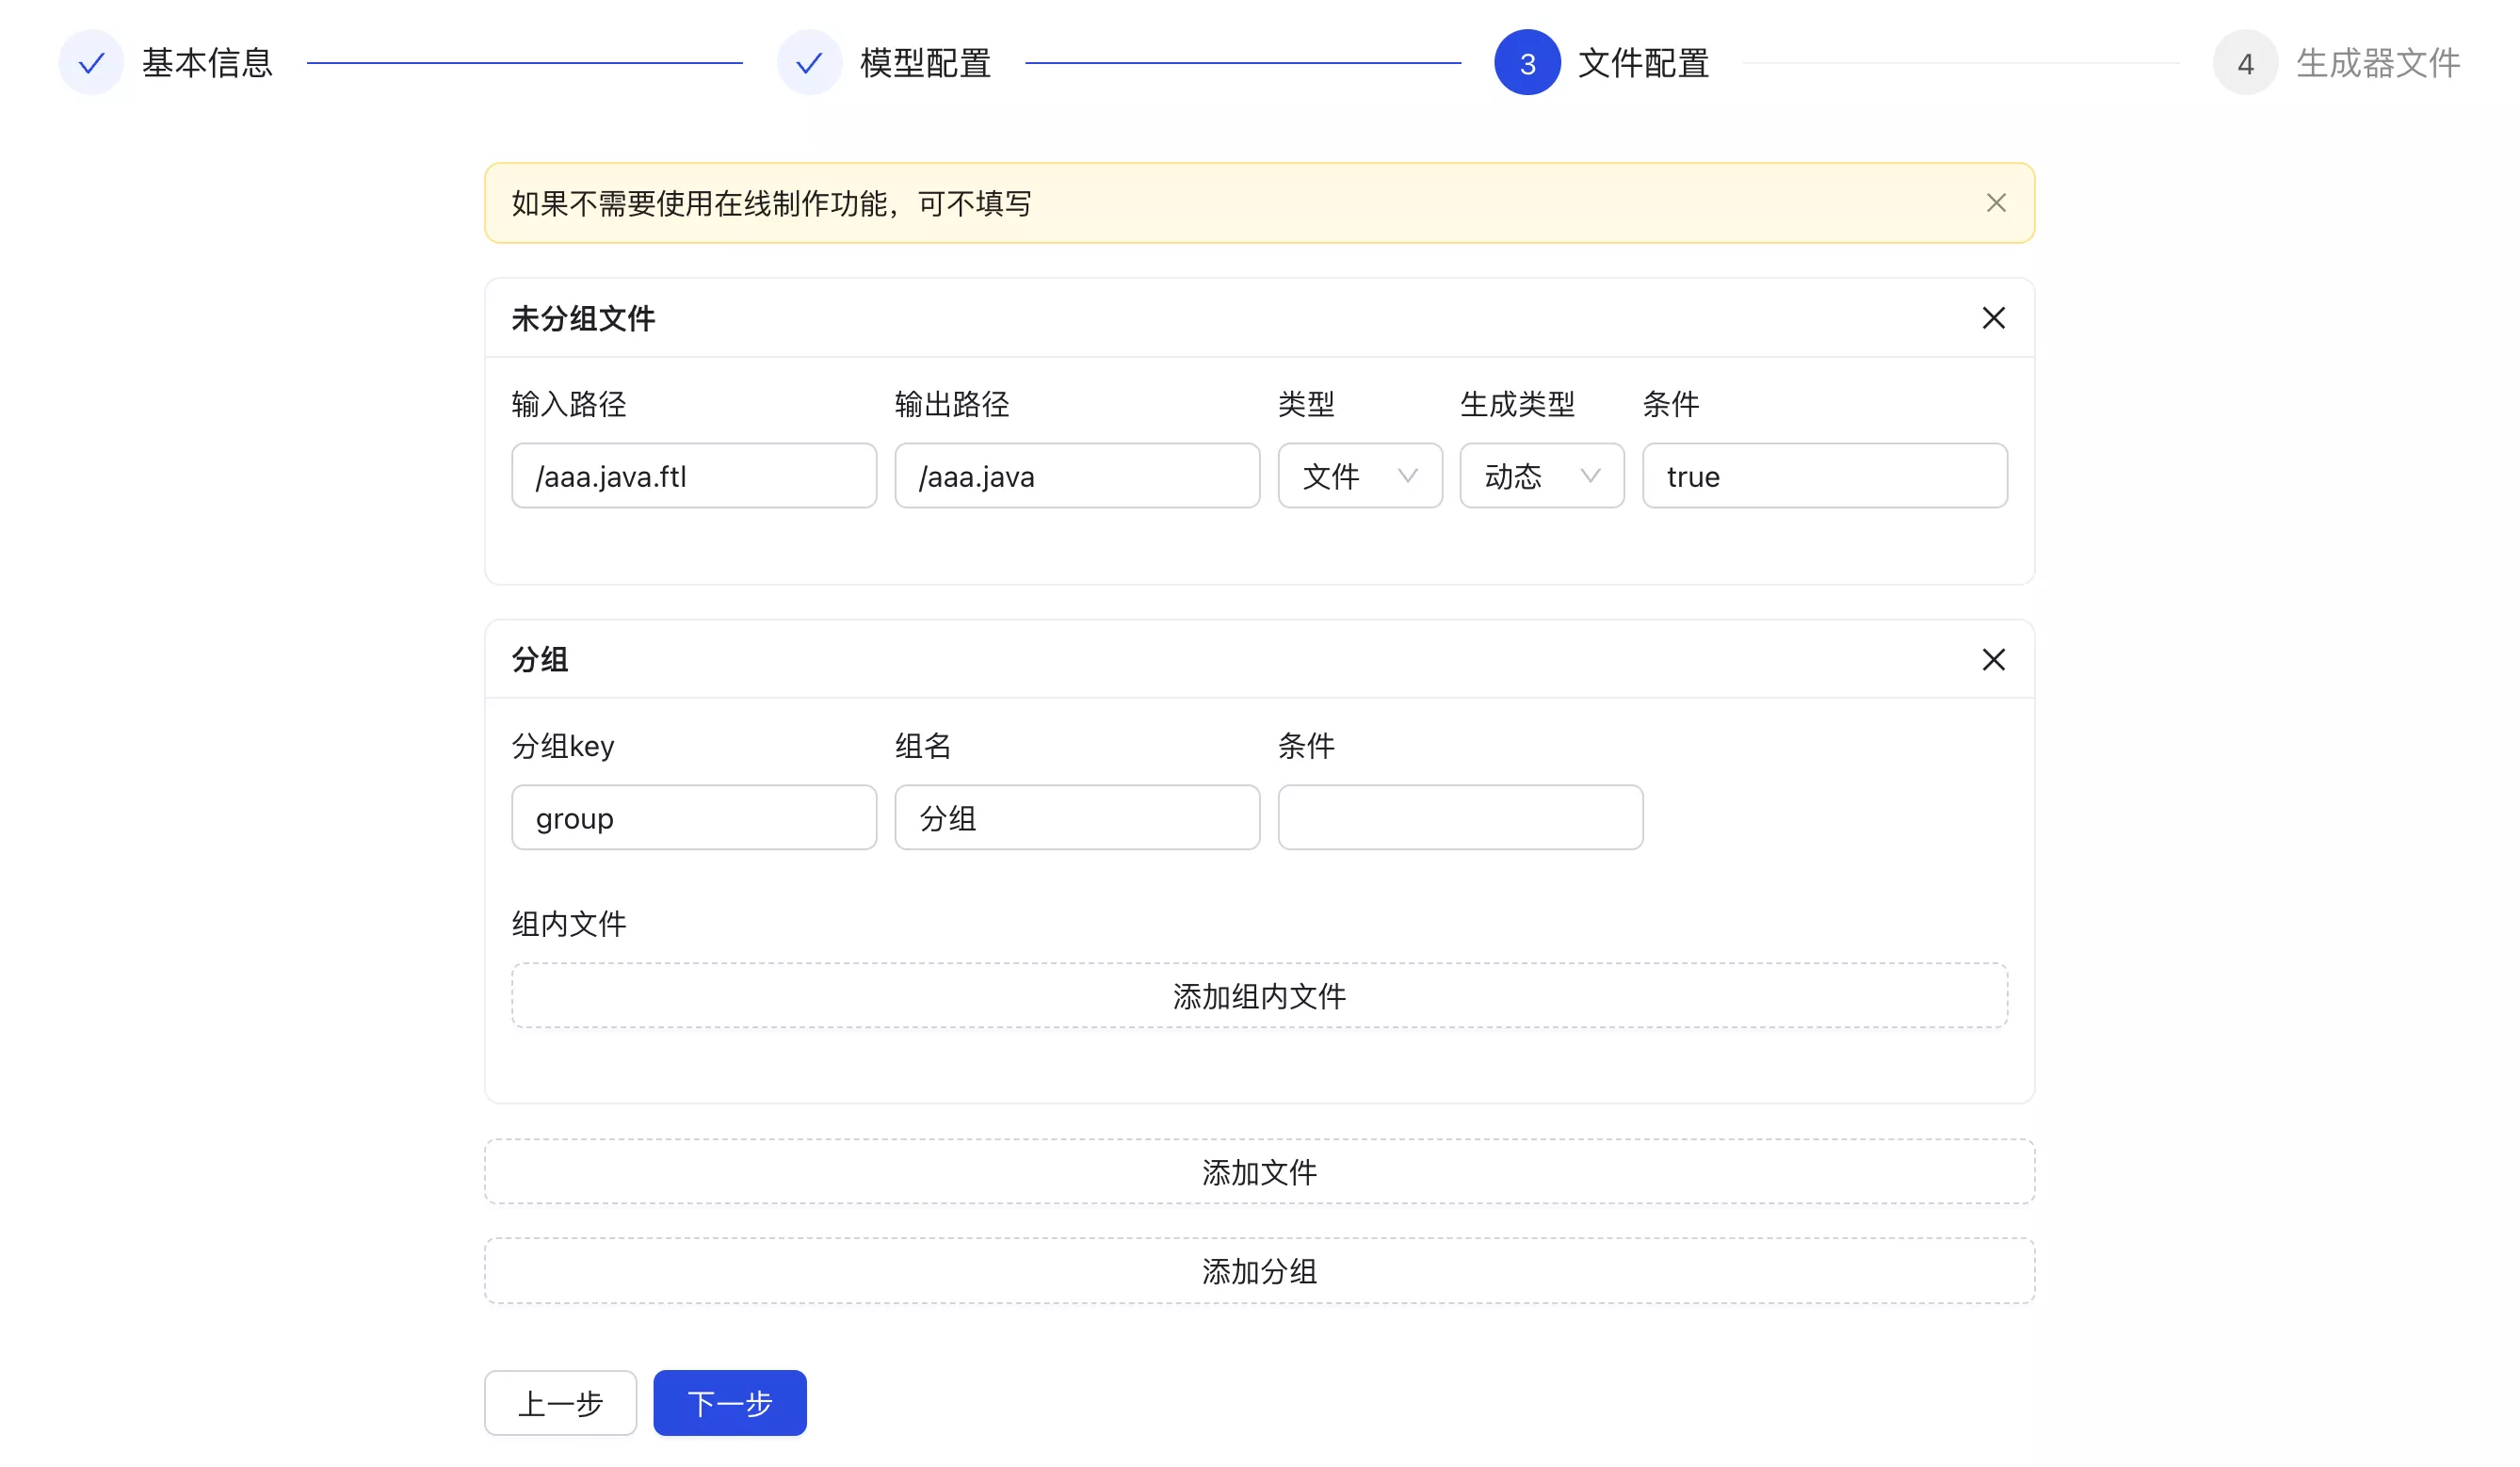
1. 创建生成器的文件配置
1. 开发
- 参考模型配置表单组件,复制为
FileConfigForm组件,在此基础上进行开发
- 页面开发
- 全局替换部分变量。eg:
model替换为file、模型替换为文件 - 修改表单项,部分选项可枚举的表单项使用 Select 下拉选择组件
- 全局替换部分变量。eg:
<Form.Item label="类型" name={[field.name, 'type']}>
  <Select
    style={{
      minWidth: 80,
    }}
    options={[
      { value: 'file', label: '文件' },
      { value: 'dir', label: '目录' },
    ]}
  />
</Form.Item>
<Form.Item label="生成类型" name={[field.name, 'generateType']}>
  <Select
    style={{
      minWidth: 80,
    }}
    options={[
      { value: 'static', label: '静态' },
      { value: 'dynamic', label: '动态' },
    ]}
  />
</Form.Item>
需要注意,如果用户添加文件分组,要在默认值中补充分组信息(尤其是 type = group)
  <Button
    type="dashed"
    onClick={() =>
      add({
        groupName: '分组',
        groupKey: 'group',
        type: 'group',
      })
    }
  >
    添加分组
  </Button>
- 体验优化
- 在创建生成器的过程中,因为文件配置是否填写都不影响用户的使用、而且用户一般并不关注,所以文件配置的填写优先级不高。可以将它和模型配置更换位置
- 增加提示语 “如果不需要使用在线制作功能,可不填写”,降低用户创建生成器的成本
<StepsForm.StepForm name="modelConfig" title="模型配置">
  <ModelConfigForm formRef={formRef} oldData={oldData} />
</StepsForm.StepForm>
<StepsForm.StepForm name="fileConfig" title="文件配置">
  <FileConfigForm formRef={formRef} oldData={oldData} />
</StepsForm.StepForm>
<Alert message="如果不需要使用在线制作功能,可不填写" type="warning" closable />
- 测试创建和修改
2. 完整代码
import { CloseOutlined } from '@ant-design/icons';
import { Alert, Button, Card, Form, FormListFieldData, Input, Select, Space } from 'antd';

interface Props {
  formRef: any;
  oldData: any;
}

export default (props: Props) => {
  const { formRef, oldData } = props;

  /**
   * 单个文件表单视图
   * @param field
   * @param remove
   */
  const singleFieldFormView = (
    field: FormListFieldData,
    remove?: (index: number | number[]) => void,
  ) => {
    return (
      <Space key={field.key}>
        <Form.Item label="输入路径" name={[field.name, 'inputPath']}>
          <Input />
        </Form.Item>
        <Form.Item label="输出路径" name={[field.name, 'outputPath']}>
          <Input />
        </Form.Item>
        <Form.Item label="类型" name={[field.name, 'type']}>
          <Select
            style={{
              minWidth: 80,
            }}
            options={[
              { value: 'file', label: '文件' },
              { value: 'dir', label: '目录' },
            ]}
          />
        </Form.Item>
        <Form.Item label="生成类型" name={[field.name, 'generateType']}>
          <Select
            style={{
              minWidth: 80,
            }}
            options={[
              { value: 'static', label: '静态' },
              { value: 'dynamic', label: '动态' },
            ]}
          />
        </Form.Item>
        <Form.Item label="条件" name={[field.name, 'condition']}>
          <Input />
        </Form.Item>
        {remove && (
          <Button type="text" danger onClick={() => remove(field.name)}>
            删除
          </Button>
        )}
      </Space>
    );
  };

  return (
    <>
      <Alert message="如果不需要使用在线制作功能,可不填写" type="warning" closable />
      <div style={{ marginBottom: 16 }} />
      <Form.List name={['fileConfig', 'files']}>
        {(fields, { add, remove }) => {
          return (
            <div style={{ display: 'flex', rowGap: 16, flexDirection: 'column' }}>
              {fields.map((field) => {
                const fileConfig =
                  formRef?.current?.getFieldsValue()?.fileConfig ?? oldData?.fileConfig;
                const groupKey = fileConfig.files?.[field.name]?.groupKey;

                return (
                  <Card
                    size="small"
                    title={groupKey ? '分组' : '未分组文件'}
                    key={field.key}
                    extra={
                      <CloseOutlined
                        onClick={() => {
                          remove(field.name);
                        }}
                      />
                    }
                  >
                    {groupKey ? (
                      <Space>
                        <Form.Item label="分组key" name={[field.name, 'groupKey']}>
                          <Input />
                        </Form.Item>
                        <Form.Item label="组名" name={[field.name, 'groupName']}>
                          <Input />
                        </Form.Item>
                        <Form.Item label="条件" name={[field.name, 'condition']}>
                          <Input />
                        </Form.Item>
                      </Space>
                    ) : (
                      singleFieldFormView(field)
                    )}

                    {/* 组内文件 */}
                    {groupKey && (
                      <Form.Item label="组内文件">
                        <Form.List name={[field.name, 'files']}>
                          {(subFields, subOpt) => (
                            <div
                              style={{
                                display: 'flex',
                                flexDirection: 'column',
                                rowGap: 16,
                              }}
                            >
                              {subFields.map((subField) =>
                                singleFieldFormView(subField, subOpt.remove),
                              )}
                              <Button type="dashed" onClick={() => subOpt.add()} block>
                                添加组内文件
                              </Button>
                            </div>
                          )}
                        </Form.List>
                      </Form.Item>
                    )}
                  </Card>
                );
              })}
              <Button type="dashed" onClick={() => add()}>
                添加文件
              </Button>
              <Button
                type="dashed"
                onClick={() =>
                  add({
                    groupName: '分组',
                    groupKey: 'group',
                    type: 'group',
                  })
                }
              >
                添加分组
              </Button>
              <div style={{ marginBottom: 16 }} />
            </div>
          );
        }}
      </Form.List>
    </>
  );
};
2. 制作生成器功能
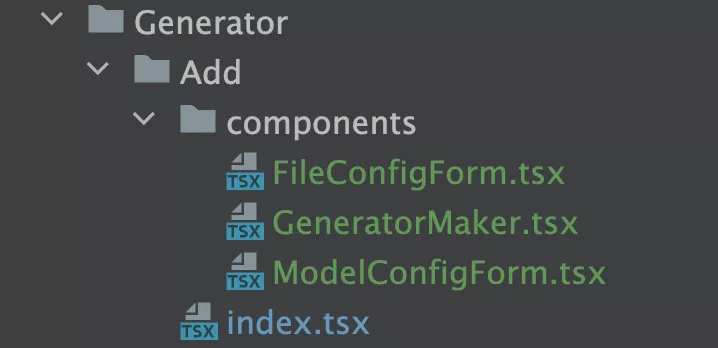
1. 开发
- 新建
GeneratorMaker组件- 接受用户已填写的 meta 信息,作为属性
- 创建页面引入该组件
- 由于 Ant Design 的分步表单组件中,通过
formRef.current.getFieldsValue得到的表单值始终只有当前步骤的,不包括之前已填写的,无法直接传递给生成器制作组件 - 需要定义三个状态变量,记录表单数据。每一个分步表单中,增加
onFinish函数,用户点击 “下一步” 时,会更新内容到状态变量中 - 将生成器制作组件放到上传生成器文件的表单底部,并传递状态变量
- 由于 Ant Design 的分步表单组件中,通过
- 组件开发
- 结构比较简单,主要是一个文件上传表单,并且在外层使用折叠组件,可以控制表单的展开和收纳
- 编写提交表单的函数,和之前的文件上传逻辑类似,提交表单时需要校验、并将 file 对象转为 url 路径
- 测试

import FileUploader from '@/components/FileUploader';
import { makeGeneratorUsingPost } from '@/services/backend/generatorController';
import { ProForm, ProFormItem } from '@ant-design/pro-form';
import { Collapse, Form, message } from 'antd';
import { saveAs } from 'file-saver';

interface Props {
  meta: API.GeneratorAddRequest | API.GeneratorEditRequest;
}

/**
 * 生成器制作
 * @param props
 */
export default (props: Props) => {
  const { meta } = props;
  const [form] = Form.useForm();

  /**
   * 提交
   * @param values
   */
  const doSubmit = async (values: API.GeneratorMakeRequest) => {
    // 校验
    if (!meta.name) {
      message.error('请填写名称');
      return;
    }

    const zipFilePath = values.zipFilePath;
    if (!zipFilePath || zipFilePath.length < 1) {
      message.error('请上传模板文件压缩包');
      return;
    }

    // 文件列表转 url
    // @ts-ignore
    values.zipFilePath = zipFilePath[0].response;

    try {
      const blob = await makeGeneratorUsingPost(
        {
          meta,
          zipFilePath: values.zipFilePath,
        },
        {
          responseType: 'blob',
        },
      );
      // 使用 file-saver 来保存文件
      saveAs(blob, meta.name + '.zip');
    } catch (error: any) {
      message.error('下载失败,' + error.message);
    }
  };

  /**
   * 表单视图
   */
  const formView = (
    <ProForm
      form={form}
      submitter={{
        searchConfig: {
          submitText: '制作',
        },
        resetButtonProps: {
          hidden: true,
        },
      }}
      onFinish={doSubmit}
    >
      <ProFormItem label="模板文件" name="zipFilePath">
        <FileUploader
          biz="generator_make_template"
          description="请上传压缩包,打包时不要添加最外层目录!"
        />
      </ProFormItem>
    </ProForm>
  );

  return (
    <Collapse
      style={{
        marginBottom: 24,
      }}
      items={[
        {
          key: 'maker',
          label: '生成器制作工具',
          children: formView,
        },
      ]}
    />
  );
};
5. 扩展思路
- 填写文件配置信息是个比较麻烦的操作,能否支持先上传模板文件,然后自动生成文件配置信息?或者支持上传文件夹,自动识别出文件列表?
- 支持传入
meta.json元信息配置文件来创建生成器。用户如果使用本地模板制作工具得到了现成的元信息文件,就能够在制作完成后直接创建、自动填充表单、再二次修改,不用完全从 0 开始在前端填写 - 给代码生成器增加更多状态。eg:制作中、打包中、待发布、审核中、已发布,设置一套完备的状态流转逻辑
- 补充前后端的异常处理逻辑。eg:后端响应异常时,前端仍然能下载文件