03-命令行开发
1. 开发方案
1. 命令行程序
- 命令行程序俗称 CLI(Command Line Interface),是指通过命令行界面运行的应用程序。通过终端窗口接收用户输入的 纯文本 命令,并执行相应的任务
- 一些常见的命令行环境包括 Unix/Linux 的终端、Windows 的命令提示符和 PowerShell 等。可能没有开发过命令行程序,但一定都接触过终端
2. 结构
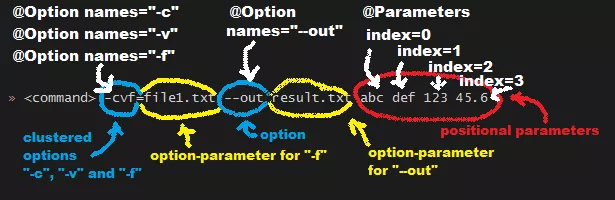
输入给命令行的命令通常包含:
command:命令类型,具体要做的事option:选项,用于改变命令的行为parameter:参数,传递给命令行工具的值
3. 优点
- 不依赖于特定的图形界面,非常轻量
- 通常可以直接在操作系统自带的终端环境中运行
- 可以和用户交互、给用户输入引导和帮助手册
- 内置一些快捷操作(查看历史命令、上下切换命令)
最大的优点 —— 简单直接。eg:复制粘贴别人写好的命令就能执行,而不用像使用网页一样点击多次,非常符合程序员的使用习惯
generate --loop --author yupi --outputText good
➜  01-local-generator git:(main) ✗# ./generator.sh generate  -l -o -a
Enter value for --loop (是否循环): true
Enter value for --outputText (输出文本): ooxx
Enter value for --author (作者): listao
配置信息:DataModel(loop=true, author=listao, outputText=ooxx)
outputPath = /Users/listao/mca/listao_generator/01-local-generator/.tmp
4. 实现方案
1. 自主实现
使用 Java 内置的类库自主实现(eg:通过 Scanner 读取用户的输入)
Scanner scanner = new Scanner(System.in);

while (scanner.hasNext()) {
    // 读取整数
    int number = scanner.nextInt();
}
缺点:
- 需要自主解析用户的输入
- 命令可能非常复杂,包含各种选项和参数,而且用户还可能乱序输入不同的参数
- 需要自主编写一套获取参数的交互流程
- 用户输入了异常值怎么办?是中断程序还是给出提示?给出什么提示?这些都要开发者自己考虑
- 需要自主实现更多高级功能
- 基本所有命令行工具都有帮助手册命令(
--help)、颜色高亮等
- 基本所有命令行工具都有帮助手册命令(
2. 第三方库
充分的调研了几种经典的 Java 命令行开发相关库
- 命令行工具开发框架
- ⭐️ Picocli:优点是 GitHub 的 star 数多(4k+)、持续更新,支持颜色高亮、自动补全、子命令、帮助手册等,最推荐
- 控制台输入处理库
- 命令行解析库
- ⭐️ JCommander:注解驱动,可以直接把命令映射到对象上,从而大幅简化代码。GitHub 上近 2k star,比较推荐
- Apache Commons CLI:简单易用,但是功能不够多。参考教程
- Jopt Simple:不推荐。冷门、很久没维护、star 数少、生态不好
public class JCommanderTest {

   @Parameter
   public List<String> parameters = Lists.newArrayList();

   @Parameter(names = { "-log", "-verbose" }, description = "Level of verbosity")
   public Integer verbose = 1;

   @Parameter(names = "-groups", description = "Comma-separated list of group names to be run")
   public String groups;

   @Parameter(names = "-debug", description = "Debug mode")
   public boolean debug = false;

   @DynamicParameter(names = "-D", description = "Dynamic parameters go here")
   public Map<String, String> dynamicParams = new HashMap<String, String>();

}
2. Picocli入门
1. 入门 Demo
<!-- https://picocli.info -->
<dependency>
    <groupId>info.picocli</groupId>
    <artifactId>picocli</artifactId>
    <version>4.7.5</version>
</dependency>
package com.listao.cli.cmd_line;

import picocli.CommandLine;
import picocli.CommandLine.Command;
import picocli.CommandLine.Option;
import picocli.CommandLine.Parameters;

/**
 * 2. mixinStandardHelpOptions:添加标准的帮助选项(-h, --help)
 */
@Command(name = "ASCIIArt", version = "ASCIIArt 1.0", mixinStandardHelpOptions = true)
// 1. 实现 `Runnable`、`Callable` 接口
public class ASCIIArt implements Runnable {

    // 3. `@Option` 注解将字段设置为命令行选项,可以给选项设置名称和描述
    @Option(names = { "-s", "--font-size" }, description = "Font size")
    int fontSize = 19;

    // 4. 通过 `@Parameters` 注解将字段设置为命令行参数,可以指定默认值、描述等信息
    @Parameters(paramLabel = "<word>", defaultValue = "Hello, picocli",
               description = "Words to be translated into ASCII art.")
    // 5. Picocli 会将命令行参数转换为强类型值,并自动注入到注解字段中
    private String[] words = { "Hello,", "picocli" };

    /**
     * 6. 在类的 `run` 或 `call` 方法中定义业务逻辑,当命令解析成功(用户敲了回车)后被调用
     */
    @Override
    public void run() {
        // 自己实现业务逻辑
        System.out.println("fontSize = " + fontSize);
        System.out.println("words = " + String.join(",", words));
    }

    public static void main(String[] args) {
        // args = new String[]{"-h"};
        args = new String[]{"xxx", "ooxx", "xxox"};
        // 7. 通过 `CommandLine` 对象的 `execute` 方法来处理用户输入的命令,剩下的就交给 Picocli 框架来解析命令并执行业务逻辑
        int exitCode = new CommandLine(new ASCIIArt()).execute(args);
        // 8. 返回的退出代码。可以调用 `System.exit` 并将该退出代码作为参数,从而向调用进程表示成功或失败
        System.exit(exitCode);
    }

}
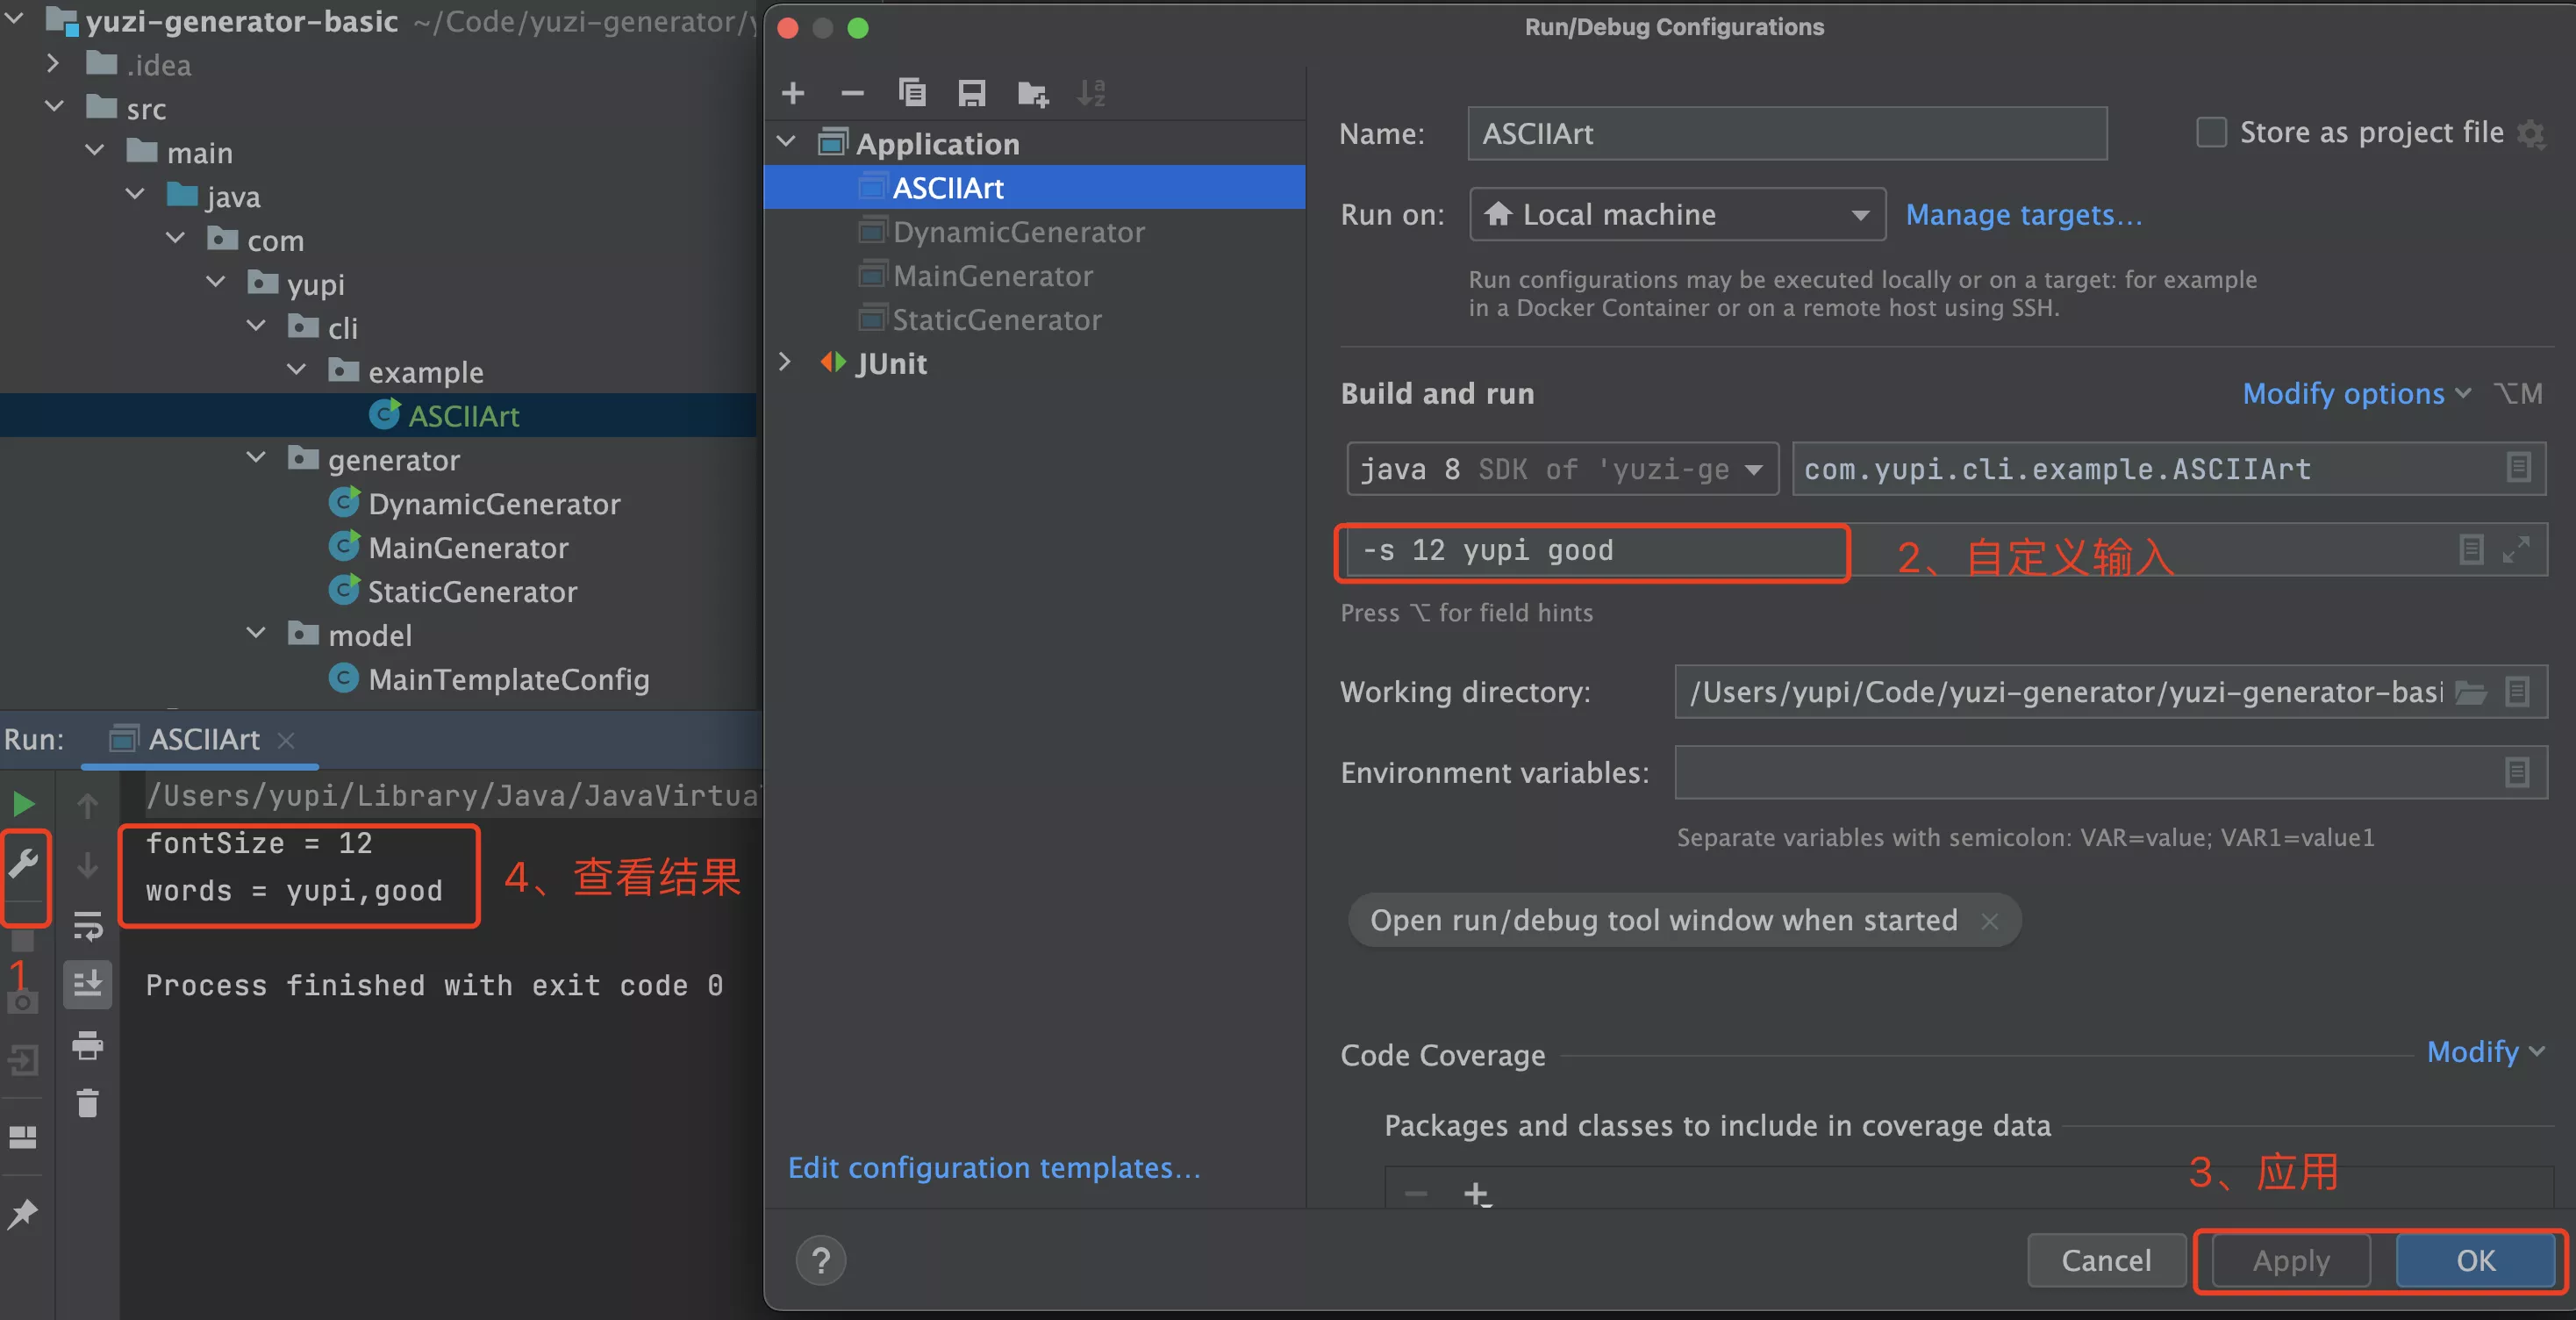
更改主程序的执行参数(args)来测试程序
2. 实用功能
1. 帮助手册
@Command(name = "ASCIIArt", mixinStandardHelpOptions = true)
Picocli 生成的帮助手册不仅规范、而且清晰完整
Usage: ASCIIArt [-hV] [-s=<fontSize>] [<word>...]
      [<word>...]   Words to be translated into ASCII art.
  -h, --help        Show this help message and exit.
  -s, --font-size=<fontSize>
                    Font size
  -V, --version     Print version information and exit.
2. 命令解析
Picocli 核心能力就是命令解析,从一句完整的命令中解析选项和参数,并使用注解的方式填充到对象的属性中
最核心的 2 个注解:

@Option注解用于解析选项names:指定选项英文名称description:指定描述信息,从而让生成的帮助手册和提示信息更清晰- 命令解析天然支持 多值选项 ,只需要把对象属性的类型设置为数组类型即可
@Option(names = "-option")
int[] values;
@Parameters注解用于解析参数
3. 交互式输入
允许用户像跟程序聊天一样,在程序的指引下一个参数一个参数地输入
1. 基本能力
交互式输入的一个典型应用场景就是:用户要登录时,引导输入密码
package com.listao.cli.cmd_line;

import picocli.CommandLine;
import picocli.CommandLine.Option;

import java.util.concurrent.Callable;

/**
 * 交互式输入
 */
// 1. 首先命令类需要实现 `Callable` 接口
public class Login implements Callable<Integer> {

    @Option(names = {"-u", "--user"}, description = "User name")
    String user;

    // 设置了 arity 参数,可选交互式
    // 2. 将 `@Option` 注解的 `interactive` 参数设置为 true,表示该选项支持交互式输入
    @Option(names = {"-p", "--password"}, arity = "0..1", description = "Passphrase", interactive = true)
    String password;

    // 设置了 arity 参数,可选交互式
    @Option(names = {"-cp", "--checkPassword"}, arity = "0..1", description = "Check Password", interactive = true)
    String checkPassword;

    // 3. 在所有参数都输入完成后,会执行 `call` 方法,可以在该方法中编写具体的业务逻辑
    public Integer call() {
        System.out.println("user = " + user);
        System.out.println("password = " + password);
        System.out.println("checkPassword = " + checkPassword);
        return 0;
    }

    // 4. 在 Main 方法中执行命令并传入参数:
    public static void main(String[] args) {
        new CommandLine(new Login())
                // .execute("-u", "user123", "-p", "123", "-cp", "456");
                // 必须指定 -p,才会触发交互式输入
                .execute("-u", "user123", "-p");
                // .execute("-h");
    }

}
Enter value for --password (Passphrase): 123456
user = user123
password = 123456
checkPassword = null
注意,如果以 jar 包方式运行上述程序,用户的输入默认是不会显示在控制台的(类似输入密码时的体验)。从 Picocli 4.6 版本开始
- 通过指定
@Option注解的echo参数为 true 来显示用户的输入 - 通过
prompt参数指定引导用户输入的提示语
2. 多个选项交互式
Picocli 支持在一个命令中指定多个交互式输入的选项,会按照顺序提示用户并接收输入
public class Login implements Callable<Integer> {

    @Option(names = {"-u", "--user"}, description = "User name")
    String user;

    @Option(names = {"-p", "--password"}, description = "Passphrase", interactive = true)
    String password;

    @Option(names = {"-cp", "--checkPassword"}, description = "Check Password", interactive = true)
    String checkPassword;

    public Integer call() throws Exception {
        System.out.println("password = " + password);
        System.out.println("checkPassword = " + checkPassword);
        return 0;
    }

    public static void main(String[] args) {
        new CommandLine(new Login()).execute("-u", "user123", "-p", "-cp");
    }

}
由于 Picocli 框架规则,用户必须在命令中指定需要交互式输入的选项(eg:-p),才会引导用户输入
public static void main(String[] args) {
    new CommandLine(new Login()).execute("-u", "user123", "-p", "-cp");
}
根据实际使用情况,又可以将交互式输入分为 2 种模式:
- 可选交互式:用户可以直接在整行命令中输入选项,而不用给用户提示信息
- 强制交互式:用户必须获得提示并输入某个选项,不允许不填写
1. 可选交互式
默认情况下,是无法直接在命令中给交互式选项指定任何参数,只能通过交互式输入(eg:命令中包含 -p xxx 会报错)
@Option(names = {"-p", "--password"}, description = "Passphrase", interactive = true)
String password;

new CommandLine(new Login()).execute("-u", "user123", "-p", "xxx", "-cp");
Enter value for --password (Passphrase): 1
Unmatched argument at index 3: 'oxx'
Usage: <main class> [-p] [-cp[=<checkPassword>]] [-u=<user>]
      -cp, --checkPassword[=<checkPassword>]
                      Check Password
  -p, --password      Passphrase
  -u, --user=<user>   User name
官方可选交互式的解决方案,通过调整 @Option 注解中的 arity 属性来指定每个选项可接受的参数个数
- arity 官方介绍
- 建议:给所有需要交互式输入的选项都增加
arity参数(一般是arity = "0..1"),这样既可以在完整命令中直接给选项填充参数,也可以选择交互式输入
// 设置了 arity 参数,可选交互式
@Option(names = {"-p", "--password"}, arity = "0..1", description = "Passphrase", interactive = true)
String password;

// 不再提示让用户输入 password 选项,而是直接读取了命令中的值
new CommandLine(new Login()).execute("-u", "user123", "-p", "123", "-cp");
2. 强制交互式
- 在之前已经提到,如果用户不在命令中输入交互式选项(eg:
-p),那么系统不会提示用户输入这个选项,属性的值将为默认值 - 有时,要求用户必须输入某个选项,而不能使用默认的空值
- 官方强制交互式的解决方案:官方的解决方案是需要自己定义业务逻辑的。原理在命令执行后对属性进行判断,如果用户没有输入指定的参数,那么再通过
System.console().readLine等方式提示用户输入 - 优雅方案:编写一段通用的校验程序,如果用户的输入命令中没有包含交互式选项,那么就自动为输入命令补充该选项即可,这样就能强制触发交互式输入
- 检测
args[]中是否存在对应选项,不存在则为数组增加选项元素(可以利用反射自动读取必填的选项名称)
- 检测
@Command
public class Main implements Runnable {

    @Option(names = "--interactive", interactive = true)
    String value;

    public void run() {
        if (value == null && System.console() != null) {
            // 主动提示用户输入
            value = System.console().readLine("Enter value for --interactive: ");
        }
        System.out.println("You provided value '" + value + "'");
    }

    public static void main(String[] args) {
        new CommandLine(new Main()).execute(args);
    }
}
4. 子命令
子命令是指命令中又包含一组命令,相当于命令的分组嵌套,适用于功能较多、较为复杂的命令行程序。官方文档
在 Picocli 中,提供两种设置子命令方式
1. 声明式
通过 @Command 注解的 subcommands 属性来给命令添加子命令。优点:更直观清晰
@Command(subcommands = {
    GitStatus.class,
    GitCommit.class,
    GitAdd.class,
    GitBranch.class,
    GitCheckout.class,
    GitClone.class,
    GitDiff.class,
    GitMerge.class,
    GitPush.class,
    GitRebase.class,
    GitTag.class
})
public class Git { /* ... */ }
2. 编程式
在创建 CommandLine 对象时,调用 addSubcommand 方法来绑定子命令。优点:更灵活
CommandLine commandLine = new CommandLine(new Git())
        .addSubcommand("status", new GitStatus())
        .addSubcommand("commit", new GitCommit())
        .addSubcommand("add", new GitAdd())
        .addSubcommand("branch", new GitBranch())
        .addSubcommand("checkout", new GitCheckout())
        .addSubcommand("clone", new GitClone())
        .addSubcommand("diff", new GitDiff())
        .addSubcommand("merge", new GitMerge())
        .addSubcommand("push", new GitPush())
        .addSubcommand("rebase", new GitRebase())
        .addSubcommand("tag", new GitTag());
3. 实践
编写一个示例程序,支持增加、删除、查询 3 个子命令,并传入不同的 args 来测试效果
package com.listao.cli.cmd_line;

import picocli.CommandLine;
import picocli.CommandLine.Command;

@Command(name = "main", mixinStandardHelpOptions = true)
public class SubCommandExp implements Runnable {

    @Override
    public void run() {
        System.out.println("执行主命令");
    }

    @Command(name = "add", description = "增加", mixinStandardHelpOptions = true)
    static class AddCommand implements Runnable {
        public void run() {
            System.out.println("执行增加命令");
        }
    }

    @Command(name = "delete", description = "删除", mixinStandardHelpOptions = true)
    static class DeleteCommand implements Runnable {
        public void run() {
            System.out.println("执行删除命令");
        }
    }

    @Command(name = "query", description = "查询", mixinStandardHelpOptions = true)
    static class QueryCommand implements Runnable {
        public void run() {
            System.out.println("执行查询命令");
        }
    }

    public static void main(String[] args) {
        // 执行主命令
        args = new String[]{};
        args = new String[]{"main"}; // 报错
        // 查看主命令的帮助手册
        args = new String[]{"-h"};
        // 执行增加子命令
        args = new String[]{"add", "-h"};
        // 执行增加子命令的帮助手册
        args = new String[]{"add", "--help"};
        // 执行不存在的子命令,会报错
        args = new String[]{"update"};
        int exitCode = new CommandLine(new SubCommandExp())
                .addSubcommand(new AddCommand())
                .addSubcommand(new DeleteCommand())
                .addSubcommand(new QueryCommand())
                .execute(args);
        System.exit(exitCode);
    }

}
输入 --help,打印出主命令和所有子命令信息,证明子命令绑定成功
Usage: main [-hV] [COMMAND]
  -h, --help      Show this help message and exit.
  -V, --version   Print version information and exit.
Commands:
  add     增加
  delete  删除
  query   查询
5. 其他功能
3. 命令模式
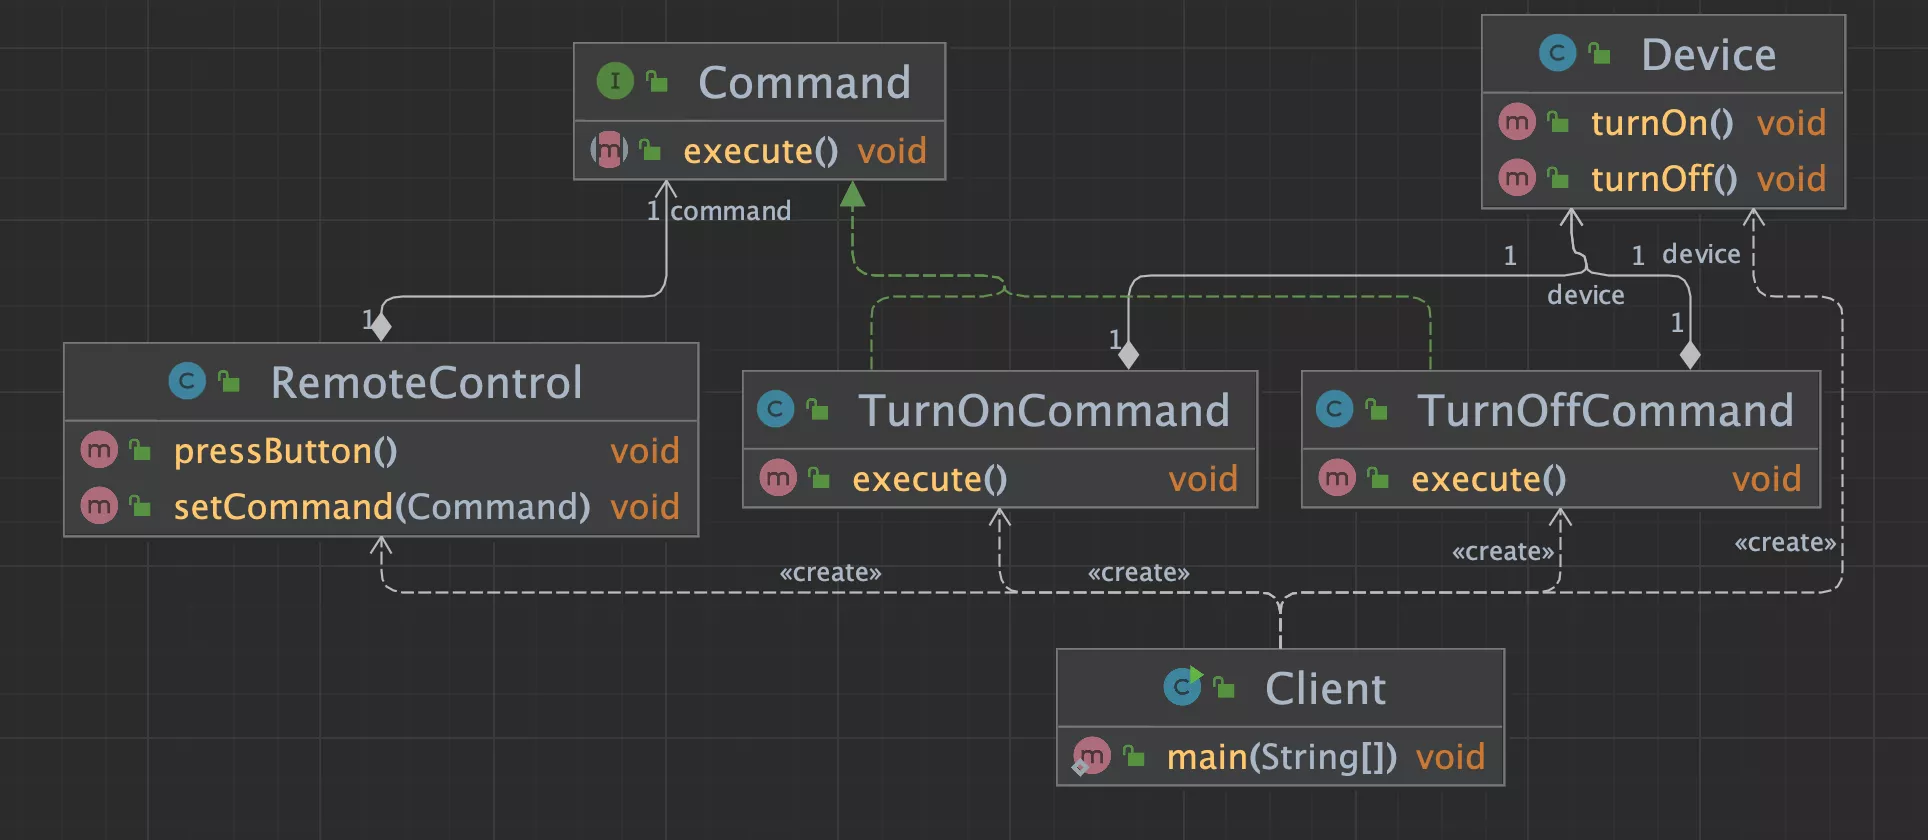
1. 概念
- 命令模式是一种行为类设计模式,核心是将每种请求或操作封装为一个独立的对象,从而可以集中管理这些请求或操作
- eg:将请求队列化依次执行、或者对操作进行记录和撤销
- 通过将请求的发送者(客户端)和接收者(执行请求的对象)解耦,提供了更大的灵活性和可维护性
- 人类:相当于客户端,要操作电视来换台
- 电视:执行请求的对象,要根据操作来换台
- 遥控器:通过点击遥控器上的 操作按钮 来控制电视
相当于把人和电视解耦了。哪怕遥控器丢了,再换一个遥控器就好了;而且现在手机都能作为万能的电视遥控器,可以同时遥控多个品牌的设备,不用关心设备的具体品牌型号,提供了更大的方便
2. 优点、应用场景
优点:解耦请求发送者和接受者,让系统更加灵活、可扩展
- 由于每个操作都是一个独立的命令类,所以需要新增命令操作时,不需要改动现有代码
应用场景:
- 系统需要统一处理多种复杂的操作
- eg:操作排队、记录操作历史、撤销重做等
- 系统需要持续增加新的命令、或要处理复杂的组合命令(子命令),使用命令模式可以实现解耦
3. 要素和实现
1. 命令
- 相当于遥控器操作按钮的制作规范
- 是一个抽象类或接口,它定义了执行操作的方法,通常是
execute,该方法封装了具体的操作
public interface Command {

    void execute();
}
2. 具体命令
- 相当于遥控器的某个操作按钮
- 命令接口的具体实现类,它负责将请求传递给接收者(设备)并执行具体的操作
@AllArgsConstructor
public class TurnOnCommand implements Command {

    private Device device;

    public void execute() {
        device.turnOn();
    }

}
@AllArgsConstructor
public class TurnOffCommand implements Command {

    private Device device;

    public void execute() {
        device.turnOff();
    }

}
3. 接受者
- 相当于被遥控的设备
- 最终执行命令的对象
@AllArgsConstructor
public class Device {

    private String name;

    public void turnOn() {
        System.out.println(name + " 设备打开");
    }

    public void turnOff() {
        System.out.println(name + " 设备关闭");
    }

}
4. 调用者
- 相当于遥控器
- 最基础的调用者类,还可以给遥控器类增加更多能力(eg:存储历史记录、撤销重做等)
- 作用:接受客户端的命令并执行
public class CmdContext {

    private Command command;

    public void setCommand(Command command) {
        this.command = command;
    }

    public void pressButton() {
        command.execute();
    }

}
5. 客户端
- 相当于使用遥控器的人
- 作用:创建命令对象并将其与接收者关联(绑定设备),然后将命令对象传递给调用者(按遥控器),从而触发执行
public class Client {
    public static void main(String[] args) {
        // 创建接收者对象
        Device tv = new Device("TV");
        Device stereo = new Device("Stereo");

        // 创建具体命令对象,可以绑定不同设备
        TurnOnCommand turnOn = new TurnOnCommand(tv);
        TurnOffCommand turnOff = new TurnOffCommand(stereo);

        // 创建调用者
        CmdContext context = new CmdContext();

        // 执行命令
        context.setCommand(turnOn);
        context.pressButton();

        context.setCommand(turnOff);
        context.pressButton();
    }

}
整个程序的 UML 类图:
4. 命令行生成器开发
1. 创建命令执行器
package com.listao.cli;

import picocli.CommandLine;
import picocli.CommandLine.Command;

/**
 * 命令执行器
 */
@Command(name = "主命令", mixinStandardHelpOptions = true)
public class CommandExecutor implements Runnable {

    private final CommandLine commandLine;

    {
        commandLine = new CommandLine(this)
                .addSubcommand(new GenerateCommand())
                .addSubcommand(new ConfigCommand())
                .addSubcommand(new ListCommand())
                .addSubcommand(new JsonGenerateCommand());
    }

    @Override
    public void run() {
        // 不输入子命令时,给出友好提示
        System.out.println("请输入具体子命令,或者输入 --help 查看命令提示");
    }

    /**
     * 执行命令
     */
    public Integer doExecute(String[] args) {
        return commandLine.execute(args);
    }

}
2. 子命令实现
1. generate子命令
- 核心命令。作用:接受参数并生成代码
- 同时支持通过完整命令和交互式输入的方式来设置动态参数
package com.listao.cli.command;

import cn.hutool.core.bean.BeanUtil;
import com.listao.generator.MainGenerator;
import com.listao.model.DataModel;
import lombok.Data;
import picocli.CommandLine.Command;
import picocli.CommandLine.Option;

import java.util.concurrent.Callable;

@Command(name = "generate", description = "生成代码", mixinStandardHelpOptions = true)
@Data
public class GenerateCommand implements Callable<Integer> {

    @Option(names = {"-l", "--loop"}, arity = "0..1", description = "是否循环", interactive = true, echo = true)
    private boolean loop;

    @Option(names = {"-a", "--author"}, arity = "0..1", description = "作者", interactive = true, echo = true)
    private String author = "yupi";

    @Option(names = {"-o", "--outputText"}, arity = "0..1", description = "输出文本", interactive = true, echo = true)
    private String outputText = "sum = ";

    public Integer call() throws Exception {
        DataModel cfg = new DataModel();
        BeanUtil.copyProperties(this, cfg);
        System.out.println("配置信息:" + cfg);
        MainGenerator.doGenerate(cfg);
        return 0;
    }

}
2. list子命令
- 辅助命令
- 查看要生成的原始文件列表信息
package com.listao.cli.command;

import cn.hutool.core.io.FileUtil;
import picocli.CommandLine.Command;

import java.io.File;
import java.util.List;

@Command(name = "list", description = "查看文件列表", mixinStandardHelpOptions = true)
public class ListCommand implements Runnable {

    public void run() {
        String projectPath = System.getProperty("user.dir");
        // 整个项目的根路径
        File parentFile = new File(projectPath);
        // 输入路径
        String inputPath = new File(parentFile, "src/main/resources/acm-template").getAbsolutePath();
        List<File> files = FileUtil.loopFiles(inputPath);
        for (File file : files) {
            System.out.println(file);
        }
    }

}
3. config子命令
- 辅助命令
- 查看允许用户传入的动态参数信息(即本项目
DataModel.java字段信息)
package com.listao.cli.command;

import cn.hutool.core.util.ReflectUtil;
import com.listao.model.DataModel;
import picocli.CommandLine.Command;

import java.lang.reflect.Field;

@Command(name = "config", description = "查看参数信息", mixinStandardHelpOptions = true)
public class ConfigCommand implements Runnable {

    public void run() {
        // 实现 config 命令的逻辑
        System.out.println("查看参数信息");

        // // 获取要打印属性信息的类
        // Class<?> myClass = MainTemplateConfig.class;
        // // 获取类的所有字段
        // Field[] fields = myClass.getDeclaredFields();

        Field[] fields = ReflectUtil.getFields(DataModel.class);

        // 遍历并打印每个字段的信息
        for (Field field : fields) {
            System.out.println("字段名称:" + field.getName());
            System.out.println("字段类型:" + field.getType());
            // System.out.println("Modifiers: " + java.lang.reflect.Modifier.toString(field.getModifiers()));
            System.out.println("---");
        }
    }

}
3. 全局调用入口
接受用户参数,创建命令执行器并调用执行
package com.listao.cli;

public class Main {

    public static void main(String[] args) {
        // args = new String[]{"generate", "-l", "false", "-a", "listaod1", "-o", "666:"};
        // args = new String[]{"config"};
        // args = new String[]{"list"};
        // args = new String[]{"-h"};
        CommandExecutor commandExecutor = new CommandExecutor();
        commandExecutor.doExecute(args);
    }

}
generate命令
Enter value for --loop (是否循环): false
Enter value for --author (作者): listao
Enter value for --outputText (输出文本): ooxx
配置信息:MainTemplateConfig(loop=false, author=listao, outputText=ooxx)
acm-template
src
com
yupi
acm
config命令
查看参数信息
字段名称:loop
字段类型:boolean
---
字段名称:author
字段类型:class java.lang.String
---
字段名称:outputText
字段类型:class java.lang.String
---
list命令
/Users/listao/mca/listao_generator/01-local-generator/src/main/resources/acm-template/README.md
/Users/listao/mca/listao_generator/01-local-generator/src/main/resources/acm-template/.gitignore
/Users/listao/mca/listao_generator/01-local-generator/src/main/resources/acm-template/src/com/yupi/acm/MainTemplate.java
4. jar 包构建
- 将代码生成器打成 jar 包,支持用户执行并使用命令行工具动态输入参数
pom.xml文件中引入maven-assembly-plugin插件,将依赖库一起打入 jar 包,并且指定<mainClass>路径- 执行
mvn package打包命令,即可构建 jar 包。yuzi-generator-basic-1.0-SNAPSHOT-jar-with-dependencies.jar
- 执行
<build>
    <plugins>
        <plugin>
            <groupId>org.apache.maven.plugins</groupId>
            <artifactId>maven-assembly-plugin</artifactId>
            <version>3.3.0</version>
            <configuration>
                <descriptorRefs>
                    <descriptorRef>jar-with-dependencies</descriptorRef>
                </descriptorRefs>
                <archive>
                    <manifest>
                        <!-- 替换为你的主类的完整类名 -->
                        <mainClass>com.listao.cli.Main</mainClass>
                    </manifest>
                </archive>
            </configuration>
            <executions>
                <execution>
                    <phase>package</phase>
                    <goals>
                        <goal>single</goal>
                    </goals>
                </execution>
            </executions>
        </plugin>
    </plugins>
</build>
5. 测试使用
java -jar <jar 包名> generate [..args]
# 1. jar 和 yuzi-generator-demo-projects 平级
# 2. 可以在命令中直接指定部分参数
➜  01-local-generator git:(main) ✗# java -jar target/01-local-generator-1.0-SNAPSHOT-jar-with-dependencies.jar generate -l -o -a
Enter value for --loop (是否循环): true
Enter value for --outputText (输出文本): oox
Enter value for --author (作者): listao
配置信息:DataModel(loop=true, author=listao, outputText=oox)
outputPath = /Users/listao/mca/listao_generator/01-local-generator/.tmp
6. 封装脚本
要输入的命令也太长,将命令的调用封装在一个 bash 脚本或 windows 批处理文件,像封装一个函数一样,简化命令
1. Linux Bash脚本
chmod a+x generator,给该文件添加可执行权限
#!/bin/bash
java -jar target/01-local-generator-1.0-SNAPSHOT-jar-with-dependencies.jar "$@"
2. Windows批处理文件
@echo off:禁止在命令执行时显示命令本身%*:用于将批处理文件接收到的所有参数传递给 Java 应用程序
@echo off
java -jar target/yuzi-generator-1.0-SNAPSHOT-jar-with-dependencies.jar %*