01-basic
1. 介绍
React 由 Meta 公司开发,是一个用于构建 Web 和原生交互界面的库

2. 优势
相较于传统基于 DOM 开发的优势
- 组件化的开发方式
- 不错的性能
相较于其它前端框架的优势
- 丰富的生态
- 跨平台支持
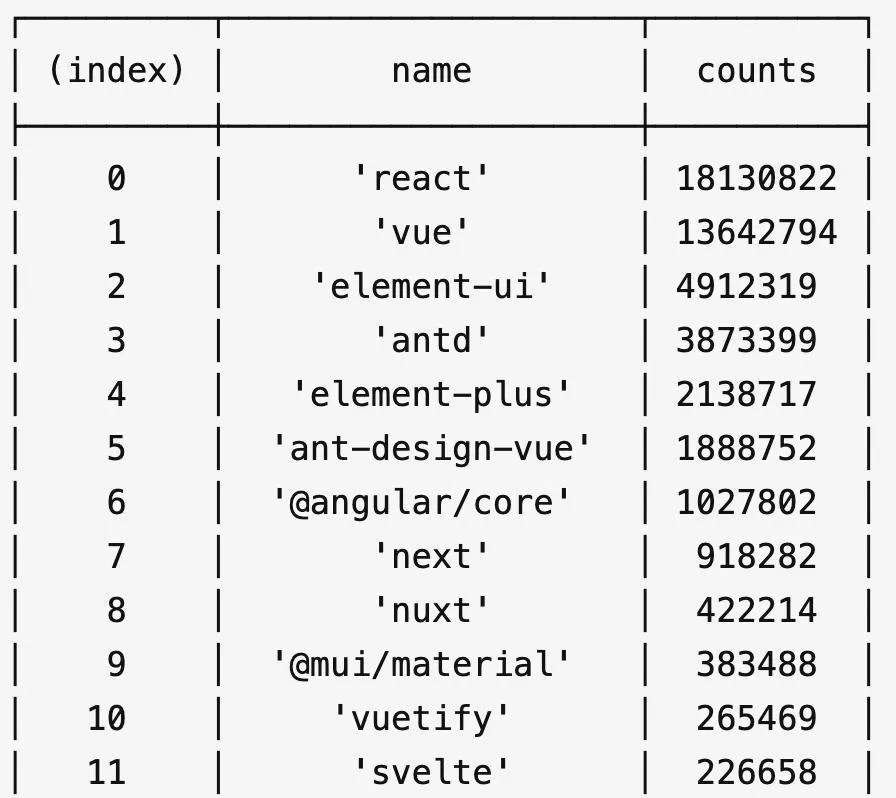
3. 市场情况
全球最流行,大厂必备
2. 开发环境创建
create-react-app 是一个快速创建 React 开发环境的工具,底层由 Webpack 构件,封装了配置细节,开箱即用
npx:Node.js 工具命令,查找并执行后续的包命令create-react-app:核心包(固定写法),用于创建 React 项目react-basic:React 项目的名称
npx create-react-app react-basic
# 报错
npx create-react-app react-basic

cd react-basic

# 删除
rm package-lock.json

npm install

# 安装,即可启动
npm install web-vitals

npm run start
Failed to compile.

Module not found: Error: Can't resolve 'web-vitals' in '/Users/listao/tmp/113/react-basic/src'
ERROR in ./src/reportWebVitals.js 5:4-24
Module not found: Error: Can't resolve 'web-vitals' in '/Users/listao/tmp/113/react-basic/src'

webpack compiled with 1 error
3. JSX
JSX 是 JS + XMl(HTML) 缩写,表示在 JS 代码中编写 HTML 模版结构,它是 React 中构建 UI 的方式
const message = 'this is message'

function App() {
  return (
      <div>
        <h1>this is title</h1>
        {message}
      </div>
  )
}
优势:
- HTML 的声明式模版写法
- JS 的可编程能力
1. 本质
JSX 并不是标准的 JS 语法,它是 JS 的语法扩展,浏览器本身不能识别,需要通过解析工具做解析之后才能在浏览器中使用

2. 高频场景
1. JS表达式
在 JSX 中可以通过
大括号语法 {}识别 JS 中的表达式。eg:常见的变量、函数调用、方法调用
- 使用引号传递字符串
- 使用 JS 变量
- 函数调用和方法调用
- 使用 JS 对象
注意:if 语句、switch 语句、变量声明不属于表达式,不能出现在
{}中
const message = 'this is message'

function getAge() {
  return 18
}

function App() {
  return (
      <div>
        <h1>this is title</h1>
        {/* 字符串识别 */}
        {'this is str'}
        {/* 变量识别 */}
        {message}
        {/* 变量识别 */}
        {message}
        {/* 函数调用,渲染为函数的返回值 */}
        {getAge()}
      </div>
  )
}
2. 列表渲染
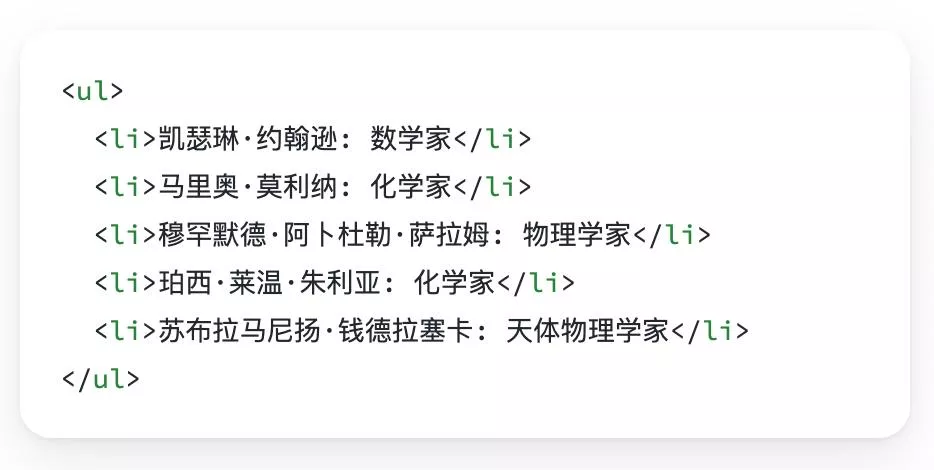
在 JSX 中,可以使用原生 JS 中的
map()实现列表渲染
const list = [
  {id: 1001, name: 'Vue'},
  {id: 1002, name: 'React'},
  {id: 1003, name: 'Angular'}
]

function App() {
  return (
      <ul>
        {list.map(item => <li key={item.id}>{item.name}</li>)}
      </ul>
  )
}
3. 条件渲染

在 React 中,可以通过逻辑与运算符
&&、三元表达式(?:)实现基础的条件渲染
const flag = true
const loading = false

function App() {
  return (
      <>
        {flag && <span>this is span</span>}
        {loading ? <span>loading...</span> : <span>this is span</span>}
      </>
  )
}
4. 复杂条件渲染
自定义函数 + 判断语句
const type = 1 // 0|1|3

function getArticleJSX() {
  if (type === 0) {
    return <div>无图模式模版</div>
  } else if (type === 1) {
    return <div>单图模式模版</div>
  } else {
    return <div>三图模式模版</div>
  }
}

function App() {
  return (
      <>
        {getArticleJSX()}
      </>
  )
}
4. 事件绑定
1. 基础实现
React 中的事件绑定,通过语法
on + 事件名称 = { 事件处理程序 },整体上遵循驼峰命名法
function App() {
  const clickHandler = () => {
    console.log('button按钮点击了')
  }

  return (
      <button onClick={clickHandler}>click me</button>
  )
}
2. 使用事件参数
在事件回调函数中设置形参 e 即可
function App() {
  const clickHandler = (e) => {
    console.log('button按钮点击了', e)
  }

  return (
      <button onClick={clickHandler}>click me</button>
  )
}
3. 传递自定义参数
语法:事件绑定的位置改造成箭头函数的写法,在执行 clickHandler 实际处理业务函数的时候传递实参
function App() {
  const clickHandler = (name) => {
    console.log('button按钮点击了', name)
  }

  return (
      <button onClick={() => clickHandler('jack')}>click me</button>
  )
}
注意:不能直接写函数调用,这里事件绑定需要一个函数引用
4. 事件对象+自定义参数
语法:在事件绑定的位置传递事件实参e和自定义参数,clickHandler中声明形参,注意顺序对应
function App() {
  const clickHandler = (name, e) => {
    console.log('button按钮点击了', name, e)
  }

  return (
      <button onClick={(e) => clickHandler('jack', e)}>click me</button>
  )
}
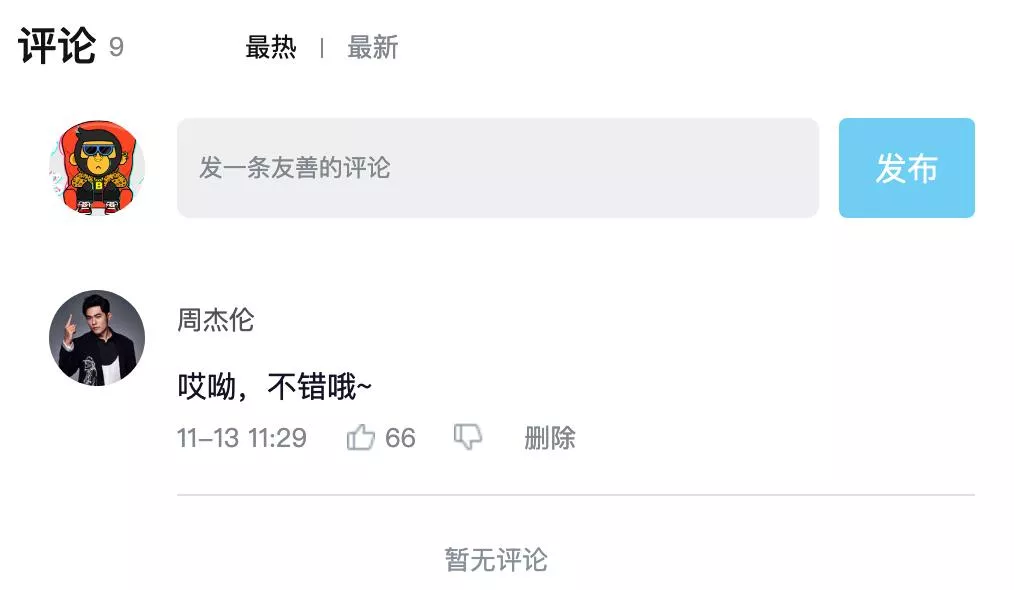
5. B站评论案例
npm install sass

npm install lodash
- 只有自己的评论才显示删除按钮,点击删除按钮
- 除当前评论,列表中不再显示

- 渲染评论列表
- 删除评论实现
- 渲染导航 Tab 和高亮实现
- 评论列表排序功能实现
import {useState} from 'react'
import './App.scss'
import avatar from './images/bozai.png'
import orderBy from 'lodash/orderBy'

/**
 * 评论列表的渲染和操作
 *
 * 1. 根据状态渲染评论列表
 * 2. 删除评论
 */

// 评论列表数据
const defaultList = [
  {
    // 评论id
    rpid: 3,
    // 用户信息
    user: {
      uid: '13258165',
      avatar: '',
      uname: '周杰伦',
    },
    // 评论内容
    content: '哎哟,不错哦',
    // 评论时间
    ctime: '10-18 08:15',
    like: 88,
  },
  {
    rpid: 2,
    user: {
      uid: '36080105',
      avatar: '',
      uname: '许嵩',
    },
    content: '我寻你千百度 日出到迟暮',
    ctime: '11-13 11:29',
    like: 88,
  },
  {
    rpid: 1,
    user: {
      uid: '30009257',
      avatar,
      uname: '黑马前端',
    },
    content: '学前端就来黑马',
    ctime: '10-19 09:00',
    like: 66,
  },
]
// 当前登录用户信息
const user = {
  // 用户id
  uid: '30009257',
  // 用户头像
  avatar,
  // 用户昵称
  uname: '黑马前端',
}

/**
 * 导航 Tab 的渲染和操作
 *
 * 1. 渲染导航 Tab 和高亮
 * 2. 评论列表排序
 *  最热 => 喜欢数量降序
 *  最新 => 创建时间降序
 */

// 导航 Tab 数组
const tabs = [
  {type: 'hot', text: '最热'},
  {type: 'time', text: '最新'},
]

const App = () => {
  // 导航 Tab 高亮的状态
  const [activeTab, setActiveTab] = useState('hot')
  const [list, setList] = useState(defaultList)

  // 删除评论
  const onDelete = rpid => {
    // 如果要删除数组中的元素,需要调用 filter 方法,并且一定要调用 setList 才能更新状态
    setList(list.filter(item => item.rpid !== rpid))
  }

  // tab 高亮切换
  const onToggle = type => {
    setActiveTab(type)
    let newList
    if (type === 'time') {
      // 按照时间降序排序
      // orderBy(对谁进行排序, 按照谁来排, 顺序)
      newList = orderBy(list, 'ctime', 'desc')
    } else {
      // 按照喜欢数量降序排序
      newList = orderBy(list, 'like', 'desc')
    }
    setList(newList)
  }

  return (
      <div className="app">
        {/* 导航 Tab */}
        <div className="reply-navigation">
          <ul className="nav-bar">
            <li className="nav-title">
              <span className="nav-title-text">评论</span>
              {/* 评论数量 */}
              <span className="total-reply">{list.length}</span>
            </li>
            <li className="nav-sort">
              {/* 高亮类名: active */}
              {tabs.map(item => {
                return (
                    <div
                        key={item.type}
                        className={
                          item.type === activeTab ? 'nav-item active' : 'nav-item'
                        }
                        onClick={() => onToggle(item.type)}
                    >
                      {item.text}
                    </div>
                )
              })}
            </li>
          </ul>
        </div>

        <div className="reply-wrap">
          {/* 发表评论 */}
          <div className="box-normal">
            {/* 当前用户头像 */}
            <div className="reply-box-avatar">
              <div className="bili-avatar">
                <img className="bili-avatar-img" src={avatar} alt="用户头像"/>
              </div>
            </div>
            <div className="reply-box-wrap">
              {/* 评论框 */}
              <textarea
                  className="reply-box-textarea"
                  placeholder="发一条友善的评论"
              />
              {/* 发布按钮 */}
              <div className="reply-box-send">
                <div className="send-text">发布</div>
              </div>
            </div>
          </div>
          {/* 评论列表 */}
          <div className="reply-list">
            {/* 评论项 */}
            {list.map(item => {
              return (
                  <div key={item.rpid} className="reply-item">
                    {/* 头像 */}
                    <div className="root-reply-avatar">
                      <div className="bili-avatar">
                        <img
                            className="bili-avatar-img"
                            src={item.user.avatar}
                            alt=""
                        />
                      </div>
                    </div>

                    <div className="content-wrap">
                      {/* 用户名 */}
                      <div className="user-info">
                        <div className="user-name">{item.user.uname}</div>
                      </div>
                      {/* 评论内容 */}
                      <div className="root-reply">
                        <span className="reply-content">{item.content}</span>
                        <div className="reply-info">
                          {/* 评论时间 */}
                          <span className="reply-time">{item.ctime}</span>
                          {/* 评论数量 */}
                          <span className="reply-time">点赞数:{item.like}</span>
                          {user.uid === item.user.uid && (
                              <span
                                  className="delete-btn"
                                  onClick={() => onDelete(item.rpid)}
                              >
                          删除
                        </span>
                          )}
                        </div>
                      </div>
                    </div>
                  </div>
              )
            })}
          </div>
        </div>
      </div>
  )
}

export default App
.app {
  width: 80%;
  margin: 50px auto;
}

.reply-navigation {
  margin-bottom: 22px;

  .nav-bar {
    display: flex;
    align-items: center;
    margin: 0;
    padding: 0;
    list-style: none;

    .nav-title {
      display: flex;
      align-items: center;
      width: 114px;
      font-size: 20px;

      .nav-title-text {
        color: #18191c;
        font-weight: 500;
      }

      .total-reply {
        margin: 0 36px 0 6px;
        color: #9499a0;
        font-weight: normal;
        font-size: 13px;
      }
    }

    .nav-sort {
      display: flex;
      align-items: center;
      color: #9499a0;
      font-size: 13px;

      .nav-item {
        cursor: pointer;

        &:hover {
          color: #00aeec;
        }

        &:last-child::after {
          display: none;
        }

        &::after {
          content: ' ';
          display: inline-block;
          height: 10px;
          width: 1px;
          margin: -1px 12px;
          background-color: #9499a0;
        }
      }

      .nav-item.active {
        color: #18191c;
      }
    }
  }
}

.reply-wrap {
  position: relative;
}

.box-normal {
  display: flex;
  transition: 0.2s;

  .reply-box-avatar {
    display: flex;
    align-items: center;
    justify-content: center;
    width: 80px;
    height: 50px;
  }

  .reply-box-wrap {
    display: flex;
    position: relative;
    flex: 1;

    .reply-box-textarea {
      width: 100%;
      height: 50px;
      padding: 5px 10px;
      box-sizing: border-box;
      color: #181931;
      font-family: inherit;
      line-height: 38px;
      background-color: #f1f2f3;
      border: 1px solid #f1f2f3;
      border-radius: 6px;
      outline: none;
      resize: none;
      transition: 0.2s;

      &::placeholder {
        color: #9499a0;
        font-size: 12px;
      }

      &:focus {
        height: 60px;
        background-color: #fff;
        border-color: #c9ccd0;
      }
    }
  }

  .reply-box-send {
    position: relative;
    display: flex;
    flex-basis: 86px;
    align-items: center;
    justify-content: center;
    margin-left: 10px;
    border-radius: 4px;
    cursor: pointer;
    transition: 0.2s;

    & .send-text {
      position: absolute;
      z-index: 1;
      color: #fff;
      font-size: 16px;
    }

    &::after {
      position: absolute;
      width: 100%;
      height: 100%;
      background-color: #00aeec;
      border-radius: 4px;
      opacity: 0.5;
      content: '';
    }

    &:hover::after {
      opacity: 1;
    }
  }
}

.bili-avatar {
  position: relative;
  display: block;
  width: 48px;
  height: 48px;
  margin: 0;
  padding: 0;
  border-radius: 50%;
}

.bili-avatar-img {
  position: absolute;
  top: 50%;
  left: 50%;
  display: block;
  width: 48px;
  height: 48px;
  object-fit: cover;
  border: none;
  border-radius: 50%;
  image-rendering: -webkit-optimize-contrast;
  transform: translate(-50%, -50%);
}

// 评论列表
.reply-list {
  margin-top: 14px;
}

.reply-item {
  padding: 22px 0 0 80px;

  .root-reply-avatar {
    position: absolute;
    left: 0;
    display: flex;
    justify-content: center;
    width: 80px;
    cursor: pointer;
  }

  .content-wrap {
    position: relative;
    flex: 1;

    &::after {
      content: ' ';
      display: block;
      height: 1px;
      width: 100%;
      margin-top: 14px;
      background-color: #e3e5e7;
    }

    .user-info {
      display: flex;
      align-items: center;
      margin-bottom: 4px;

      .user-name {
        height: 30px;
        margin-right: 5px;
        color: #61666d;
        font-size: 13px;
        line-height: 30px;
        cursor: pointer;
      }
    }

    .root-reply {
      position: relative;
      padding: 2px 0;
      color: #181931;
      font-size: 15px;
      line-height: 24px;

      .reply-info {
        position: relative;
        display: flex;
        align-items: center;
        margin-top: 2px;
        color: #9499a0;
        font-size: 13px;

        .reply-time {
          width: 76px;
          margin-right: 20px;
        }

        .reply-like {
          display: flex;
          align-items: center;
          margin-right: 19px;

          .like-icon {
            width: 14px;
            height: 14px;
            margin-right: 5px;
            color: #9499a0;
            background-position: -153px -25px;

            &:hover {
              background-position: -218px -25px;
            }
          }

          .like-icon.liked {
            background-position: -154px -89px;
          }
        }

        .reply-dislike {
          display: flex;
          align-items: center;
          margin-right: 19px;

          .dislike-icon {
            width: 16px;
            height: 16px;
            background-position: -153px -153px;

            &:hover {
              background-position: -217px -153px;
            }
          }

          .dislike-icon.disliked {
            background-position: -154px -217px;
          }
        }

        .delete-btn {
          cursor: pointer;

          &:hover {
            color: #00aeec;
          }
        }
      }
    }
  }
}

.reply-none {
  height: 64px;
  margin-bottom: 80px;
  color: #99a2aa;
  font-size: 13px;
  line-height: 64px;
  text-align: center;
}
6. 表单控制
1. 受控绑定
概念:使用 React 组件的状态(useState)控制表单的状态

function App() {
  const [value, setValue] = useState('')

  return (
      <input
          type="text"
          value={value}
          onChange={e => setValue(e.target.value)}
      />
  )
}
2. 非受控绑定
概念:通过获取 DOM 的方式获取表单的输入数据
function App() {
  const inputRef = useRef(null)

  const onChange = () => {
    console.log(inputRef.current.value)
  }

  return (
      <input
          type="text"
          ref={inputRef}
          onChange={onChange}
      />
  )
}
3. B站评论案例
npm install uuid

npm install classnames

npm install dayjs

npm install axios
- 手机输入框评论内容,并发布评论
id处理和时间处理(uuid和day.js)
import {useEffect, useRef, useState} from 'react'
import './App.scss'
import avatar from './images/bozai.png'
import _ from 'lodash'
import classNames from 'classnames'
import {v4 as uuidV4} from 'uuid'
import dayjs from 'dayjs'
import axios from 'axios'

// 当前登录用户信息
const user = {
  // 用户 id
  uid: '30009257',
  // 用户头像
  avatar,
  // 用户昵称
  uname: '黑马前端',
}

// 导航 Tab 数组
const tabs = [
  {type: 'hot', text: '最热'},
  {type: 'time', text: '最新'},
]

// 封装请求数据的 Hook
function useGetList() {
  // 获取接口数据渲染
  const [commentList, setCommentList] = useState([
    {
      "rpid": 3,
      "user": {
        "uid": "13258165",
        "avatar": "http://listao.cn:10000/i/0/010857-0.webp",
        "uname": "周杰伦"
      },
      "content": "哎哟,不错哦",
      "ctime": "10-18 08: 15",
      "like": 126
    },
    {
      "rpid": 2,
      "user": {
        "uid": "36080105",
        "avatar": "http://listao.cn:10000/i/0/010857-0.webp",
        "uname": "许嵩"
      },
      "content": "我寻你千百度 日出到迟暮",
      "ctime": "11-13 11: 29",
      "like": 88
    },
    {
      "rpid": 1,
      "user": {
        "uid": "30009257",
        "avatar": "http://listao.cn:10000/i/0/010857-0.webp",
        "uname": "黑马前端"
      },
      "content": "学前端就来黑马",
      "ctime": "10-19 09: 00",
      "like": 66
    }
  ])

  // useEffect(() => {
  //   // 请求数据
  //   async function getList() {
  //     // axios请求数据
  //     const res = await axios.get(' http://localhost:3004/list')
  //     setCommentList(res.data)
  //   }
  //
  //   getList()
  // }, [])

  return {
    commentList,
    setCommentList
  }
}

// 封装 Item 组件
function Item({item, onDel}) {
  return (
      <div className="reply-item">
        {/* 头像 */}
        <div className="root-reply-avatar">
          <div className="bili-avatar">
            <img
                className="bili-avatar-img"
                alt=""
                src={item.user.avatar}
            />
          </div>
        </div>

        <div className="content-wrap">
          {/* 用户名 */}
          <div className="user-info">
            <div className="user-name">{item.user.uname}</div>
          </div>
          {/* 评论内容 */}
          <div className="root-reply">
            <span className="reply-content">{item.content}</span>
            <div className="reply-info">
              {/* 评论时间 */}
              <span className="reply-time">{item.ctime}</span>
              {/* 评论数量 */}
              <span className="reply-time">点赞数:{item.like}</span>
              {/* 条件:user.id === item.user.id */}
              {user.uid === item.user.uid &&
                  <span className="delete-btn" onClick={() => onDel(item.rpid)}>
                删除
              </span>}
            </div>
          </div>
        </div>
      </div>
  )
}


const App = () => {
  // 渲染评论列表
  // 1. 使用 useState 维护 list
  // const [commentList, setCommentList] = useState(_.orderBy(list, 'like', 'desc'))
  const {commentList, setCommentList} = useGetList()

  // 删除功能
  const handleDel = (id) => {
    console.log(id)
    // 对commentList做过滤处理
    setCommentList(commentList.filter(item => item.rpid !== id))
  }

  // tab切换功能
  // 1. 点击谁就把谁的 type 记录下来
  // 2. 通过记录的 type 和每一项遍历时的 type 做匹配,控制激活类名的显示
  const [type, setType] = useState('hot')
  const handleTabChange = (type) => {
    console.log(type)
    setType(type)
    // 基于列表的排序
    if (type === 'hot') {
      // 根据点赞数量排序
      // lodash
      setCommentList(_.orderBy(commentList, 'like', 'desc'))
    } else {
      // 根据创建时间排序
      setCommentList(_.orderBy(commentList, 'ctime', 'desc'))
    }
  }

  // 发表评论
  const [content, setContent] = useState('')
  const inputRef = useRef(null)
  const handlePublish = () => {
    setCommentList([
      ...commentList,
      {
        rpid: uuidV4(), // 随机 id
        user: {
          uid: '30009257',
          avatar,
          uname: '黑马前端',
        },
        content: content,
        ctime: dayjs(new Date()).format('MM-DD hh:mm'), // 格式化 月-日 时:分
        like: 66,
      }
    ])
    // 1. 清空输入框的内容
    setContent('')
    // 2. 重新聚焦  dom(useRef) - focus
    inputRef.current.focus()
  }

  return (
      <div className="app">
        {/* 导航 Tab */}
        <div className="reply-navigation">
          <ul className="nav-bar">
            <li className="nav-title">
              <span className="nav-title-text">评论</span>
              {/* 评论数量 */}
              <span className="total-reply">{10}</span>
            </li>
            <li className="nav-sort">
              {/* 高亮类名: active */}
              {tabs.map(item =>
                  <span
                      key={item.type}
                      onClick={() => handleTabChange(item.type)}
                      className={classNames('nav-item', {active: type === item.type})}>
                {item.text}
              </span>)}
            </li>
          </ul>
        </div>

        <div className="reply-wrap">
          {/* 发表评论 */}
          <div className="box-normal">
            {/* 当前用户头像 */}
            <div className="reply-box-avatar">
              <div className="bili-avatar">
                <img className="bili-avatar-img" src={avatar} alt="用户头像"/>
              </div>
            </div>
            <div className="reply-box-wrap">
              {/* 评论框 */}
              <textarea
                  className="reply-box-textarea"
                  placeholder="发一条友善的评论"
                  ref={inputRef}
                  value={content}
                  onChange={(e) => setContent(e.target.value)}
              />
              {/* 发布按钮 */}
              <div className="reply-box-send">
                <div className="send-text" onClick={handlePublish}>发布</div>
              </div>
            </div>
          </div>
          {/* 评论列表 */}
          <div className="reply-list">
            {/* 评论项 */}
            {commentList.map(item => <Item key={item.id} item={item} onDel={handleDel}/>)}
          </div>
        </div>
      </div>
  )
}

export default App
7. React副作用管理
1. 概念理解
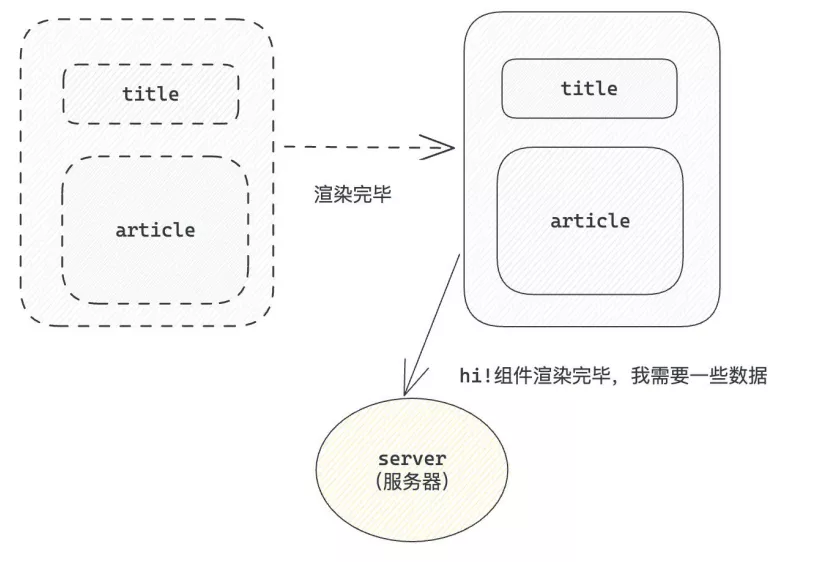
useEffect 是一个 React Hook 函数,用于在 React 组件中创建不是由事件引起,而是由渲染本身引起的操作(副作用)
- eg:发送 AJAX 请求,更改 DOM 等
- 说明:以下组件没有发生任何用户事件,组件渲染完毕,就请求服务器要数据,整个过程属于“只由渲染引起的操作”
2. 基础使用
需求:在组件渲染完毕之后,立刻调用的函数
// 参数1:一个函数,副作用函数,在函数内部可以放置要执行的操作
// 参数2:一个数组(可选参),放置依赖项,不同依赖项会影响第一个参数函数的执行。空数组时,副作用函数在组件渲染完毕之后执行一次
useEffect(() => {}, [])
3. useEffect依赖说明
useEffect 副作用函数的执行时机存在多种情况,根据传入依赖项的不同,会有不同的执行表现
| 依赖项 | 副作用功函数的执行时机 |
|---|---|
| 没有依赖项 | 组件初始渲染 + 组件更新时执行 |
| 空数组依赖 | 只在初始渲染时执行一次 |
| 添加特定依赖项 | 组件初始渲染 + 依赖项变化时执行 |
4. 清除副作用
概念:在 useEffect 中编写的由渲染本身引起的对接组件外部的操作,社区叫做副作用操作
清理副作用:在 useEffect 中开启了一个定时器,想在组件卸载时把这个定时器再清理掉
useEffect(() => {
    // 实现副作用操作逻辑
    return () => {
        // 清除副作用逻辑
    }
}, [])
说明:清除副作用的函数最常见的执行时机是在组件卸载时自动执行
function Son() {
  // 1. 渲染时开启一个定时器
  useEffect(() => {
    const timer = setInterval(() => {
      console.log('定时器执行中...')
    }, 1_000)

    return () => {
      // 清除副作用(组件卸载时)
      clearInterval(timer)
    }
  }, [])
  return <div>this is son</div>
}

function App() {
  // 通过条件渲染模拟组件卸载
  const [show, setShow] = useState(true)
  return (
      <div>
        {show && <Son/>}
        <button onClick={() => setShow(false)}>卸载Son组件</button>
      </div>
  )
}
8. 自定义Hook实现
概念:自定义 Hook 是以
use 打头的函数,通过自定义 Hook 函数用来实现逻辑的封装和复用

- 问题:布尔切换的逻辑,当前组件耦合在一起的,不方便复用
- 解决思路:自定义 hook
function useToggle() {
  // 可复用的逻辑代码
  const [value, setValue] = useState(true)

  const toggle = () => setValue(!value)

  // 哪些状态和回调函数需要在其他组件中使用 return
  return {
    value,
    toggle
  }
}

/**
 * 封装自定义 hook 通用思路
 * 1. 声明一个以 use 打头的函数
 * 2. 在函数体内封装可复用的逻辑(只要是可复用的逻辑)
 * 3. 把组件中用到的状态或回调 return 出去(以对象或数组)
 * 4. 在哪个组件中要用到这个逻辑,就执行这个函数,解构出来状态和回调进行使用
 */
function App() {
  const {value, toggle} = useToggle()
  return (
      <div>
        {value && <div>this is div</div>}
        <button onClick={toggle}>toggle</button>
      </div>
  )
}
9. Hooks使用规则
- 只能在组件中或其他自定义 Hook 函数中调用
- 只能在组件的顶层调用,不能嵌套在
if、for、其它的函数中
function App() {
  const [value, setValue] = React.useState('')
  return (
      <div>
        this is App
      </div>
  )
}
function App() {
  if (Math.random() > 0.5) {
    const [value, setValue] = useState('')
  }
  return (
      <div>
        this is App
      </div>
  )
}
ERROR
[eslint]
src/App.js
  Line 13:31:  React Hook "useState" is called conditionally. React Hooks must be called in the exact same order in every component render  react-hooks/rules-of-hooks

Search for the keywords to learn more about each error.
10. B站案例

- 使用请求接口的方式获取评论列表并渲染
- 使用自定义 Hook 函数封装数据请求的逻辑
- 把评论中的每一项抽象成一个独立的组件实现渲染